kurgo.com/product-instructions
4-15
Instructions and care
™
NOTICE: Please contact Kurgo directly with any product or warranty inquiries.
Kurgo Products
•
2D Fanaras Drive, Salisbury, MA 01952
•
877-847-3868
•
www.kurgo.com
•
info@kurgo.com
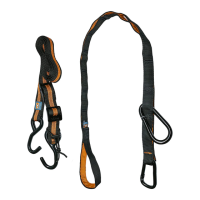
KEY
S-hook
Cam buckle
Metal slide
Extra Zip Line webbing
Bungee & toggle
Zip Line carabiner
Harness carabiner
Leash nook
A
B
C
D
E
G
F
H
Fig. 4
E
I
A
A E AB C D
G
HF
Installed Zip Line
Back seat
Seatbelt
Tether
SB1 SB2
The following is the recommended set up for the Auto Zip Line. When used in conjunction with a harness it represents the best way to keep
your pup safe and out of the front seat. Note that the product is intended to restrain your pet and keep it from distracting you while driving, and
does not guarantee protection from injury in every situation.
Maintain tension on
seatbelt in locked position
while adjusting the other
seatbelt connection
A
SB2
Fig. 1
SB2
K
E D
Fig. 3
SB2
A
CE
Fig. 2
Recommended set up for the Auto Zip Line:
1. Hook the two s-hooks (A) onto the rear passenger seatbelt tabs (SB1/SB2).
The end of the zip line with the cam buckle (B) should be on the driver’s side.
2. With your left hand, lock the rear driver’s side seatbelt in place by swiftly pulling
down on the seatbelt strap.
3. With right hand, grab extra zip line webbing (D) and apply constant pressure to the
extra webbing to ensure that the seatbelt stays in the locked position. (see Fig. 1)
4. With left hand, reach over and lock the passenger seatbelt in position using the same
swift pulling motion.
5. With the 2 seatbelts in the locked position pull on the extra zip line webbing in your
right hand to remove all slack from the zip line. (See Fig. 2)
6. Feed extra webbing (D) through metal slide (C) to secure strap tension.
7. Roll up extra webbing (D) towards metal slide (C) and secure using bungees and
toggle system (E). (See Fig. 3 & 4).
8. Tug on each seatbelt before attaching the dog to ensure they are in the correct
locked position. This should be done before each trip.
9. Place the zip line carabiner (F) onto zip line.
10. Attach the harness carabiner (G) to your dog’s harness (not included).
11. Locate appropriate leash nook (H) that lets your dog sit up and lay down and
loop onto the carabiner (F) attached to the zip line.