- 11 -
LGE Internal Use OnlyCopyright © LG Electronics. Inc. All rights reserved.
Only for training and service purposes
ADJUSTMENT INSTRUCTION
1. Application
This spec. sheet applies to LA43B/M Chassis applied LED TV
all models manufactured in TV factory
2. Specification
(1) Because this is not a hot chassis, it is not necessary to use
an isolation transformer. However, the use of isolation
transformer will help protect test instrument.
(2) Adjustment must be done in the correct order.
(3) The adjustment must be performed in the circumstance of
25 ±5
ºC
of temperature and 65±10% of relative humidity if
there is no specific designation
(4) The input voltage of the receiver must keep 100~240V,
50/60Hz
(5) At first Worker must turn on the SET by using Power Only
key.
(6) The receiver must be operated for about 5 minutes prior to
the adjustment when module is in the circumstance of over
15
ºC
In case of keeping module is in the circumstance of 0°C, it
should be placed in the circumstance of above 15°C for 2
hours
In case of keeping module is in the circumstance of below
-20°C, it should be placed in the circumstance of above
15°C for 3 hours.
䮝 Caution
When still image is displayed for a period of 20 minutes or
longer (especially where W/B scale is strong.
Digital pattern 13ch and/or Cross hatch pattern 09ch), there
can some afterimage in the black level area
3. Adjustment items
3.1. Main PCBA Adjustments
(1) ADC adjustment: Component 480i, 1080p / RGB-PC 1080p
(2) EDID download: HDMI and RGB-PC
Ŷ$ERYH DGMXVWPHQW LWHPV FDQ EH DOVR SHUIRUPHG LQ )LQDO
Assembly if needed. Adjustment items in both PCBA and
final assembly tages can be checked by using the INSTART
Menu(1.ADJUST CHECK)
Component 1080p and RGB-PC Adjust will be calculated by
480i adjust value.
3.2. Final assembly adjustment
(1) White Balance adjustment
(2) RS-232C functionality check
(3) Factory Option setting per destination
(4) Shipment mode setting (In-Stop)
(5) GND and HI-POT test
3.3. Appendix
(1) Shipment conditions
(2) Tool option menu
(3) USB Download (S/W Update, Option and Service only)
(4) Preset CH Information
4. MAIN PCBA Adjustments
4.1. ADC Calibration
4.1.1. Overview
ƒ$'& DGMXVWPHQW LVQHHGHGWRILQG WKHRSWLPXPEODFNOHYHO DQG
gain in Analog-to-Digital device and to compensate RGB
deviation
4.1.2. Equipment & Condition
(1) Protocol: RS-232C
(2) Inner Pattern
- Resolution : 1080p(Comp) / 1024*768(RGB)
- Pattern : Horizontal 100% Color Bar Pattern
- Pattern level : 0.7±0.1 Vp-p
4.1.3. Adjustment
4.1.3.1. Adjustment method
- Connect to Jig by using RS-232(USB), adjust Component
䮝 Manual adj (If needed in Final Assembly)
- Required equipment : Adjustment R/C
- Enter Service Mode by pushing “ADJ” key,
6WDUWµ273¶$'&7\SHE\SXVKLQJµŹ¶NH\DW>$'&&DOLEUDWLRQ@
䮝 In L13 case, Adjust ADC(OTP) is automatically ‘OK’
4.1.3.2. Adj. protocol (only Internal patten)
4.2. EDID Download
4.2.1. Overview
ƒ,W LV D 9(6$ UHJXODWLRQ $ 3& RU D 017 ZLOO GLVSOD\ DQ
optimal resolution through information sharing without any
necessity of user input. It is a realization of “Plug and Play”.
4.2.2. Equipment
ƒ6LQFH HPEHGGHG (',' GDWD LV XVHG (',' GRZQORDG -,*
HDMI cable and D-sub cable are not need.
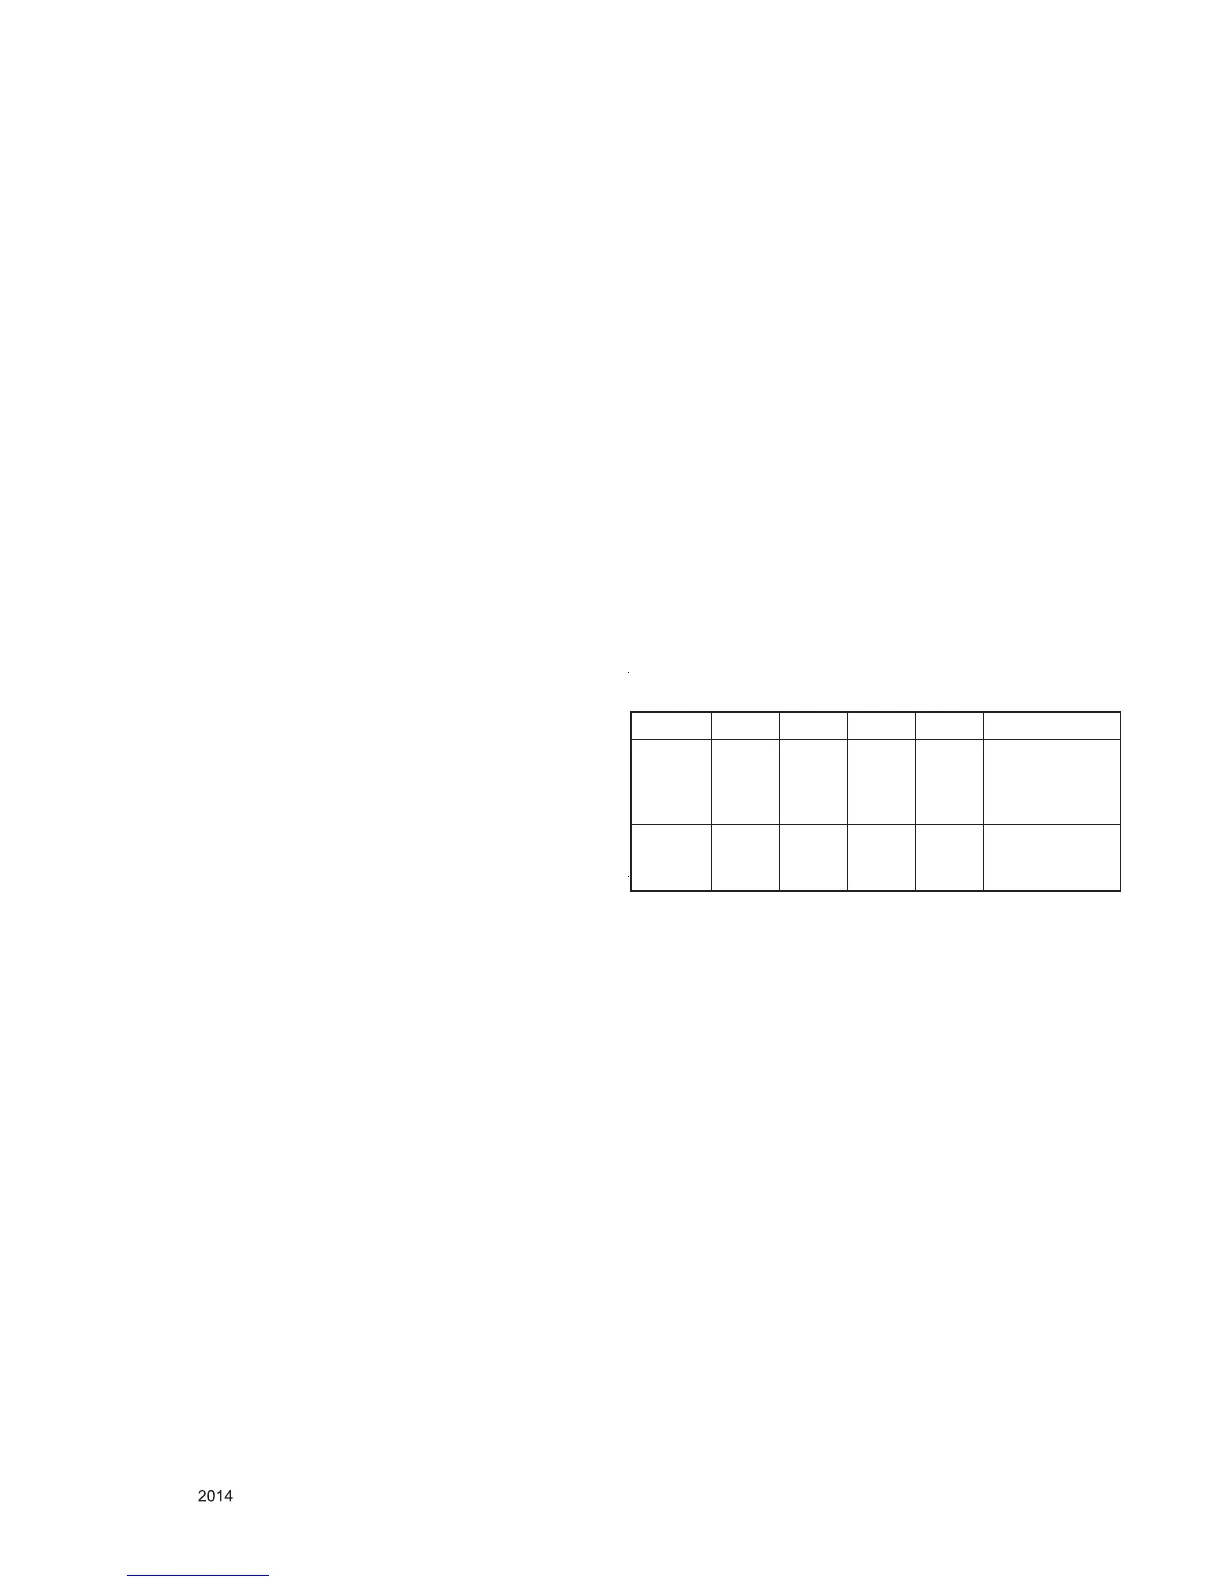
ƒ$GMXVWE\XVLQJUHPRWHFRQWUROOHU
Protocol CMD 1 CMD 2 Data 1 Data 2 Remark
Enter adj
mode
a a 00 00 When transfer
the ‘Mode
In’,Carry the
command.
Start
ADC adj
a d 00 10 Automatically
adjustment (Use
internal pattern)
 Loading...