Dear MAC AUDIO Customer,
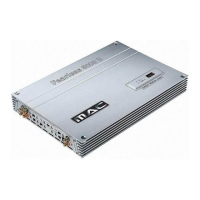
The FEARLESS 5000 D car hi-fi power amplifier will enable you to satisfy your high demands on sound reproduction in your car. With its impressive deep-
bass power reserves, low harmonic content and neutral reproduction, the FEARLESS 5000 D takes car hi-fi to new heights. The amplifier is characterized
by low operating current, rapid switching capabilities and excellent temperature stability. Experience and enjoy how this high-tech machine perfectly
reproduces magnificent sound.
Please read all of the owner’s manual before installing and using the amplifier.
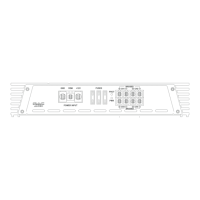
1. TECHNICAL DATA FEARLESS 5000 D
Channels 1-4 Channel 5
Stereo / Bridged
Max. output power (1 kHz sinus burst 2:8, B+=14.4V) 4 x 210 W / 2 x 540 W 900 W on 4 Ohm
Nominal output power (DIN 45 324, B+=14.4V) 4 x 70 W / 2 x 180 W 300 W on 4 Ohm
Max. output power (1 kHz sinus burst 2:8, B+=14.4V) 4 x 275 W 1300 W on 2 Ohm
Nominal output power (DIN 45 324, B+=14.4V) 4 x 90 W 450 W on 2 Ohm
Loudspeaker impedance (stereo) 2 – 8 Ohm
Frequency response 5 – 75 000 Hz (-3 dB)
Total harmonic content (DIN 45 403) < 0.03% (1 kHz, channels 1 – 4)
< 0.1% (100 Hz, channel 5)
Stereo separation (IEC 581 ) > 60 dB (1 kHz)
Weighted noise distance (IEC A) > 100 dB
Input sensitivity LOW LEVEL INPUT 400 mV – 4 V
Input impedance LOW LEVEL INPUT 30 kOhm
Channels 1 and 2: high-pass filter 15 – 6000 Hz (12 dB per octave)
Channels 3 and 4: high-pass filter 15 – 800 Hz (12 dB per octave)
low-pass filter 50 – 6000 Hz (12 dB per octave)
Channel 5: low-pass filter 50 – 300 Hz (12 dB per octave)
subsonic filter 10 – 30 Hz (12 dB per octave)
Power supply +12 V (9 – 15 V), negative to ground
Fuse 3 x 25 A
Dimensions (W x H x D) 492 x 59 x 290 mm
Weight 6.4 kg
SPECIFICATIONS SUBJECT TO CHANGE WITHOUT NOTICE
2. OUTSTANDING FEATURES
• High-pass filter with continuously adjustable crossover frequency for channels 1 and 2
• High-pass and low-pass filters (band-pass) with continuously adjustable crossover frequency for channels 3 and 4
• Electronic protection against short-circuit, DC offset and overheating
• Muting circuit suppresses power-on pop
• Heavy duty screwed gold-plated RCA jacks
• Sealed and gold-plated screw terminals for speaker and power supply connection
• Dual colour LED for power (green) and overload (red) indication
• Channel 5:
• Digital high-performance power amplifier with a very high efficiency
• Low-pass (subwoofer) and subsonic filter with infinitely adjustable separating frequencies
• Infinitely adjustable bass equalization
• Phase regulator
• Remote control for volume control
3. IMPORTANT INFORMATION – PLEASE READ BEFORE INSTALLING!
• This amplifier is designed exclusively for use with 12 V power supplies and negative ground. Do not attempt to use it with any other power supplies!
• The amplifier must be installed in location with adequate air circulation to dissipate the heat generated during operation. Make very sure that the cooling
fins of the heat sinks are not near or pressing against any panels or other surfaces that could obstruct the air circulation – this is very important. Do not
install the amplifier in small, enclosed or unventilated areas (for example the spare wheel recess). The best location is probably in the boot of the car.
• Install the amplifier so that it has maximum protection against vibration, dust and dirt.
• Make sure that the input and output connection cables are installed far enough away from the power supply cables. Routing the power and signal
cables too close together can cause interference.
• Make sure that you install the amplifier in a location where the fuse(s) and controls are accessible.
• Installing the amplifier properly is crucial for the performance and reliability of your sound system. When in doubt it is always advisable to have the
amplifier installed by a qualified technician, especially if it is part of a system with multiple loudspeakers or a complex multi-channel system.
4. CONNECTIONS
4.1 POWER SUPPLY AND AUTO-ON FUNCTION
IMPORTANT: TO PREVENT THE RISK OF SHORT CIRCUITS DISCONNECT THE CONNECTION CABLE FROM THE POSITIVE POLE OF
THE CAR BATTERY BEFORE YOU START INSTALLING THE AMPLIFIER.
The power cabling usually installed in on-board car networks is not sufficient for a power amplifier’s demands. Make sure that the power lines to GND and
to the +12 V terminal have been sufficiently specified. A cable cross-section of at least 20 mm² must be used to connect the battery to the amplifier’s terminals.
First connect the amplifier’s GND terminal to the battery’s minus pole. It is very important that the connection is good. Dirt residues must be carefully removed
from the battery’s connection point. A loose connection may cause malfunctions or interference noise or distortion.
 Loading...