Do you have a question about the Makeblock mBot mega and is the answer not in the manual?
Instructions for installing motor driver modules onto the MegaPi board.
Steps to install the Bluetooth module onto the MegaPi board.
Securing the MegaPi board to the robot's main body shell.
Attaching IR proximity sensors to the main body shell.
Attaching RGB LEDs and impact switches to the motor brackets.
Securing DC motors to the robot's motor brackets.
Attaching Mecanum wheels to the motor brackets, noting L/R labels.
Attaching line follower sensors to the connector bracket.
Connecting the connector bracket to the motor bracket assembly.
Installing nylon standoffs for mounting purposes.
Steps for installing the main body shell of the robot.
Attaching an IR proximity sensor to the upper shell.
General guidance on connecting electronic modules to the MegaPi board.
Overview of the MegaPi board features and interfaces.
Referencing figures for proper electronic module connection and wiring order.
Diagrams showing the physical placement of modules on the robot.
Instructions for connecting DC motors to the MegaPi board.
Steps for attaching the upper shell of the robot.
Attaching the battery holder to its mounting bracket.
Guidance on installing the battery holder into the robot.
How to switch between different gameplay modes using LED colors.
How mBot Mega responds to hand gestures for movement.
Instructions for setting up and operating the line following mode.
How mBot Mega autonomously avoids obstacles.
Information regarding Bluetooth connection stability with low batteries.
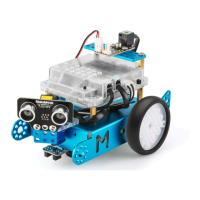
The mBot Mega is a versatile robotic platform designed for users aged 12 and above, offering a rich experience in robotics, programming, and electronic module integration. It is not suitable for children under 3 years old, and children between 3 and 12 should be accompanied by adults during use. The device is built around the MegaPi control board, which serves as the central hub for connecting various electronic modules and controlling the robot's movements and functions.
The mBot Mega is designed to perform a variety of tasks, including gesture recognition, line following, and automatic obstacle avoidance. Its modular design allows for easy assembly and customization, making it an excellent tool for learning about robotics and electronics.
MegaPi Control Board: The MegaPi board is the brain of the mBot Mega, featuring a Raspberry Pi communication interface, 10 servo interfaces, a USB Type-B interface, high-power output (0-10 A), a power switch, and three M4 mounting holes. It also includes a wireless communication module, motor drivers, a high-power DC supply input (6-12 V), and four stepper/DC motor interfaces. This comprehensive set of interfaces enables the mBot Mega to interact with a wide range of sensors and actuators.
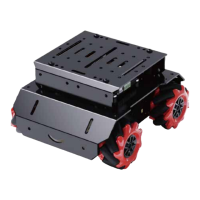
Motor System: The mBot Mega is equipped with four DC motors and four 60 mm Mecanum wheels. The Mecanum wheels allow for omnidirectional movement, providing exceptional maneuverability. The motors are connected to the MegaPi board via dedicated DC motor driver modules, ensuring precise control over the robot's motion.
Sensor Array: The robot incorporates several sensors to perceive its environment:
Output Modules:
Connectivity: The mBot Mega supports Bluetooth connectivity, allowing it to be controlled wirelessly via a smart device. It also includes a USB cable for wired connection to a computer, which is useful for programming and firmware updates.
The mBot Mega offers a user-friendly experience, from assembly to operation, with clear instructions and intuitive controls.
Assembly: The assembly process involves mounting various components to the body shell, including the MegaPi board, IR proximity sensors, motor brackets, DC motors, Mecanum wheels, RGB LEDs, impact switches, and line follower sensors. Plastic spacers are crucial during assembly to prevent short-circuiting of electronic modules by the metal shell. The manual provides detailed diagrams for each step, ensuring correct installation. Special attention is given to distinguishing between L and R Mecanum wheels and ensuring proper motor connections to the MegaPi board for expected movement.
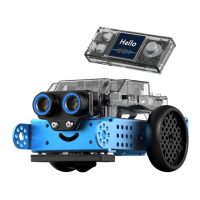
Function Switching: The robot's default gameplay modes can be switched by pressing an impact switch. The color of the RGB LEDs indicates the active function:
Gesture Recognition: In this mode, the mBot Mega responds to hand gestures:
Line Following: When in line following mode, the robot can follow a black line that is wider than 18 mm. Users simply place the line follower sensor over the line, and the robot autonomously tracks it.
Automatic Obstacle Avoidance: In this mode, the mBot Mega uses its IR proximity sensors to detect obstacles and navigate around them autonomously.
Battery Installation: The robot is powered by six AA batteries, housed in a dedicated battery holder that attaches to a bracket. When batteries are low, the robot's performance may be affected, and Bluetooth connection might be disconnected, especially in high-speed mode. Users are advised to replace batteries promptly.
App Control: The mBot Mega can be controlled via the "Makeblock" and "mBlock" apps, available on the App Store and Google Play. Before connecting, ensure that GPS and Bluetooth are turned on on the smart device, and access is allowed for the app.
Proper maintenance ensures the longevity and optimal performance of the mBot Mega.
Component Inspection: Regularly check the wires, plugs, housings, and other parts for any damage. If damage is found, stop using the device until it has been properly repaired.
Screw Management: During assembly and disassembly, especially for components like the Mecanum wheels, screws may wear out. Extra screws (M2.6*28) are provided for replacement if needed.
Cleaning: When cleaning the product, ensure it is powered off and disconnected from any external power supply, especially if liquid is used.
Storage: For long-term storage, fully charge the product and recharge it every three months to maintain battery health.
Environmental Considerations: To prevent damage and ensure safety, avoid placing the product in water, fire, or environments with high humidity or extreme temperatures. Do not use or charge the product in environments with temperatures outside its operating range.
Disassembly and Repair: Users are advised not to disassemble, repair, or modify the product themselves to avoid damage or safety incidents.
Power Supply: The product should be connected to the power supply in strict accordance with the specified limits. Use the recommended adapter (5V/2A) for charging; the adapter itself is not a toy.
Support: In case of product quality problems, missing or damaged parts, or technical support needs, users can contact support@makeblock.com. Service hours are 9:00-12:00 and 14:00-18:30 (Beijing Time), Monday to Friday, excluding public holidays. Additional resources, including projects, troubleshooting guides, FAQs, and main control board circuits, are available on the Makeblock support website.
| Microcontroller | ATmega2560 |
|---|---|
| Motor Quantity | 2 |
| Motor Type | DC Motor |
| Communication | Bluetooth, USB, 2.4G wireless |
| Sensors | Ultrasonic sensor, line follower, light sensor |
| Programming | mBlock, Arduino IDE |
| Motor Ports | 4 |