8 ENGLISH
Tool / battery protection system
Thetoolisequippedwithatool/batteryprotectionsys-
tem.Thissystemautomaticallycutsoffpowertothe
motortoextendtoolandbatterylife.Thetoolwillauto-
maticallystopduringoperationifthetoolorbatteryis
placed under one of the following conditions:
Overload protection
Whenthetoolorbatteryisoperatedinamannerthat
causesittodrawanabnormallyhighcurrent,thetool
automaticallystopsandthelampblinks.Inthissit-
uation, turn the tool off and stop the application that
caused the tool to become overloaded. Then turn the
tool on to restart.
Overheat protection
Whenthetoolorbatteryisoverheated,thetoolstops
automaticallyandthelamplightsup.Inthiscase,letthe
toolandbatterycoolbeforeturningthetoolonagain.
Overdischarge protection
Whenthebatterycapacityisnotenough,thetoolstops
automatically.Inthiscase,removethebatteryfromthe
toolandchargethebattery.
Switch action
CAUTION: Before installing the battery car-
tridge into the tool, always check to see that the
switch trigger actuates properly and returns to
the "OFF" position when released.
CAUTION: Switch can be locked in "ON" posi-
tion for ease of operator comfort during extended
use. Apply caution when locking tool in "ON"
position and maintain rm grasp on tool.
CAUTION: Do not install the battery cartridge
with the lock button engaged.
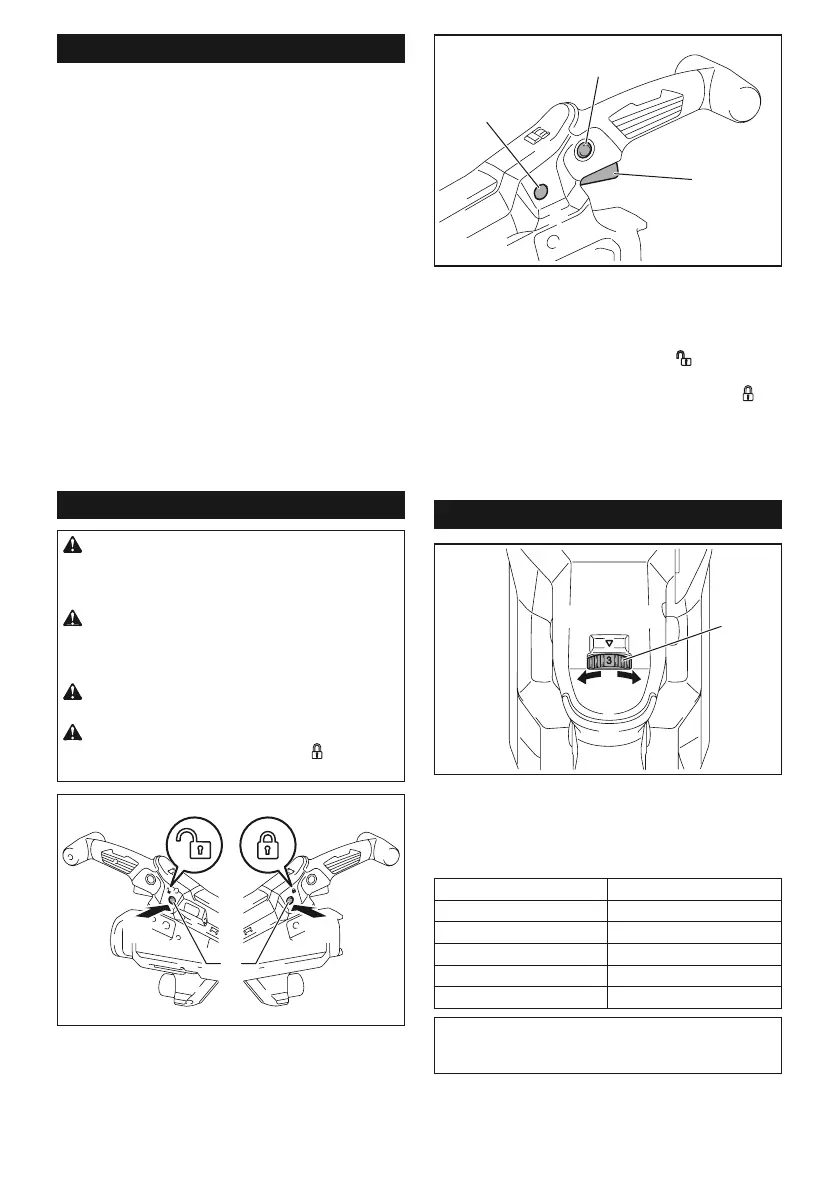
CAUTION: When not operating the tool,
depress the trigger-lock button from
side to
lock the switch trigger in the OFF position.
1
►1. Trigger-lock button
1
2
3
►1. Switch trigger 2. Lock button 3. Trigger-lock
button
Topreventtheswitchtriggerfromaccidentallypulled,
the trigger-lock button is provided. To start the tool,
depress the trigger-lock button from A (
) side and pull
the switch trigger. Release the switch trigger to stop.
After use, depress the trigger-lock button from B (
)
side.
For continuous operation, depress the lock button while
pulling the switch trigger, and then release the switch
trigger.Tostopthetool,pulltheswitchtriggerfully,then
release it.
Speed adjusting dial
1
►1.Speedadjustingdial
Therotationspeedofthetoolcanbechangedbyturn-
ingthespeedadjustingdial.Thetablebelowshows
the number on the dial and the corresponding rotation
speed.
Number Speed
1 1,000 min
-1
2 1,200 min
-1
3 1,400 min
-1
4 1,600 min
-1
5 1,800 min
-1
NOTICE: When changing the speed dial from "5"
to "1", turn the dial counterclockwise. Do not turn
the dial clockwise forcibly.
 Loading...