12 ENGLISH
Quick mode-switching function
What you can do with the quick mode-
switching function
Thequickmode-switchingfunctionsavesthetimeforchanging
theapplicationmodeofthetool.Youcanswitchtoyourdesired
applicationmodebyjustpressingthequickmode-switching
button.Itishelpfulwhendoingarepetitiveworkwhichrequires
toswitchbetweentwoapplicationmodesalternately.
EXAMPLEIfyouhaveaworktouseTmodeandmax
impactforce,registerthemaximpactforceforquick
mode-switchingfunction.Onceregisterit,youcanswitch
tothemaximpactforcefromTmodebyjustoneclickof
thequickmode-switchingbutton.Also,youcanreturntoT
modebypressingthequickmode-switchingbuttonagain.
Even if the tool is in other application mode than T
mode,pressingthequickmode-switchingbutton
changestomaximpactforce.Itisconvenientforyou
toregisteraapplicationmodethatyoufrequentlyuse.
You can choose one of following application modes for
quickmode-switchingfunction:
Impact force
• Max
• Hard
• Medium
• Soft
Assist type
• Wood mode
• Bolt mode
• T mode (1)
• T mode (2)
Registering application mode
Tousethequickmode-switchingfunction,registeryour
desired application mode to the tool beforehand.
1. With the button
or ,chooseyourdesired
application mode.
2.
Press and hold the button andthequick
mode-switching button at the same time until the custom-
ize lamp and the lamp of desired application mode blinks.
1
2
►1. Quick mode-switching button 2. Customize lamp
NOTE:
You can overwrite the current application mode
withnewonebyperformingtheprocedureabove.
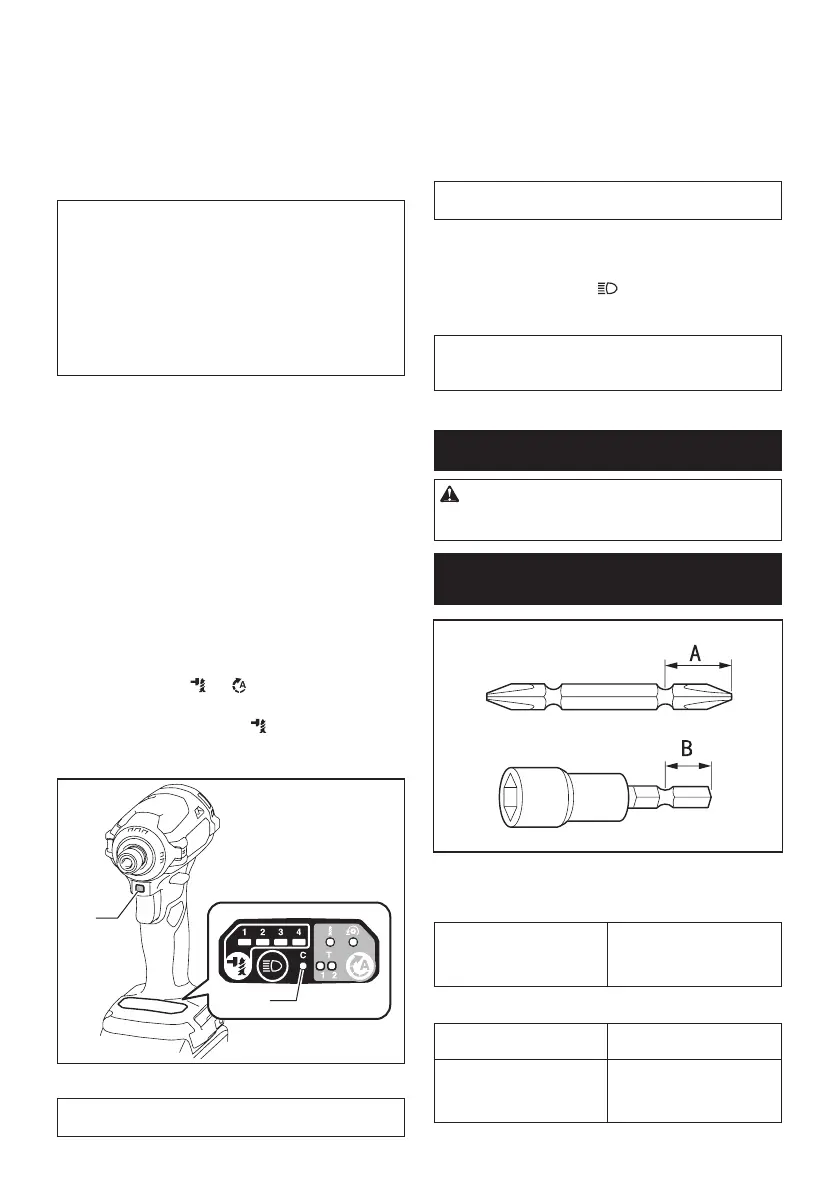
Using the quick mode-switching function
When the tool is in the mode that is not registered,
pressthequickmode-switchingbuttontoswitchtothe
registered application mode. The tool switches between
the registered application mode and last application
modeeverytimeyoupressthequickmode-switching
button.Thefrontlampsonbothsideswillashonce
when switching to the registered application mode.
NOTE: The customize lamp will light up when the
application mode registered to the tool is chose.
Cancelling the quick mode-switching
function
Press and hold the button andquickmode-switch-
ing button at the same time until the customize lamp
and all impact force grade lamps blink.
NOTE:Aftercancellingthequickmode-switching
function,thequickmode-switchingbuttonworksfor
changing the impact force.
ASSEMBLY
CAUTION: Always be sure that the tool is
switched off and the battery cartridge is removed
before carrying out any work on the tool.
Installing or removing driver bit/
socket bit
Useonlydriverbit/socketbitthathasinsertingportionshown
inthegure.Donotuseanyotherdriverbit/socketbit.
For tool with shallow driver bit hole
A=12mm
B=9mm
Useonlythesetypeofdriver
bit. Follow the procedure
1. (Note) Bit-piece is not
necessary.
For tool with deep driver bit hole
A=17mm
B=14mm
Toinstallthesetypesofdriver
bits, follow the procedure 1.
A=12mm
B=9mm
Toinstallthesetypesofdriver
bits, follow the procedure 2.
(Note)Bit-pieceisnecessary
for installing the bit.
 Loading...