23 ENGLISH
State of abnormality Probable cause (malfunction) Remedy
The vacuum cleaner does not run
along with the switch operation of
the tool.
The wireless unit is not installed into
the tool.
Thewirelessunitisimproperlyinstalled
into the tool.
Installthewirelessunitcorrectly.
The terminal of the wireless unit and/or
theslotisdirty.
Gentlywipeodustanddirtontheterminalofthe
wireless unit and clean the slot.
The wireless activation button on the
tool has not been pushed.
Pushthewirelessactivationbuttonbrieyandmake
sure that the wireless activation lamp is blinking
in blue.
Thestand-byswitchonthevacuum
cleaner is not set to “AUTO”.
Setthestand-byswitchonthevacuumcleanerto
“AUTO”.
More than 10 tools are registered to the
vacuum cleaner.
Perform the tool registration again.
If more than 10 tools are registered to the vacuum
cleaner, the tool registered earliest will be cancelled
automatically.
The vacuum cleaner erased all tool
registrations.
Perform the tool registration again.
Nopowersupply Supplythepowertothetoolandthevacuum
cleaner.
Thetoolandvacuumcleanerareaway
from each other (out of the transmission
range).
Get the tool and vacuum cleaner closer each other.
The maximum transmission distance is approxi-
mately10mhoweveritmayvaryaccordingtothe
circumstances.
Radiodisturbancebyotherappliances
whichgeneratehigh-intensityradio
waves.
Keepthetoolandvacuumcleanerawayfromthe
appliances such as Wi-Fi devices and microwave
ovens.
The vacuum cleaner runs while the
tool's switch trigger is not pulled.
Other users are using the wireless
activation of the vacuum cleaner with
their tools.
Turnothewirelessactivationbuttonoftheother
tools or cancel the tool registration of the other
tools.
MAINTENANCE
CAUTION: Always be sure that the tool is
switched o and the battery cartridge is removed
before attempting to perform inspection or
maintenance.
CAUTION: Clean out the guard to ensure
there is no accumulated sawdust which may
impede the operation of the guarding system. A
dirtyguardingsystemmaylimittheproperoperation
whichcouldresultinseriouspersonalinjury.The
mosteectivewaytoaccomplishthiscleaningiswith
compressed air. If the dust is being blown out of
the guard, be sure the proper eye and breathing
protection is used.
NOTICE: Never use gasoline, benzine, thinner,
alcohol or the like. Discoloration, deformation or
cracks may result.
To maintain product SAFETY and RELIABILITY,
repairs,anyothermaintenanceoradjustmentshould
beperformedbyMakitaAuthorizedorFactoryService
Centers,alwaysusingMakitareplacementparts.
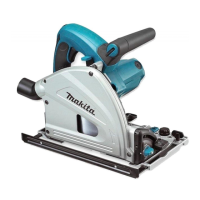
Adjusting 0°-cut and 45°-cut
accuracy
NOTICE: Do not engage the levers for -1° bevel
angle when adjusting 0°-cut accuracy.
NOTICE: Do not engage the lever for 48° bevel
angle when adjusting 45°-cut accuracy.
Theseadjustmentshavebeenmadeatthefactory.
Butiftheyareo,youcanadjustthemasthefollowing
procedures.
1. Slightlyloosentheclampingscrewsonthefront
and rear of the tool.
2. Adjustthebladeangle.
►Fig.44: 1. Triangular rule
Toadjustthe0°-cutaccuracy,makethebaseperpen-
dicular to the blade using a triangular rule, square rule,
etc.byturningtheadjustingbolt.
►Fig.45: 1.Adjustingboltfor0°-cut
Toadjustthe45°-cutaccuracy,makethebase45°to
thebladeusingatriangularrulebyturningtheadjusting
bolt.
►Fig.46: 1.Adjustingboltfor45°-cut
3. Tighten the clamping screws and make a test cut.
 Loading...