EasyManua.ls Logo

Master Forge 20071214 User Manual

Master Forge 20071214
28 pages
To Next Page IconTo Next Page
To Previous Page IconTo Previous Page
Page #10 background image
10
ASSEMBLY INSTRUCTIONS
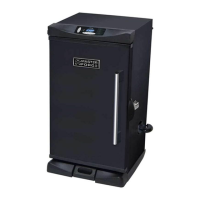
10. Align keyholes on drip de ector (E) with studs on the
inside of smoker body (A). Press drip de ector (E)
down to secure in place.
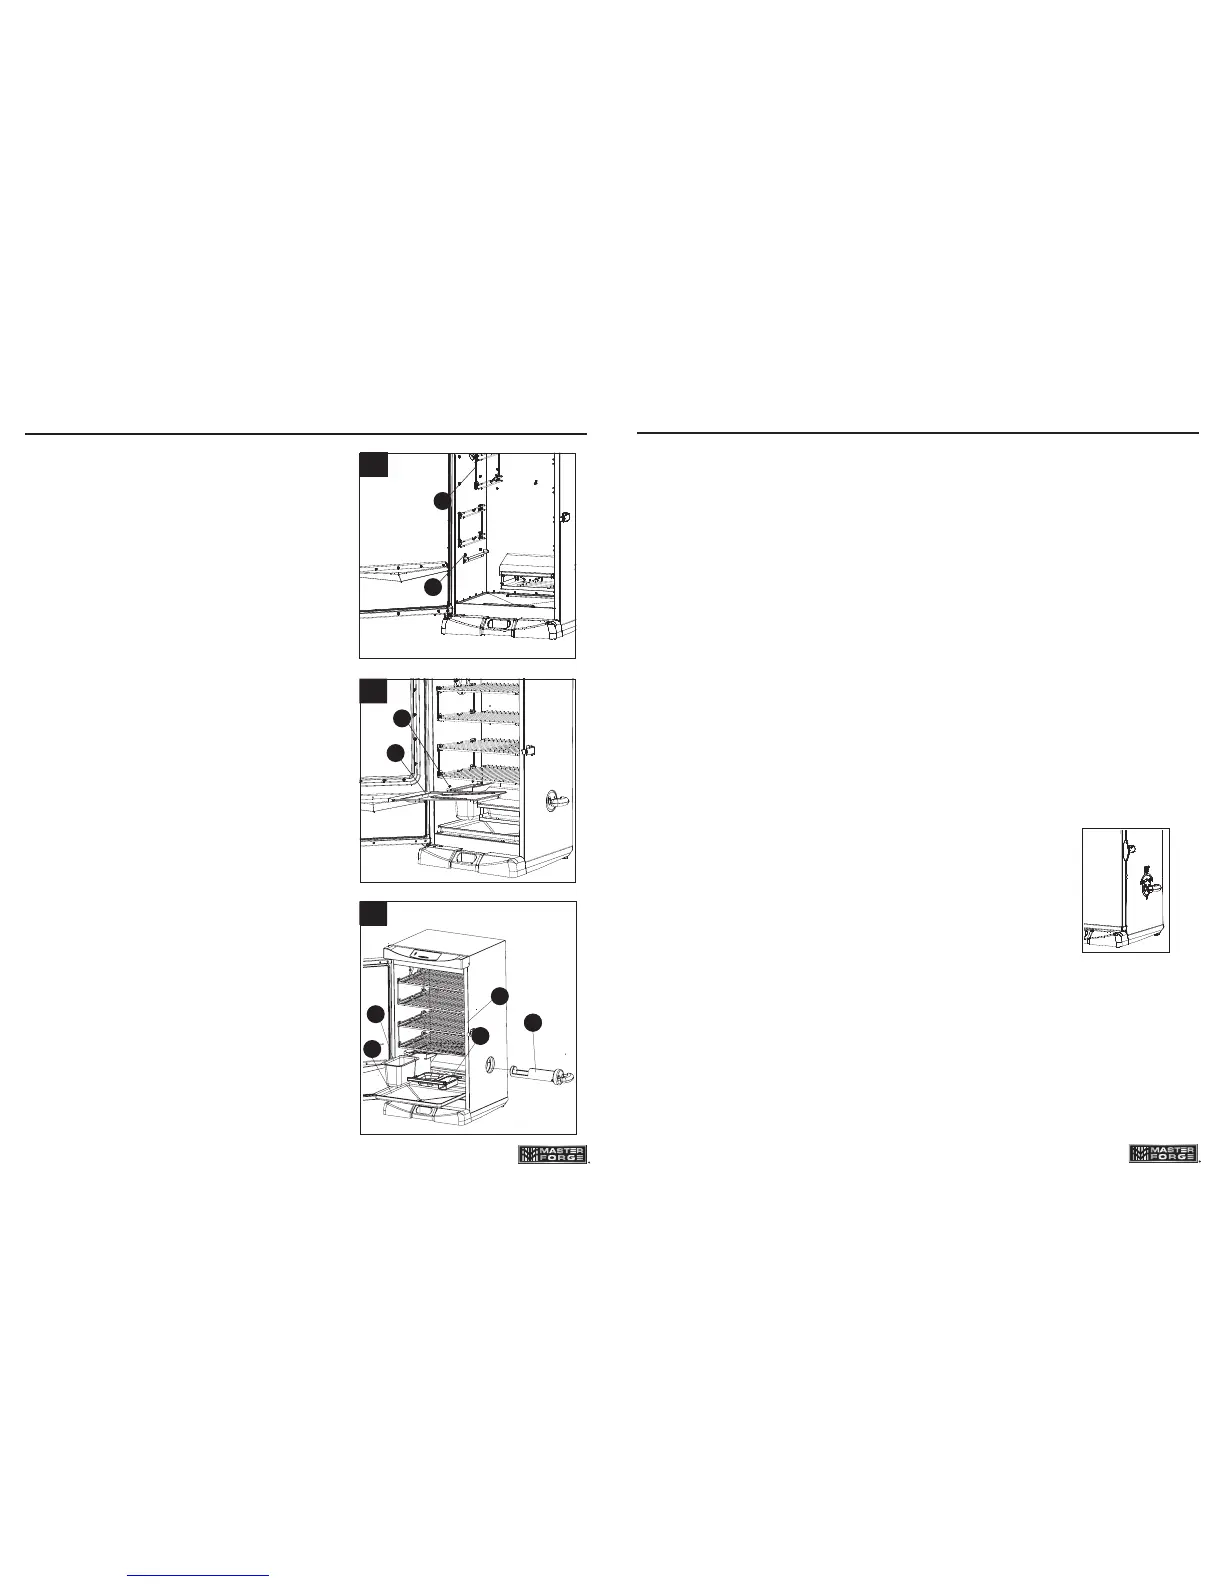
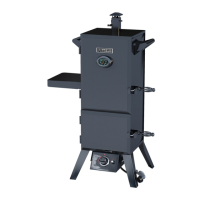
9. Place smoking racks (D) inside smoker body (A).
11. Place water bowl (H), wood chip tray (I), and drip pan
(F) inside smoker body (A). Insert wood chip loader
(G) into side of smoker body (A).
10
9
Lowes.com/masterforge
A
E
D
A
9
11
G
A
I
H
43
INSTRUCCIONES DE UNCIONAMIENTO
Lowes.com/masterforge
Aclimate la unidad antes del primer uso. Podría emanar algo de humo durante este tiempo. Esto es normal.
1. Asegúrese de que la bandeja de goteo esté en su lugar y SIN AGUA.
2. Con gure la temperatura en 135 °C (275 °F) y haga funcionar la unidad por 3 horas. Durante los
últimos 45 minutos, agregue 1/2 taza de astillas de madera en el cargador para astillas para completar
la aclimatación. Esta cantidad es igual al contenido de un cargador de astillas de madera lleno
3. Apague y deje enfriar.
Nota: Nunca añada más de 1/2 taza de astillas de madera a la vez (1 cargador lleno) a la vez. NO se
deben añadir astillas adicionales hasta que las añadidas previamente hayan dejado de producir humo.
C       
Antes de encender la unidad, coloque 1/2 taza de astillas de madera en el cargador de astillas.
• Nunca utilice más de 1/2 taza de astillas de madera a la vez. Nunca utilice trozos de madera.
Introduzca el cargador de astillas de madera en el ahumador. Las astillas de madera deben estar
niveladas con el borde superior del cargador de astillas de madera.
Gire la manija en dirección de las manecillas del reloj hacia la marca de la echa en el ahumador
para descargar la madera. La madera caerá en la bandeja para astillas de madera. Gire la manija
en dirección contraria a las manecillas del reloj hasta la posición vertical y deje el cargador de
astillas de madera en su lugar dentro del ahumador.
Revise la bandeja para astillas de madera periódicamente para ver si se quemó la madera. Para
hacerlo, quite el cargador de astillas de madera y mire el interior del ahumador a través del ori cio.
Agregue más astillas si es necesario.
Cuando revise el nivel de astillas de madera, debe sacar el cargador de astillas de madera
completamente del interior del ahumador.
C        
• Saque el cargador de astillas de madera del ahumador.
Coloque las astillas de madera en el cargador de astillas de madera y vuelva
a introducirlo en el ahumador.
Gire la manija en dirección de las manecillas del reloj hacia la marca de la echa
en el ahumador para descargar la madera. La madera caerá en la bandeja para
astillas de madera.
Es posible que la temperatura se incremente rápidamente por un momento
luego de que se agregue la madera. Se estabilizará en poco tiempo. NO cambie
la con guración de temperatura.
RECAUCIN
• El cargador de astillas de madera estará CALIENTE, aún si la manija se encuentra fría.
• Mantenga la puerta del ahumador cerrada al agregar astillas de madera.
Es posible que se produzcan llamaradas cuando se abra la puerta. Si las astillas de madera se
encienden, cierre la puerta de inmediato y espere que las astillas se apaguen para volver a abrir
la puerta. NO rocíe con agua.

Questions and Answers:

Master Forge 20071214 Specifications

General IconGeneral
BrandMaster Forge
Model20071214
CategorySmokers
LanguageEnglish

Summary

Package Contents

Included Parts List

Lists all components included in the smoker package.

Hardware Contents

Hardware Identification

Identifies and shows actual size of all hardware pieces.

Safety Information

General Safety Precautions

Basic safety precautions to follow when using electrical appliances and the smoker.

California Proposition 65 Warnings

Information on chemicals in the product known to cause cancer or reproductive harm.

Troubleshooting

Problem Resolution Guide

Lists common problems, their possible causes, and corrective actions.

Power Light Issues

Addresses problems where the power light does not switch on.

Slow Heating Issues

Troubleshooting for units taking excessive time to heat up.

Door Seal Gaps

Resolves issues with gaps between the door and smoker or door seal damage.

Grease Leaks

Addresses grease leaking from the smoker through the door and legs.

No Smoke Issues

Troubleshooting steps when no smoke is produced.

Temperature Fluctuations

Addresses rapid temperature decreases or shutdowns after a few hours.

Error Message Display

Troubleshooting when the controller displays an error message.

Heating Malfunctions

Resolves issues where the unit isn't heating or the controller won't adjust heat.

Meat Probe Temperature Display

Troubleshooting issues with the meat probe temperature not showing on the display.

Preparation

Initial Setup Steps

Steps to take before beginning assembly, ensuring all parts are present.

Assembly Instructions

Attaching Front Foot

Instruction for attaching the front foot to the smoker body.

Attaching Adjustable Screw Leg

Instruction for inserting and securing the adjustable screw leg.

Attaching Rear Handle

Instruction for attaching the rear handle to the smoker body.

Attaching Door Handle

Instruction for attaching the door handle to the smoker door.

Placing Smoking Racks

Instruction for placing the smoking racks inside the smoker body.

Installing Drip Deflector

Instruction for aligning and securing the drip deflector.

Placing Water Pan and Trays

Instruction for placing the water bowl, wood chip tray, and drip pan.

Control Panel Operation

Setting Temperature

Steps to set the desired cooking temperature using the control panel.

Setting Timer

Steps to set the cooking time using the control panel.

Using Meat Probe

Instructions for using the meat probe to monitor internal meat temperature.

Using Light

How to turn the smoker's internal light on and off.

Resetting Control Panel

Procedure to reset the control panel if an error message appears.

How to Use Control Panel

Detailed guide on operating the smoker's control panel functions.

Operating Instructions

Pre-seasoning the Unit

Steps for pre-seasoning the smoker before first use, including adding wood chips.

Using Wood Chips

Guidance on how to add and use wood chips for smoking.

Wood Chip Loader Safety

Important safety cautions regarding the hot wood chip loader.

Important Facts About Using Smoker

Maximum Temperature Setting

Specifies the maximum temperature setting for the smoker.

Moving the Unit

Warning against moving the unit across uneven surfaces.

Wood Chip Loader and Tray Requirement

Mandates the presence of the wood chip loader and tray during operation.

Using Wood Chips for Smoke Flavor

Explains the necessity of wood chips for smoke production.

Grease Tray Checks

Guidance on checking and emptying the grease tray during cooking.

Door Latch Adjustment

Instructions on how to adjust the door latch for a tighter seal.

Care and Maintenance

Cleaning Components

Instructions for cleaning removable parts like grate supports and water bowl.

Cleaning Wood Chip Tray

Guidance on cleaning the wood chip tray and loader to remove ash.

Ash Disposal

Method for safely disposing of cold ashes.

Smoker Interior/Exterior Cleaning

Instructions for cleaning the smoker's inside and outside surfaces.

Door Seal Cleaning

Importance of cleaning the door seal for proper function.

Related product manuals