1010
1111
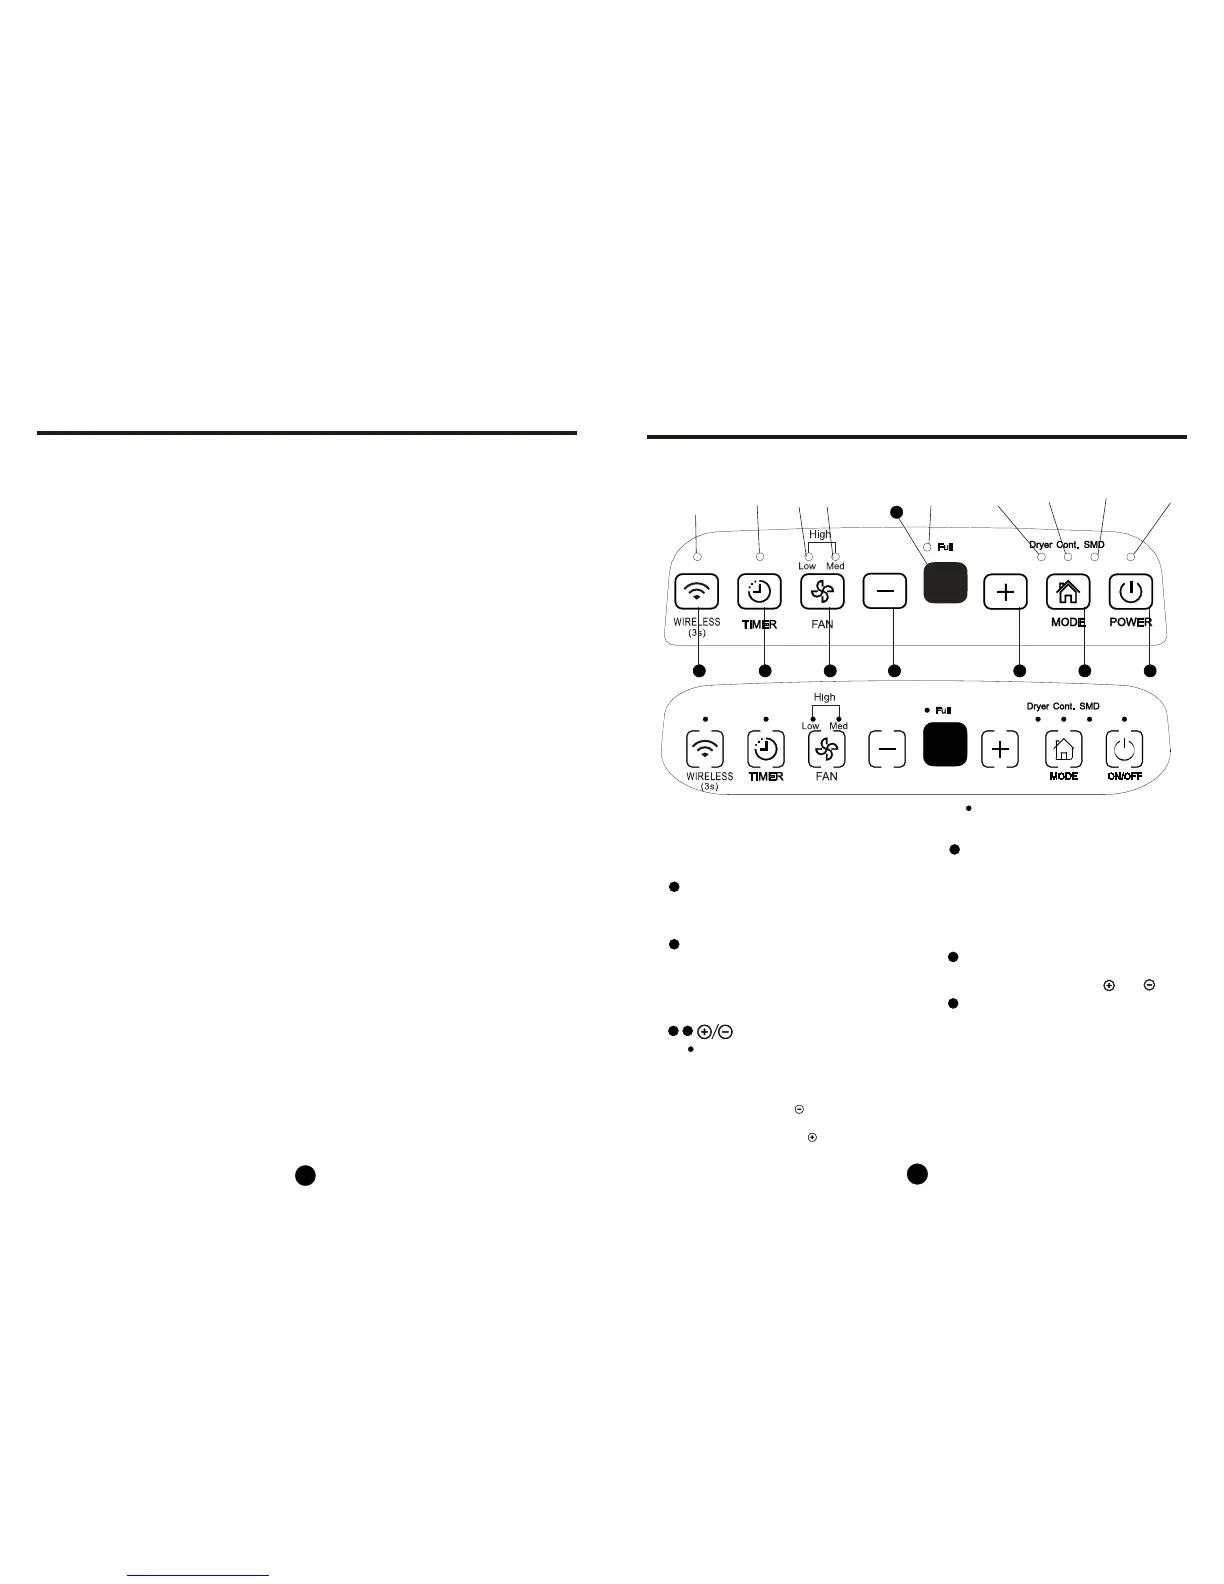
Control pads
33
When you push the button to change
operation modes, the unit will make
a beep sound to indicate that it is
changing modes.
NOTE: The control panel of the unit you purchased may be slightly different according
to the models.
Fig.1
22
Humidity Set Control Pads
: Up/Down Pads
TIMER Set Control Pads
Use the Up/Down pads to set the Auto start and
Auto stop time from 0.0 to 24.
The humidity level can be set within a range of
35%RH(Relative Humidity) to 85%RH(Relative
Humidity) in 5% increments.
For drier air, press the pad and set to a lower
percent value(%).
For damper air, press the pad and set a higher
percent value(%).
CONTROL PADS ON THE DEHUMIDIFIER
55
Timer Pad
Press to initiate the Auto start and Auto stop
feature, in conjuction with the and pads.
11
44
Power Pad
Press to turn the dehumidifier on and off.
11223344556677
Unit operation on
indicator light
88
Fan speed
indicator light
Wireless operation
on indicator light
Bucket full
indicator light
Continuous
operation on
indicator light
Dryer operation
on indicator light
Smart dehumidifying
operation on indicator
light
Mode Pad
Press to select the desired operation mode from
Dehumidifying,Dryer,Continuous dehumidifying and
Smart dehumidifying.
NOTE: Dryer and Smart dehumidifying modes are
optional.
66
Fan Pad
77
Wireless Pad(optional)
Press this pad for 3 seconds to initiate the
Wireless connection mode. The LED DISPLAY
shows 'AP' (at this time the unit shuts off all other
functions) to indicate you can set Wireless
connection. If connection(router) is successful
within 8 minutes, the unit will exit Wireless
connection mode automatically and the Wireless
indicator illuminates and the unit enters the
previous functions. If connection is failure within
8 minutes, the unit exits the Wireless connection
mode automatically.
Control the fan speed. Press to select
fan speed in three steps-low, med and
high. The fan speed indicator light
illuminates under different fan speed
settings. But when select high fan speed,
both the low and med fan speed lights
illuminate.
NOTE: When the compressor startups or stops
running, the unit may make a loud voice, it is normal.
Timer
indicator light
the equipment are removed from site promptly and all isolation valves on the equipment are
closed off.
k) Recovered refrigerant shall not be charged into another refrigeration system unless it has
been cleaned and checked.
15.Labelling
Equipment shall be labelled stating that it has been de-commissioned and emptied of
refrigerant. The label shall be dated and signed. Ensure that there are labels on the equipment
stating the equipment contains flammable refrigerant.
16.Recovery
When removing refrigerant from a system, either for servicing or decommissioning, it is
recommended good practice that all refrigerants are removed safely.
When transferring refrigerant into cylinders, ensure that only appropriate refrigerant recovery
cylinders are employed. Ensure that the correct number of cylinders for holding the total system
charge is available. All cylinders to be used are designated for the recovered refrigerant and
labelled for that refrigerant (i.e. special cylinders for the recovery of refrigerant). Cylinders shall
be complete with pressure relief valve and associated shut-off valves in good working order.
Empty recovery cylinders are evacuated and, if possible, cooled before recovery occurs.
The recovery equipment shall be in good working order with a set of instructions concerning
the equipment that is at hand and shall be suitable for the recovery of flammable refrigerants.
In addition, a set of calibrated weighing scales shall be available and in good working order.
Hoses shall be complete with leak-free disconnect couplings and in good condition. Before
using the recovery machine, check that it is in satisfactory working order, has been properly
maintained and that any associated electrical components are sealed to prevent ignition in the
event of a refrigerant release. Consult manufacturer if in doubt.
The recovered refrigerant shall be returned to the refrigerant supplier in the correct recovery
cylinder, and the relevant Waste Transfer Note arranged. Do not mix refrigerants in recovery
units and especially not in cylinders. If compressors or compressor oils are to be removed,
ensure that they have been evacuated to an acceptable level to make certain that flammable
refrigerant does not remain within the lubricant. The evacuation process shall be carried out
prior to returning the compressor to the suppliers. Only electric heating to the compressor
body shall be employed to accelerate this process. When oil is drained from a system, it shall
be carried out safely.
SAFETY PRECAUTIONS
 Loading...