 Loading...
Do you have a question about the Miele T 640 and is the answer not in the manual?
| Type | Tumble dryer |
|---|---|
| Capacity | 7 kg |
| Appliance type | Freestanding |
| Loading type | Front-loading |
| Noise level | 65 dB |
| Color | White |
| Drying Programs | Delicates |
| Dimensions (H x W x D) | 850 x 595 x 580 mm |
Provides an overview of the appliance's main components.
Explains the functions of the appliance's control panel buttons and indicators.
Instructions for environmentally friendly disposal of packaging materials.
Guidance on recycling and disposing of the old appliance responsibly.
Guidelines for the proper and intended use of the tumble dryer.
Safety checks and precautions related to electrical connection and installation.
Important considerations for operating the dryer, including temperature and ventilation.
Lists fabric types and treatments that pose a fire risk when tumble drying.
Information on the use of approved accessory parts for the appliance.
Steps to take before discarding an old appliance to prevent misuse.
Overview of operation, switching on, loading, and selecting programmes.
How to select additional options and start the drying programme.
Explains the meaning of drying symbols found on textile care labels.
Lists specific fabric types that are unsuitable for tumble drying.
Provides advice on drying different fabric types and their shrinkage properties.
Tips for efficient dryer operation to conserve energy and time.
Detailed steps for powering on and properly loading the dryer.
Detailed explanation of programme selection using the programme selector.
How to activate or deactivate extra drying options.
Initiating the drying cycle and understanding the indicator lights.
Explains the meaning of the indicator light and its causes.
Steps to follow after the drying programme has finished.
Explains the energy-saving option and its effect on programme duration.
Describes the short programme option for non-delicate fabrics.
Details the low-temperature setting for delicate fabrics.
Information on the audible end-of-programme signal and volume adjustment.
Details programmes for cotton fabrics, including drying levels and load capacity.
Outlines programmes for minimum iron fabrics, including pre-treatment and load advice.
Information on timed drying programmes for specific items.
Details on programmes for woollens and smoothing out creases.
Steps to cancel an ongoing drying programme.
How to switch to a new programme after the current one has started.
Instructions for safely opening the door mid-cycle.
Step-by-step guide to engage the child lock feature.
Procedure for disabling the electronic system lock.
General information about customisable drying programmes and their memory.
Explanation of how to adjust the final moisture level for drier results.
Details on storing and recalling preferred programme settings.
How to activate or deactivate the anti-crease function.
Detailed steps for activating, de-selecting, and storing programmable functions.
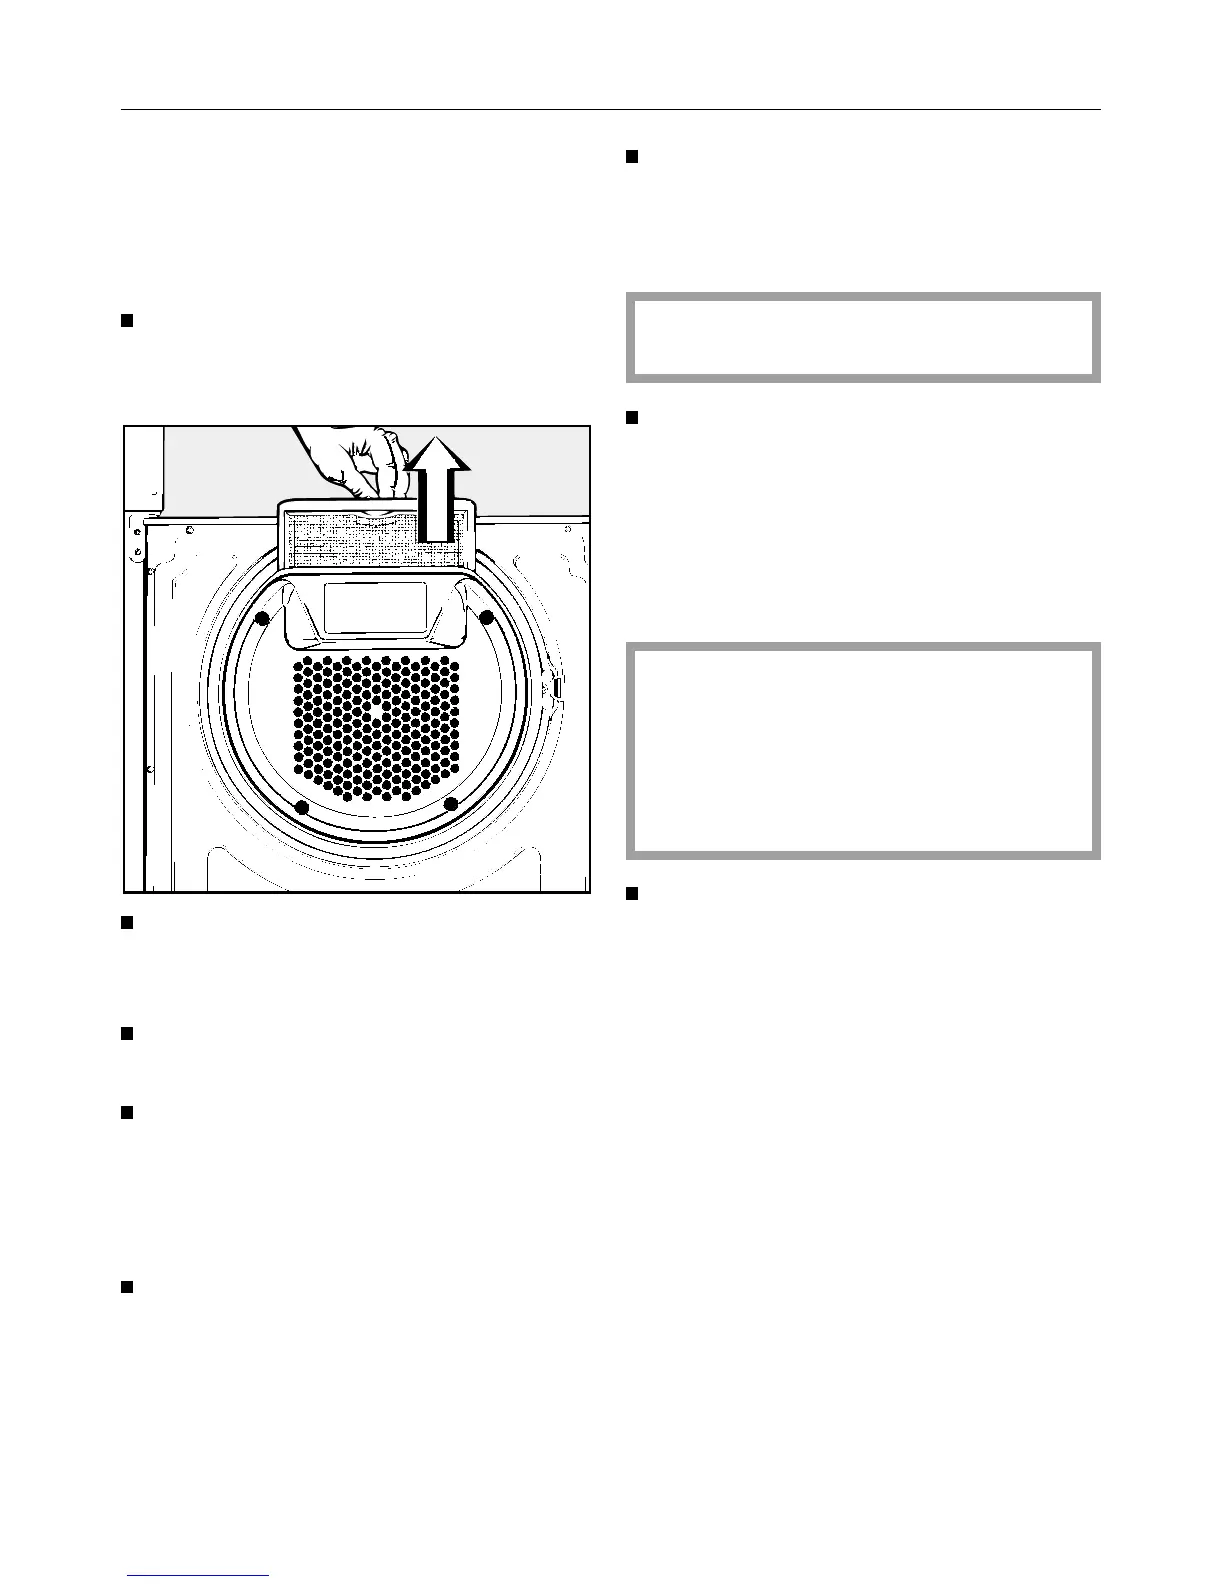
Instructions for cleaning the fluff filter after each use.
Guidance on cleaning the exterior and interior of the dryer.
Troubleshooting steps for when the dryer does not turn on.
Advice on reducing static electricity in synthetic fabrics.
Solutions for laundry that remains damp after drying.
Explanation of fluff build-up and its causes.
Troubleshooting for extended drying times.
Steps to address issues with the drum light.
How to open the door when power is unavailable.
Details issues with 'Locked', 'Drying', 'Anti-crease/Finish', and 'Clean out airways' indicators.
Detailed guide on how to replace the drum light bulb.
Information on contacting Miele for repair services.
Details on potential future software and programme updates.
Guidelines for installing the dryer under a worktop or in kitchen units.
Instructions for connecting the vent pipe to the side outlets.
How to attach the vent adapter and flexible venting pipe.
Factors affecting duct length and how to calculate effective duct length.
Importance of duct diameter for efficient airflow and reduced friction.
Illustration and components of a window vent kit installation.
Diagram showing vent connection details from the side.
Recommendations for installing multiple dryers on a shared venting system.
Illustration and components of a wall vent kit installation.
Top-down view showing vent connection to the wall.
Diagram for upward ducting via flexible hose to an exhaust flue.
Diagram for upward ducting via plastic piping to a wall vent kit.
Diagram for connecting plastic vent pipe to the dryer.
Diagram showing venting outlet height for washer/dryer stack.
Detailed instructions for electrical connection by qualified personnel.
Information specific to non-rewireable plugs and fuse replacement.
Data on electricity consumption and drying times for cotton programmes.
Consumption data for minimum iron programmes.
Consumption data for special care programmes like woollens and smoothing.
Details height, width, depth, weight, and drum volume.
Covers voltage, rated load, fuse rating, and consumption references.
Information on awarded test certificates and suppression standards.