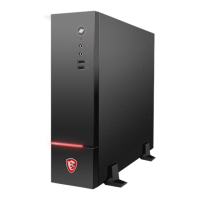
5
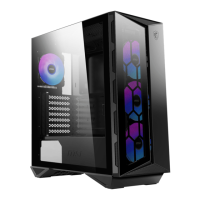
Getting Started
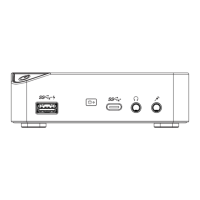
1
Power Button
Press the power button to turn the system on and off.
2
Ventilator
The ventilator on the enclosure is used for air convection and to prevent the
equipment from overheating. Do not cover the ventilator.
3
Power Supply Switch
Switch this switch to I can turn on the power supply. Switch it to 0 to cut off
the power circulation.
4
Power Jack
Power supplied through this jack supplies power to your system.
5
Microphone Jack
This connector is provided for microphones.
6
Headphone Jack
This connector is provided for headphones or speakers.
7
USB 2.0 Port
This connector is provided for USB peripheral devices. (Speed up to 480
Mbps)
⚠
Important
High-speed devices are recommended for USB 3.2 ports whereas low-
speed devices, such as mouse or keyboard, are suggested to be plugged
into the USB 2.0 ports.
8
USB 3.2 Gen 1 Port
This connector is provided for USB peripheral devices. (Speed up to 5 Gbps)
9
USB 3.2 Gen 1 Port (Type-C)
This connector is provided for USB peripheral devices. This connector can
provide up to 5V/3A of power. (Speed up to 10 Gbps)
10
Hard Disk Drive LED
This indicator shows the activity status of the HDD. It flashes when the
system is accessing data on the HDD and remains off when no disk activity
is detected.
11
HDMI-Out Port
The High-Definition Multimedia Interface (HDMI) is an all-digital audio/video
interface capable of transmitting uncompressed streams. HDMI supports
all TV format, including standard, enhanced, or high-definition video, plus
multi-channel digital audio on a single cable.
 Loading...