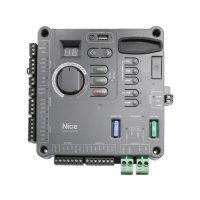
2.3) DESCRIPTION OF THE CONNECTIONS:
1-2 : Flashing light = Output for LUCY 24C (24 Vdc) flashing light, maximum lamp power: 25 W
3-4 : 24 Vdc = 24 Vdc output [ direct current ] for powering accessories (Photocells, Radio etc) max. 200 mA
5-6 : Stop = Input with STOP function (Emergency, shutdown or extreme safety)
5-7 : Photocell = Input for safety devices (Photocells, pneumatic edges)
5-8: Step-by-Step = Cyclic functioning command input (OPEN- STOP- CLOSE- STOP), same as the STEP-BY-STEP key
9-10 : Aerial = Input for the built-in receiver radio aerial
Only qualified, expert personnel may carry out installation and subsequent maintenance, in compliance with European
standards and directives and following the best indications dictated by “expert workmanship”. Whoever carries out these jobs will be
held responsible for any damage caused
2.4) NOTES on CONNECTIONS:
For the most part, connections are easy: a lot of them are direct connections to a single user point or contact.
• The output for connecting the flashing light LUCY on terminals 1 and 2, negative and positive pole respectively, has a fixed voltage
so it is necessary to use a flashing light with an electric card that generates flashing.
• The output for powering accessories on terminals 3 and 4 has a direct current ( 3 = negative - , 4 = positive + ); pay attention to
polarity when connecting the accessories.
ATTENTION:
the direct current supply on the photocells made by Nice does not allow synchronised functioning (an alternate current
supply is needed) .
• Current standards specify that very low voltage electric circuits must always refer to earth potential. Terminal 3 (0 volt) on the unit is
already earthed via the gearmotor’s metal structure
2.5) INSTALLING THE AERIAL
(Built-in radio):
An ABF or ABFKIT type aerial must be used if the receiver is going to work well: range is limited to a few metres without an aerial.
Install the aerial as high as possible; if there are metal or reinforced concrete structures, install the aerial above them. Connect the
central core of the coax to terminal 10 and the earth shield to terminal 9. If the aerial is installed in a place that is not connected to
earth (masonry structures) the shield’s terminal can be earthed to provide a greater range. The earth point must, of course, be in the
immediate vicinity and be of a good quality. If an ABF or ABFKIT aerial cannot be installed, you can get quite good results using the
length of wire supplied with the receiver as the aerial, laying it flat and connecting it to terminal 10.
3) TESTING:
The system must be checked and tested when connections are completed.
We recommend working, initially, with all the functions disabled (dip-switches OFF). Check that the two trimmers that adjust maximum
force (5 - 7 in Fig.1) are set halfway.
A) Check that the chain support is halfway so that movement is problem free both in opening and closing.
Make sure that all the standards relative to the automatic gates and doors category have been observed!
B) Power the unit and check that voltage between terminals 3-4 is 24 Vdc.
As soon as the unit is powered the indicator lights (9 see Fig.1 ), on the active inputs, should turn on and the OK LED should flash.
As a rule the LEDs on the STOP and PHOTOCELL safety devices’ inputs are always on while the LED on the STEP-BY-STEP
command input is off. If this is not the case, switch power off immediately and check connections carefully.
C) Check that all the safety devices on the unit are working properly (emergency stop, photoelectric cells, pneumatic edges, etc.);
each time they trigger the corresponding STOP and PHOTOCELL LEDs should turn off.
•This is one of the most important checks and must be done with great care. In fact, the “active” safety of the automatic door
depends on the correct functioning of the safety devices. The flashing light is an excellent instrument for signalling the state of
danger and the torque limiting devices are a great help in minimising damage but only the correct installation of the safety devices
will make it possible to stop the automatism before it can cause any damage
.
English
13
 Loading...