English
13 14
www.ninjakitchen.com1-877-646-5288
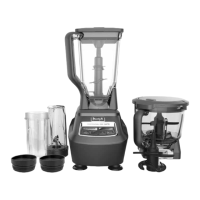
Assembly and Use of the Food Processor Bowl
USING THE CHOPPING BLADE ASSEMBLY
1 Review warning and caution statements on page 13
before proceeding to number 2.
2 Place the motor base on a clean, dry, level surface such
as a counter or table top. Press down on the motor
base to make sure that the suction cups adhere to the
counter or table top.
3 Secure the bowl onto the motor base.
4 Holding the Chopping Blade Assembly by the shaft,
place it onto the gear shaft inside the bowl. Ensure that
the Chopping Blade Assembly fits around the gear shaft
and that it is standing straight. (Fig. 1)
5 Add the ingredients and secure the bowl lid onto the
bowl. (Fig. 1)
6 Plug the power cord into the electrical outlet and press
on the power button ( ). (Fig. 2) Select the speed
that best suits your needs. Pulse ingredients for even
chopping by pressing down in short intervals.
NOTE: Please refer to “Speed Settings & Uses” chart
for suggested uses and speeds.
7 When you have reached your desired consistencey, stop
the appliance by pressing the power button ( ) and
wait for the blade to stop turning.
8 To remove the lid, press the release button on the lid
and pull the lid handle up to a 90° angle. (Fig. 2)
9 Turn the bowl counter-clockwise and lift it to remove it
from the motor base. (Fig. 3)
10 To release the motor base from the counter or table
top, place your hands underneath both sides of the
motor base and gently pull the unit up and towards you.
(Fig.4)
1 Review warning and caution statements above before
proceeding to number 2.
2 Place the motor base on a clean, dry, level surface such
as a counter or table top. Press down on the motor
base to make sure that the suction cups adhere to the
counter or table top.
3 Align and lower the Bowl onto the motor base. (Fig. 1)
Handle should be aligned slightly to the right of the “LOCK”
symbol on the motor base.
4 Rotate the bowl clockwise as far as it will go to lock in
place. (Fig. 2)
5 The bowl can be placed on the motor base two ways;
the handle can be on the front right corner or the front
left corner. (Fig. 3a, Fig. 3b)
6 Holding the desired blade assembly by the top of the
shaft, place it onto the drive gear inside the bowl.
Ensure that the blade assembly is seated properly and
is standing upright. (Fig. 4)
NOTE: The blade assembly will fit loosely on the drive gear.
7 Add the ingredients to the bowl, making sure that they
do not exceed the highest measured marking line on
the side of the bowl.
8 Holding the lid by the handle in the upright position,
place it on top of the bowl aligning the triangle (
)
located on the lid with the triangle ( ) located on the
bowl’s handle. (Fig. 5) The triangles on the lid and the
bowl handle MUST be aligned in order for the blender
to turn on. Press the handle down until you hear a click.
NOTE: To add liquids during processing,
open the drizzle hole on the top of the
lid and pour the liquid slowly into the
mixture.
9 Plug the power cord into the electrical
outlet and press the power button (
).
IMPORTANT: As a safety feature, the power
button (
) will flash and the motor will not work
if the bowl and lid are not installed correctly.
When the bowl and lid are installed properly, the
power button ( ) will be solid, indicating that the
appliance is ready for use.
ASSEMBLY
USING THE DOUGH BLADE ASSEMBLY
IMPORTANT: Use only the “DOUGH” button when
using this attachment.
1 Review warning and caution statements on page 13
before proceeding to number 2.
2 Place the motor base on a clean, dry, level surface such
as a counter or table top. Press down on the motor
base to make sure that the suction cups adhere to the
counter or table top.
3 Secure the bowl onto the motor base.
4 Holding the Dough Blade Assembly by the shaft, place
it onto the gear shaft inside the bowl. Ensure that the
Dough Blade Assembly fits around the gear shaft and
that it is standing straight. (Fig. 5)
5 Add the ingredients and secure the bowl lid onto the
bowl. (Fig. 5)
6 Plug the power cord into the electrical outlet and press
on the power button ( ).
7 To remove the lid, press the release button on the lid
and pull the lid handle up to a 90° angle. (Fig. 2)
8 Turn the bowl counter-clockwise and lift it to remove it
from the motor base. (Fig. 3)
9 To release the motor base from the counter or table
top, place your hands underneath both sides of the
motor base and gently pull the unit up and towards you.
(Fig.4)
Fig. 4 Fig. 5Fig. 1 Fig. 2
Fig. 3a
Fig. 3b
Fig. 1 Fig. 5Fig. 2 Fig. 3
Fig. 4
WARNING: Chopping Blade Assembly is sharp and not locked in place. Before emptying contents carefully
remove lid and Chopping Blade Assembly, holding it by the shaft. Failure to do will result in risk of
laceration.
WARNING: Remove utensils prior to processing. Failure to remove may cause the bowl to be damaged or to
shatter, which may cause personal injury.
WARNING: Never leave the appliance unattended while in use.
CAUTION: Do not blend hot liquids, doing so may cause excessive pressure buildup, resulting in risk of the
user being burned.
IMPORTANT: Make sure that the motor base is plugged in for use.
OR
REMOVALUSE
CHOPPING BLADE
ASSEMBLY
USE
DOUGH BLADE
ASSEMBLY
 Loading...