Do you have a question about the NSI Tork TPE24VA and is the answer not in the manual?
Details on valve port configurations like standard plumbing for actuator mounting.
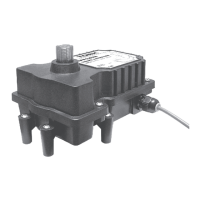
Describes the main body position of the actuator over port B.
Table listing actuator positions, valve ports, and cam settings for proper operation.
Instructions for electrically rotating the valve actuator using the toggle switch.
Steps for manually rotating the valve actuator using the hand-locking knob.
Annual maintenance steps, including lubricating actuator seals and shafts.
Details on valve port configurations like standard plumbing for actuator mounting.
Describes the main body position of the actuator over port B.
Table listing actuator positions, valve ports, and cam settings for proper operation.
Instructions for electrically rotating the valve actuator using the toggle switch.
Steps for manually rotating the valve actuator using the hand-locking knob.
Annual maintenance steps, including lubricating actuator seals and shafts.
The TORK nsi Model TPE24VA Valve Actuator is designed for use with pool and spa equipment, providing automated control over water flow. This device is an essential component for managing the circulation and direction of water in various pool and spa plumbing configurations.
The valve actuator's primary function is to rotate a valve diverter, directing water to different ports (e.g., between a pool and a spa, or for draining/filling operations). It operates electrically, allowing for automated control, but also supports manual override for situations where power is unavailable or specific manual adjustments are needed. The actuator is designed to be mounted on top of a valve, engaging with the valve shaft to facilitate rotation.
The actuator features internal cams and switches that define its rotational limits and positions. These cams can be adjusted to synchronize the actuator's movement with the specific plumbing setup and desired water flow paths. Synchronization is crucial, especially in systems with multiple actuators or complex plumbing, to ensure that the actuators operate in harmony with the controller and other system components. A toggle switch on the rear of the actuator allows for quick synchronization adjustments if the actuator is rotating in the wrong direction relative to the system's controller.
The product comes with a one-year limited warranty covering manufacturing defects. The manufacturer will repair or replace the product at its option. The warranty does not cover damage from accident, abuse, or misuse and disclaims all other warranties, expressed or implied, including merchantability.
| Brand | NSI |
|---|---|
| Model | Tork TPE24VA |
| Category | Controller |
| Language | English |