6
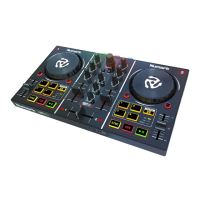
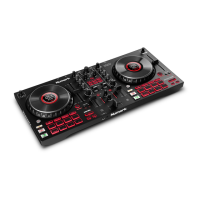
25. Play/Pause: This button pauses or resumes playback.
Press and hold Shift and then press this button to “stutter-play” the track from the initial
cue point.
26. Pitch Fader: Move this fader to adjust the speed (pitch) of the track.
Press and hold Shift and then press one of the Pitch Bend buttons to adjust the total
range.
27. Pitch Bend –/+: Press and hold one of these buttons to momentarily reduce or increase
(respectively) the speed of the track.
Press and hold Shift and then press one of these buttons to set the range of the pitch
fader.
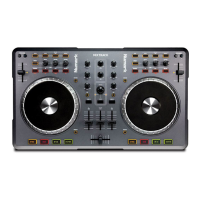
28. Performance Pads: These pads have different functions on each deck depending on the
current pad mode. See the full User Guide for more information.
29. Cue: Press this button to enter Cue mode. Press the button again to enter a second bank
of cues. To assign a cue to a pad, press a pad at the desired location in the track. To
clear a cue from a pad, press Shift and the desired pad.
30. Saved Loop: Press this button to enter Saved Loop mode. Press the button again to
enter a second bank of saved loops. To assign a loop to a pad and activate it, press a
pad to create a Loop In point at the current location, and then press it again to create the
Loop Out point at another location. To deactivate or reactivate a loop, press the
corresponding pad. To delete a loop, press Shift and the desired pad.
31. Auto Loop: Press this button to enter Auto Loop mode. Press the button again to enter a
second bank of auto loop lengths. To activate an auto loop, press a pad. To deactivate
an auto loop, press the pad again.
32. Roll: Press this button to enter Roll Mode. Press the button again to enter a second bank
of roll lengths. To trigger a roll, press a pad.
33. Speakers: These speakers will play the same current audio as the Main Outputs. Use the
Speaker Level knob to adjust the volume of the speakers.
34. Main Level: Turn this knob to adjust the volume level of the Main Outputs.
35. Speaker Level: Turn this knob to adjust the volume level of the speakers.
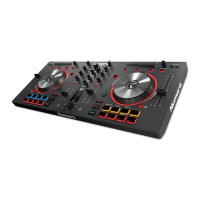
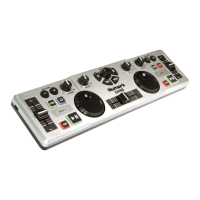
Front Panel
2
1
3
1. Headphones (1/4”, 1/8”) (6.35 mm, 3.5 mm): Connect your 1/4” or 1/8” (6.35 mm or 3.5
mm) headphones to this output for cueing and mix monitoring. The headphone volume is
controlled using the Cue Gain knob.
2. Mic Input (1/4” / 6.35 mm): Use a standard 1/4” (6.35 mm) cable (not included) to
connect a standard dynamic microphone to this input.
3. Mic Level: Turn this knob to adjust the volume level of the microphone input. You can
adjust the microphone attenuation and routing in the Settings menu.