Terminal Charging
Base for PAX A920
Installation Guide
Copyright© 2021 PayFacto Inc. Page 3of10
Introduction
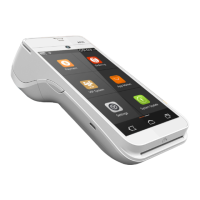
This document explains how to install the charging base for the PAX A920 terminal and included
silicone sleeve. The charging base makes it easy to recharge the terminal without having to remove the
siliconesleevetoensurethatthemicro-USBconnectorisproperlyseatedintheterminal’scharging
port.
NOTE: The terminal must be fitted with the PayFacto-
branded silicone sleeve for the best results. The
PayFacto silicone sleeve displays the PayFacto logo on
the back. You should not use the charging base for any
terminal not protected by the silicone sleeve.
This setup guide describes the following topics:
Charging Base Requirement
Charging Base Overview
◦
◦
Charging Base Installation
Install Terminal Silicone Sleeve
Install Terminal Charging Cable
◦
◦
Working with the Charging Base
Using the Charging Base
LED Status Light

 Loading...