4
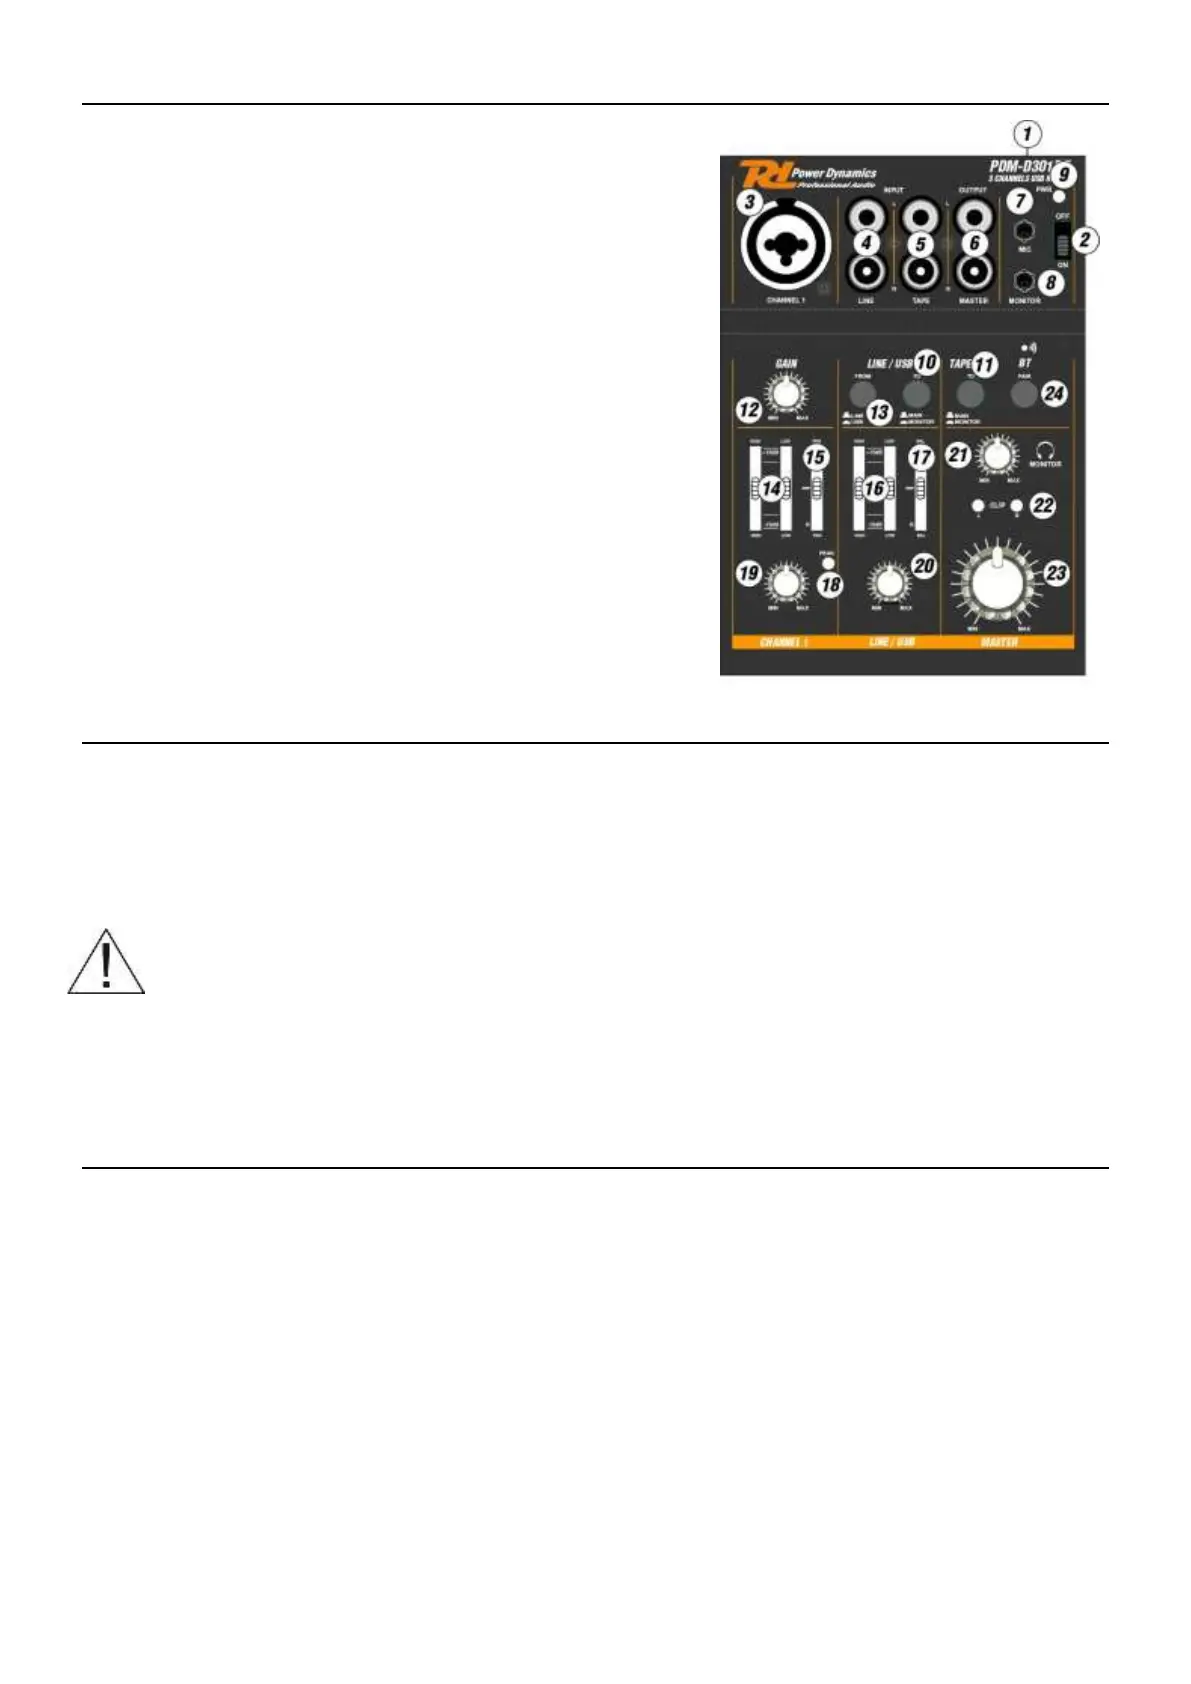
OVERVIEW
1. USB Port type B (5Volt /500mA)
2. Power ON/OFF
3. Combo connector
- XLR with +18V Phantom power for microphone
- Jack 6.3mm (1/4”) for line input
4. Line input RCA jacks
5. Tape input RCA jacks
6. Master output
7. Microphone input Jack 3.5mm
8. Monitor output Jack 3.5mm
9. Power LED indicator
10. Switch send LINE/USB signal to Main (up) or Monitor (down)
11. Tape switch to Main/Monitor output
12. Gain control for channel 1
13. Switch input signal from Line (up) or USB (down)
14. 2-Way equalizer for channel 1
15. Panorama control
16. 2-Way equalizer for channel LINE/USB
17. Balance control
18. Peak LED indicator
19. Level control channel 1
20. Level control channel LINE/USB
21. Level control monitor / headphone
22. Clip LED indicator L/R
23. Master volume
24. Pair BT for audio streaming with led indicator (172.603 only)
MIXER OPERATION
Prior to connecting / disconnecting and prior to switching on, always turn back the output controls (21, 23) to the minimum.
1. Connect a microphone or a mono audio source with line signal level to the combined jack MIC / LINE (3) of the mono
channel:
Connect a microphone via a balanced XLR plug. A +18V phantom power is available at the XLR jack (for
operating a condenser microphone using this phantom power).
Connect a unit with line level (e. g. receiver of a wireless microphone system) via a 6.3mm plug. The 6.3mm jacks
balanced. To connect units with unbalanced output, use 2-pole 6.3mm plugs.
WARNING: Please choose balanced cable and MIC to connect. Do not use the unbalanced cables! When the unit is
powered on, remember not to connect the high level signal to XLR MIC In, which may damage the unit. Via XLR
connector is am phantom power of +18V always present!
2. Connect a stereo audio source with line signal level (e. g. CD player) to the RCA jacks (4/5) of the stereo channel.
3. Connect RCA jacks to MASTER (6) mix for amplifier or a recorder.
4. For monitoring purposes, connect stereo headphones (impedance ≥ 8 Ω) or amplifier of a small monitor system to the
3.5mm stereo jack MONITOR (8).
5. To switch on, slide the button PWR (2); the power LED ON (9) lights up. To switch off, disengage the button.
OPERATION WITH A COMPUTER
When operating the mixer with a computer, install audio software for your operating system. Various programs for audio
reproduction/recording are available on the internet free of charge.
1. Start the computer. Connect the USB port (1) to a USB port on the computer. The computer will recognize the
switched-on mixer as a USB audio device for audio input and audio output.
2. Call up the replay/recording software and make the settings required for audio reproduction via the mixer or audio
recording from the mixer.
If no audio recording or audio reproduction is possible, check the system settings of the computer to find out if the USB interface
has been selected for audio input or audio output.

 Loading...