• 摇杆をホストに接続するとバックグラウンドライトが点灯しているが動作しない場合、
一度抜き差しするか、ガイドコントローラーが正常に動作しているかを確認してください。
• 摇杆が反応せず、ホスト画面が動かない場合、ホストが意図せずシャットダウンした
可能性がありますので、ホストを再起動してから摇杆を接続してください。
• ゲーム中に摇杆の操作が適切でない場合、摇杆を再度抜き差しして接続してください。
• ガイドコントローラーを接続する際には、ガイドコントローラーをオフにする必要が
あります。自動的に接続されてガイドが成功しないようにしてください。
12 疑難排除
• 製品内部への水や他の液体の侵入を避け、損傷を防止してください。
• 湿気の多い場所、高温、油煙などの環境に保管しないでください。
• 装置の接続と取り外し時には、適度な力を使うように注意してください。
• 本製品は成人の監視下で子供が使用する必要があります。
13 注意事項
PS4、X-ONE/SERIESのホストで使用すると、双方向の音声機能が実現され、ゲーム中で
音声コミュニケーションが可能です。
11 ジョイスティックの オーディオ機 能
- 15 -
14 製品仕様
製品モデル
接続方式
有線接続
動作電流
パッケージサイズ
製 品サイズ
製品重量
約 347 * 255 * 105 mm
約 335 * 230 * 97 mm
約
1252
g
通常時:40mA、引導付き手柄接続時:500mA以下
PXN-008
使用温度
0 - 40 ℃
使用湿度
20 ~ 80 %
ステップ 1 ジョイスティックの USBメインケーブルをPS3本体のUSBポートに挿 入し、
PS3本体の電源をオンにします。
ステップ 2 接続に成功すると、本体はジョイスティックに自動的にチャンネルを割り当て、
対応するチャンネルライトが点灯します。
04 PS3本体の使用
ステップ 1 PS4純正コントローラーがオフの状態で、USBデータケーブルで
ジョイスティックのコントロ ーラー ガイドポートに 接 続します。
ステップ 2 ジョイスティックの USBメインケーブルをPS4本体のUSBポートに挿 入し、
PS4本体の電源をオンにします。
ステップ 3 ジョイスティックの ボタンを押すと、ジョイスティックの チャン
ネルライトが点灯し、接続が成功します。
05 PS4本体の使用
ステップ 1 ジョイスティックの USBプラグをコンピューターのUSBポートに挿 入します。
ジョイスティックのチャンネルライトが 点 灯します。
ステップ 2 コンピューターに初めて接続すると、新しいハードウェアが検出され、
ドライバのインストールが自動的に完了します。
ステップ 3 コンピューターゲームコントローラーを開き、機能の自己テストを行うことが
できます。具体的な方法は次のとおりです:
Windows 7以 降 の シ ス テ ム :コ ン ト ロ ー ル パ ネ ル
→ デバイスとプリンター →
ゲームコントローラーアイコンを右クリック → ゲ ー ムコ ントロ ーラー の 設 定 →
プ ロ パ ティテスト をクリックします。
03 PCコンピューターの使用
- 12 -
PS4
P S 4
PC
ご 注 意( SWITCHプ ラットフォー ム )
「SHARE」 と 「 OPTIONS」 ボタンを同時に押すとスクリーンショット機能が起動します。
「TOUCHPAD」 ボタンを押すとスクリーンショット機能が起動します。
- 14 -
OTG変換アダプター
• 摇 杆 ス イ ッ チ を 「 DP」 アイコンの位置に移動すると、方向ジョイスティックは各ホストで
「十字キー」 の機能となります。
• 摇 杆 ス イ ッ チ を 「 LS」 アイコンの位置に移動すると、方向ジョイスティックは各ホストで
「左ジョイスティック」 の機能となります。
09 スティックモードの切り替え方法
• TURBO機能の設定(連射)
1. A、B、X、Y、LB、RB、LT、RTのボタンにTURBO機能を設定できます。
2. TURBOの設定方法:TURBOキーとTURBO機能を設定したいボタンを同時に押し、
LEDが点 滅します。
3. TURBOのクリア方法:TURBOキーとTURBO機能が設定されているボタンを同時
に押し、LEDが点滅から消灯します。
10 TURBO機能の設定
08 Androidプ ラットフォ ー ム の 使 用
(Android 4.4以上が必要)
• Androidスマ ートフォンとの 接 続
ジョイスティックをOTGでスマ ートフォン に 接 続
すると、操作が可能です。
(ご 注 意 :スマ ートフォンで は 、スマ ートフォンの
設定でOTG機能を有効にする必要があります。
OTG変換アダプターは別途購入が必要です。)
• Androidテレビとの接 続
ジョイスティックの USBメインラインをAndroidテレビのUSBポートに挿 入すると、
操作が可能です。
(ご注意:アンドロイドテレビのシステムカスタマイズにより、一部のアンドロイドテレビで
は外部機器の接続がサポートされていない場合があります。)
TV
- 13 -
OTG変換
アダプター
SWITCHドックのUSBポート
• SWITCH本体への接続方法
SWITCHメイン画面下部で、設定→コントローラーとセンサー→有線接続オプションで
Proコントローラーを選択し、そのオプションが有効になっていることを確認してください。
ステップ 1 SWITCH本体モードへの接続には、OTG変換
アダプター が 必 要です。ジョイスティックの
USBメインラインをType-C OTG変換アダプターと接続し、
SWITCH本体のUSBポートに挿 入します。
ステップ 2 接 続 が 成 功すると、ジョイスティック上 の
チャネ ル ラ イト が 点 灯 し ます。
(*注:Type-C OTG変換アダプターは別途購入が必要です)
• SWITCHドックとの接続方法
ステップ 1 SWITCH本体をドックに置き、接続が正常
に行われていることを確認します。
ステップ 2 ジョイスティックの USBメインラインをドックの
USBポートに挿入し、SWITCH本体の電源をオンにします。
ステップ 3 接続が成功すると、本体は自動的にジョイスティックにチャンネルを割り当て、
対応するチャンネルライトが点灯します。
07 SWITCH本体の使用方法
ステップ 1 X-ONE/SERIES純正コントローラーを電源オフの状態でUSB
データケーブルでジョイスティックのコントローラーガイドポートに接続します。
ステップ 2 ジョイスティックの USBメインラインをX-ONE/SERIES本体の
USBポートに挿入し、X-ONE/SERIES本体の電源をオンにします。
ステップ 3 接続が成功すると、ジョイスティック上の チャネルライトが点灯します。
06 X-ONE/SERIES本体の使用方法
X-SERIES X本体への接続の図解
• If the backlight of arcade stick is on but it is not functioning when connected to the
console, please try unplugging it, or check if the controller is functioning properly.
• If the arcade stick is unresponsive and the console screen is frozen, it is possible that
the console has experienced a sudden crash. Please restart the console and reconnect
the arcade stick.
• If the arcade stick is not responding correctly during gameplay, try disconnecting and
reconnecting the arcade stick. This can help refresh the connection and resolve any
temporary issues.
• When connecting the arcade stick, make sure to turn off the console to prevent
automatic connection between the arcade stick and the console, which may interfere
with the proper initialization process.
12 Troubleshooting
• Avoid allowing water or other liquids to enter the internal components of the product to
prevent damage.
• Avoid storing the product in humid, high-temperature, or oily environments.
• When connecting and disconnecting devices, apply moderate force and avoid
excessive pressure.
• Children should use this product under the supervision of adults.
13 Attentions
Interactive communication function is available on PS4 and X-ONE/SERIES platform.
11 Audio Function
- 10 -
14 Product Specifications
Product Model
Connection Method
Wired connection
Working Current
Package Size
Product Size
Product Weight
About 347 * 255 * 105 mm
About 335 * 230 * 97 mm
About 1252 g
Under normal conditions: 40mA
With a controller: Below 500mA
PXN-008
Operating Temperature
0 - 40 ℃
Operating Humidity
20 ~ 80 %
Step 1 Plug the USB cable of the arcade stick into the computer, and the channel light
" " will remain on.
Step 2 When connecting to the computer for the first time, it will prompt to find new
hardware and automatically complete the driver installation.
Step 3 Open the game controller settings on your computer to perform a functionality
self-test. Here are the specific steps:
Win7 or above systems: Open the Control Panel → Device and Printer → Right-click on
the Gamepad icon → Game Controller Setting, click the Properties Testing.
Connection Diagram with PS4
Step 1 Plug the USB cable of the arcade stick into PS3, then power on the PS3 console.
Step 2 The console will automatically assign a channel to the arcade stick when
connection is successful, and the corresponding channel light will remain on.
04 Using on PS3
Step 1 Turn off the original PS4 controller and connect it to the arcade stick's controller
interface using the USB data cable.
Step 2 Plug the main USB cable of the arcade stick into the PS4 console and turn on
the console.
Step 3 Press the " " button on the arcade stick once. The " " channel light on
the arcade stick will stay on to indicate a successful connection.
05 Using on PS4
Connection Diagram with PC
03 Using on PC
- 07 -
PS4
P S 4
PC
* Note (on the SWITCH platform):
Press "SHARE" and "OPTIONS" buttons simultaneously to activate the screenshot function.
Press the "TOUCHPAD" button to activate the screenshot function.
- 09 -
OTG Adapter
Connection Diagram with Android TV
• When you switch the joystick to the " DP " position, the directional joystick functions as
a " D-pad " on various gaming consoles.
• When you switch the joystick to the " LS " position, the directional joystick functions as
the " left stick " on various gaming consoles.
09 Switch the Joystick Mode
• TURBO Function Setting (Auto-Fire)
1. The buttons that can have the TURBO function enabled are: A, B, X, Y, LB, RB, LT, and RT.
2. To set the TURBO function: Simultaneously hold down the TURBO button + the button
you want to enable TURBO for. The LED will flash.
3. To clear the TURBO setting: Simultaneously hold down the TURBO button + the button
that has the TURBO function enabled. The LED will change from flashing to off.
10 TURBO Function Setting
08 Using on the Android
(requires Android 4.4 or above)
• Connect the arcade stick to an Android smartphone
Connect the arcade stick to your smartphone using
an OTG cable to use it.
(* Note: Please ensure that the OTG function is enabled in
your phone settings, and you will need to purchase an OTG adapter.)
• Connect the arcade stick to an Android TV
Plug the main USB cable of the arcade stick into Android TV to use it.
(* Note: Due to system customization on certain Android TV models, some of them may
not support the connection of external devices.)
TV
Compatible Platforms
System Requirement on PC
System Requirement on Android
Thank you for choosing and supporting PXN, please read this manual carefully before
starting to enjoy your gaming experience.
PC, PS3, PS4, X-ONE/SERIES, SWITCH, Android
Windows 7 / 8 / 10 / 11
Android 4.4+
01 System Requirements
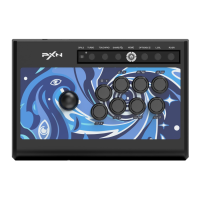
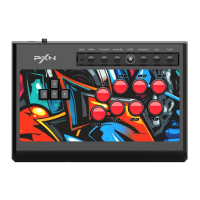
02 Product Overview
Guide Port for
Controller
Action
Buttons
Secondary
Buttons
Arcade Stick
USB Cable
3.5mm Headphone Jack
- 06 -
プ ラットフォー ム の サ ポ ート
PXNレイシダの選択とサポートに感謝します。使用する前に、このマニュアルを注意深くお
読 みくだ さい 。
PC、 PS3、 PS4、 X-ONE/SERIES、 SWITCH、 Android
Windows 7 / 8 / 10 / 11
Android 4.4+
PCのシステム要件
Androidのシステム要件
01 システム要件
02 製品の外観
コ ントロ ーラ ー
ガイドポ ート
補 助 ボタン
ジョイスティック
USBメインケーブル
3.5mmイヤ ホ ン ジャック
- 11 -
アク ション ボタン
Connection Diagram with X-SERIES X
- 08 -
OTG
Adapter
Connect with SWITCH Dock
• Connect with SWITCH Console
Step 1 To connect the arcade stick with SWITCH console,
you will need an OTG adapter. Connect the stick's USB
main cable to the Type-C OTG adapter and insert it into
the SWITCH console.
Step 2 Once the connection is successful, the " " channel
light on the arcade stick will remain on.
(* Note: The Type-C OTG is not included)
• Connect with SWITCH Dock
Step 1 Place the SWITCH console into the dock to
ensure successful connection.
Step 2 Plug the main USB cable of the arcade stick into
the SWITCH dock and turn on the console.
Step 3 The console will automatically assign a channel to the arcade stick when
connection is successful, and the corresponding channel light will remain on.
Enter homepage of SWITCH, select Setting → Controllers and sensors → select Pro
Controller Wired Connection. Please make sure that the option state is ON.
07 Using on SWITCH
Step 1 Turn off the original X-ONE/SERIES controller and connect it to the arcade
stick's controller interface using the USB data cable.
Step 2 Plug the main USB cable of the arcade stick into the X-ONE/SERIES
console and turn on the console.
Step 3 The " " channel light on the arcade stick will stay on to indicate a successful
connection.
06 Using on X-ONE/SERIES
User Manual
使 用マニュアル
“ ” is a registered trademark of ShenZhen PXN Electronics Technology Co., Ltd
PS4/PS3 is a registered trademark of Sony Computer Entertainment Inc.
Xbox is a registered trademark of Microsoft Corporation.
SWITCH is a registered trademark of Nintendo Co., Ltd.
All trademarks are the property of their respective owner. Technical specifications are subject
to change. Information contained herein is subject to change without prior notice. ShenZhen
PXN Electronics Technology Co., Ltd. shall not be made liable for any errors that may appear.
Please keep this information for later reference.