receptacles, and the point where they exit from
the apparatus.
11. Only use attachments/accessories specified by
the manufacturer.
12. Use only with a cart, stand,
tripod, bracket, or table
specied by the manufacturer,
or sold with the apparatus.
When a cart is used, use
caution when moving the
cart/apparatus combination to
avoid injury from tip-over.
13. Unplug this apparatus during lightning storms or
when unused for long periods of time.
14. Refer all servicing to qualified service personnel.
Servicing is required when the apparatus has
been damaged in any way, such as the AC power
cord or plug is damaged, liquid has spilled
or objects have fallen into the apparatus, the
apparatus has been exposed to rain or moisture,
does not operate normally, or has been dropped.
Please check and identify the supplied accessories.
Remote Control (with battery) ...............................................................................................................................................x 1
AC Power Adapter.......................................................................................................................................................................x 1
Car Power Adapter...................................................................................................................................................................... x 1
Headphone Splitter ....................................................................................................................................................................x 1
To DC IN 9V Jack
2
Car power adapter
To cigarette
lighter socket
1
AC power adapter
2
1
To DC IN 9V Jack
To wall outlet
DRC99390
C. Using the Built-in Battery
The unit has a built-in, non-replaceable, rechargeable battery. Charge the built-in battery before using it for the
rst time. Complete charging typically takes approximately 4-5 hours. The charging light will go out when the
built-in battery becomes fully charged.
To recharge the built-in battery
Turning on the Unit
1. Slide the CHARGE / STANDBY / ON switch on the left side of the unit to the ON
position.
2. The start-up picture will appear on the screen.
3. After use, slide the CHARGE / STANDBY / ON switch to the STANDBY (power o )
position.
1. Read these instructions.
2. Keep these instructions.
3. Heed all warnings.
4. Follow all instructions.
5. Do not use this apparatus near water.
6. Clean only with a dry cloth.
7. Do not block the ventilation openings. Install in
accordance with the manufacturer's instructions.
8. Do not install near any heat sources such as
radiators, heat registers, stoves, or other apparatus
(including ampliers) that produce heat.
9. Do not defeat the safety purpose of a polarized
or grounding - type plug. A polarized plug has
two blades with one wider than the other. A
grounding type plug has two blades and a third
grounding prong. The wide blade or the third
prong are provided for your safety. If the provided
plug does not fit into your outlet, consult an
electrician for replacement of the obsolete outlet.
10. Protect the power cord from being walked on
or pinched particularly at plugs, convenience
Cautions:
• Use theprovided12Vcar poweradapteronly.Use withother carpower adapterscoulddamagetheunit.
• The 12Vcar poweradapterincludedwith thisunit isforitsuse only.Donotuseitwithotherequipment.
• Intheinterestoftracsafety,donot operatethis unitor viewvideos whiledriving avehicle.
• Makesurethe unitis securelyfastened topreventitfromfallingor yingthrough theair inthe eventof an
accident.
• Whenthe insideofthecigarette lightersocketisdirty with ashesordust,theplug sectionmaybecome
hot due to poor contact. Be sure to clean the cigarette lighter socket before use.
• After use,disconnect the12V carpower adapterfromboththe unitand cigarettelightersocket.
B. Using the Car Power Adapter
Warning:
Disconnect the car power
adapter when not in use.
Notforusein24Vvehicles.
A. Using the AC Power Adapter
Cautions:
• The ACpoweradapterincludedwiththisunitisforitsuseonly.Do notuse itwith otherequipment.
• Whentheunitisnotgoingtobeusedforlongtime,disconnecttheACpoweradapterfromthewalloutlet.
• Whenthe AC power adapterisplugged in, the apparatusisnotcompletely disconnected from the main
power supply, even when the power is turned o.
Notes:
• Whenthebuilt-inbattery powerislow,"Battery Low"willdisplayonthescreenandtheunitwillstopplaying.
• Rechargethebuilt-inbatterywhen youarereadytouseitagain.
• While usingthe built-inbattery,theenvironmentaltemperatureshouldbe 41°F(5°C)to95°F(35°C).
• Toget thelongest servicelifeofthebuilt-inbattery,chargeatindoor-temperature.
• The built-in batte ryi nthis de vice ma ypre se nt a ri sk offireor ch emical burn ifm istreated.D o not
disassemble, heat above 212
o
F (100
o
C), or incinerate.
• The unitshould notbe exposedto excessiveheatsuchassunshine,reorthelike.
• Whendiscarding the unit, environmentalproblemsmustbe consideredandlocalrulesor laws governing
the disposal of such products must be strictly followed.
Warnings:
• Thebuilt-in batterycanonlyberechargedwhentheunit is in CHARGE modewhileusing the AC power
adapter.
• The built-inbattery cannotberechargedwhen theunit isin ONmode.
• DoNOTrechargethe built-inbatteryinavehicleusingthecarpoweradapter.
• Batteries should not be exposed to excessive heat such as sunshine, re or the like.
The unit can play back
RegionManagementInformation
Re gion ManagementI nfor ma tion:Thisunit isdes ig ne dandmanufactured to respond tot he R eg ion
Management Information that is encod ed on DVDs.I fthe regio nnumber printed onthe DVDd oes not
correspond to the region number of this unit, it cannot play that disc.
The region number of this unit is 1.
Notes on Unauthorized Discs
Youmay notbe abletoplaysomeDVDs on this unit, particularlyiftheywerepurchasedfromoutside your
geographic area or made for business purposes.
DVDs
[8cm/12cm disc]
Compatible
Audio CDs
[8cm/12cm disc]
Disc Function or Operation That is Not Available
When the symbol appears on the screen, it indicates the function or operation attempted is not available at that
time.ThisoccursbecausetheDVDmanufacturerdeterminesthespecicfunctionsofDVDs.Certainfunctionsmay
notbeavailableonsomeDVDs.BesuretoreadthedocumentationprovidedwiththeDVD.
IconsUsedonDVDs
Sample lcons
Note:
WhenplayingbackaCD-G(Graphics)or CD
EXTRAdisc,theaudioportionwillbeplayed,
but the graphic images will not be shown.
Languageselectionsforaudio
Languageselectionsforsubtitles
Screen aspect ratio
Multiplecameraangles
Region code indicator
Titles, Chapters and Tracks
• DVDsaredividedinto“titles” and “chapters”. If the disc
has more than one movi e on it, eac h movie would be a
separate “title”. “Chapters” are sections of titles.
• AudioCDs are divided into“tracks”. A “track” is usually
one song on an Audio CD.
Note: Numbersidentify each title,chapter,andtrackonadisc.Mostdiscs have these numbersrecordedon
them, but some do not.
Battery Replacement
Whe n th e bat tery beco me s we ak ,
the operating distance of the remote
control will be greatly reduced and you
will need to replace the battery.
2. Insert on eCR202 5(3V)
size battery.
To Change Remote Battery
1. Open the battery door.
Remove the
PLASTICsheet
before USING the
Remote Control.
Note: If the remote control is not going to be used for a long time, remove the battery.
WARNING: Do not dispose of the battery in a re or it may leak and/or explode.
WARNING: Batteries should not be exposed to excessive heat such as sunshine, re or the like.
CAUTION: Danger of explosion if battery is incorrectly replaced. Replace only with the same or equivalent type.
Disc Formats
user manual
Read these instructions before using your new product for the rst time.
Important Safety Instructions
Safety Precautions
Safety Precautions
* SEE BOTTOM OF UNIT FOR GRAPHIC SYMBOLS *
WARNING: Should any trouble occur, disconnect the AC power adapter and refer servicing to a qualied technician.
The lightning flash with an arrowhead
symbol, within the equilateral triangle,
is inte nded to aler t the us er to th e
pr es en ceof unins ul at ed"dangerous
voltage"withinthe product's enclosurethatmaybe
ofsucientmagnitudetocauseanelectricshock.
The exc la ma tio n poin t wit hin th e
equilateral triangle is intended to alert
the user to the presence of important
operating and maintenance (servicing)
instructions in this owner’s manual.
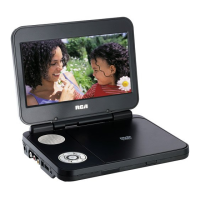
Accessories
Using the Remote Control
• Point the remotecontrolattheREMOTESENSORlocated
on the unit.
• When using this unit in verybri ghtl ight,the in frare d
REMOTESENSORmaynotworkproperly.
Remote Control
ControlReferenceGuide
Power Supply
Warning:
The AC/DC adaptor is used as disconnect device. The AC/DC adaptor of apparatus should not be obstructed
OR should be easily accessed during intended used. To be completely disconnect the power input, the AC/DC
adaptor of apparatus shall be disconnected from the mains.
The12Vcarpoweradapter
allows the unit to be used
wi th veh icl es tha t h ave
a 12V,nega ti vegr ou nd
electrical system.
The supplied AC power
adapter operates on AC
100-120V.
This product contains a
low power laser device.
THIS CLASS B DIGITAL APPARATUS COMPLIES WITH CANADIAN ICES-003.
WARNING: TOPREVENTFIRE OR SHOCKHAZARD,DONOTREMOVE COVER(ORBACK). NOUSER-SERVICEABLE
PARTSINSIDE.REFERSERVICINGTOQUALIFIEDSERVICEPERSONNEL.
WARNING: TOREDUCETHERISKOFELECTRICSHOCK,DONOTEXPOSETHISAPPLIANCETORAINORMOISTURE.
DONOTPLACEOBJECTSFILLEDWITHLIQUIDSONORNEARTHISUNIT.
CAUTION: USEOFCONTROLSORADJUSTMENTS OR PERFORMANCE OF PROCEDURESOTHERTHANTHOSE
SPECIFIEDMAYRESULTINHAZARDOUSRADIATIONEXPOSURE.
CAUTION: DANGEROFEXPLOSIONIFBATTERYIS INCORRECTLYREPLACED.REPLACEONLYWITHTHESAMEOR
EQUIVALENTTYPE.
Remote Control
1. VIDEO MODE button
Adj us t Br ig ht ne ss,
Panel Display and
ContrastoftheLCD
screen.
2. PREV button
Mo veback t hr ou gh
titles, chapters or
tracks on a disc.
3. / SEARCH
buttons
SEARCH: F a s t
reverse playback.
SEARCH: F a s t
forward playback.
4. GOTO button
SkipdirectlytoalocationonaCD/DVD.
5. Cursor ( , , , ) buttons
Move between selections on a menuscreen and adjust
certain settings.
ENTER button
Conrm selections on a menu screen.
6. MEMORY button
Set titles/chapters in a favorite order.
7. Number (0 - 9) buttons
Use when creating programs or locating a title/chapter/
track or specic time.
8. REPEAT A-B button
Performpoint-to-point repeatplaybackonaDVDorCD.
REPEAT DISC button
Repeata DVDchapter ortitle.
Repeat a CD track or the whole disc.
SETUP button
In Stop Mode, press to displaythe unit’s
SETUPmenu.
9. MENU button
Enterandexitthe mainDVD Menu.
10. NEXT button
Sk ip to nex t title, chapter or track on a
disc.
11. STOP button
Stop playing a disc.
PLAY button
Start or resume playback of a disc.
PAUSE button
Pre ss on ce to pa us e pl ayb ac k. Pr es s
subsequently to advance frame by frame
ona DVD.
12. DISPLAY button
Show status information on the screen.
13. ANGLE button
Switch between multiple camera angles if
applicableto theDVD.
14. AUDIO button
Select one of the audio sound trac ks on
aDVD( if more thanone isava ilable) or
select the audio output mode on a CD.
15. SUBTITLE button
Sel ec t one of the sub ti tle la ng uag es
programmedonaDVD(ifavailable).
RETURN button
Return to normal operation after using the
SETUPmenu ofaDVD.
SUBTITLE/
RETURN
M
6
5
4
98 07
3
2
ENTER
MEMORY
DISPLAY
AUDIO
MENU
PREV
SEARCH
GOTO
VIDEO
MODE
NEXT
STOP
PAUSE
PLAY
ANGLE
SETUP
A-B DISC
REPEAT
1
2
3
4
5
6
7
8
9
10
11
12
13
14
15
Connections
On Placement
• Donotuse theunit inplaces thatareextremelyhot,cold,dusty,or humid.
• Place theunit ona atand evensurface.
• Donotrestrict theairowoftheunitbyplacingit ina placewith poorairow,bycoveringitwitha cloth,
or by placing it on carpeting.
• Toavoidmagnetizing,donotplacetheunitnearspeakersormagnets.
• Donot use thisunitindirect sunlightorleavetheunit inaclosed automobile(orsimilar environments)
whereit wouldbeexposedtohightemperaturesabove104°F(40°C).
• NonakedamesourcessuchaslightedcandlesshouldbeplacedontheACpoweradapterorthemainunit.
• The AC/DC adaptorandapparatus should not beexposedto splashing or drippingliquids,and no objects
lled with liquids, such as vases, should be placed on the AC/DC adaptor and apparatus.
• The apparatusshouldnot be exposedtodripping orsplashingand thatnoobjectslled withliquids,such
as vases, should be placed on apparatus.
On Safety
• When connectingordisconnecting the ACpower adapter,griptheplug andnotthe corditself.Pullingthe
cord may damage it and create a hazard.
• Whenyouarenotgoingtousetheunitforalongperiodoftime,disconnecttheACpoweradapter.
On Condensation
• Whenleftina heatedroomwhereit iswarmanddamp,waterdropletsorcondensationmayforminsidethe
unit.When thereiscondensationinside theunit,theunit may notfunctionnormally.Lettheunit stand for1
to 2 hours before turning the power on, or gradually heat the room and allow the unit to dry before use.
VentilationWarning
• Donot block the ventilation openings or holes. Ifthe ventilationopeningsorholesare blockedbya
newspaper or cloth, etc., the heat may not be able to get out.
• Donot operate the unit in aconnedspace,suchasa bookcaseor built-incabinet.Allowabout4 inches
(10cm) of free space all around the unit for adequate ventilation.
RatingPlateLocation
• The ratingplateislocatedonthebottomofunit.
FCC Statements
NOTE:ThisequipmenthasbeentestedandfoundtocomplywiththelimitsforaClassBdigitaldevice,pursuant
to Part 15 of the FCC Rules. These limits are designed to provide reasonable protection against harmful
interference in a residential installation. This equipment generates, uses and can radiate radio frequency energy
and, if not installed and used in accordance with the instructions, may cause harmful interference to radio
communications. However, there is no guarantee that interference will not occur in a particular installation. If
this equipment does cause harmful interference to radio or television reception, which can be determined by
turning the equipment o and on, the user is encouraged to try to correct the interference by one or more of the
followingmeasures:
– Reorient or relocate the receiving antenna.
– Increase the separation between the equipment and receiver.
– Connect the equipment into an outlet on a circuit dierent from that to which the receiver is connected.
– Consultthedealeroranexperiencedradio/TVtechnicianforhelp.
Warning:Changesormodicationsto thisunitnotexpresslyapprovedbythepartyresponsibleforcompliance
could void the user's authority to operate the equipment.
Notes on Copyright
It is forbidden by law to copy, broadcast, show, broadcast on cable, play in public, or rent copyrighted material
without permission.
Apparatus Claims of U.S. Patent Nos. 6,836,549; 6,381,747; 7,050,698; 6,516,132 and 5,583,936 licensed for limited
viewing uses only.
Thi s produc t incorporates copy right protection technology that is protected by U.S. patents and other
intellectualpropertyrights.UseofthiscopyrightprotectiontechnologymustbeauthorizedbyMacrovision,and
isintended forhome andother limitedviewing usesonly unlessotherwiseauthorizedbyMacrovision.Reverse
engineering or disassembly is prohibited.
Chapter1
Title1 Title2
Chapter2 Chapter3 Chapter1 Chapter2
Track1 Track2 Track3 Track4 Track5
AVCMultimedia,
Markham,Ontario,L3R1E3
http://www.RCAav.com
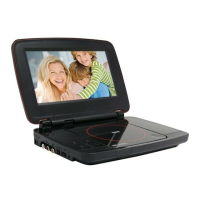
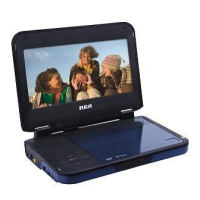
1. LCDscreen
2. DC IN 9V - 12V jack
3. AUDIO / VIDEO OUT jack
4. CHARGE / STANDBY / ON switch
5. VOLUME control
Adjusts the volume.
6. Headphone jack
7. STOP button
Press to stop playing a disc.
MENU button
AccessesDVDDiscMenuifDVD discis currently
playing.
Accesses Setup menu if disc is not playing.
button
Press to start or resume playback of a disc.
Pressing during playback of a disc will cause
playback to be paused.
Unit
PREV button
Press to go back to the previous title / chapter /
track.
InDVDMenuorSetupMenu,presstoscroll
left.
SEARCH button
Press to scroll up, press and hold to perform
fast forward playback during CD playback.
InDVD Menu,SetupMenuorJPGMenu,
press o scroll up.
NEXT button
Press to advance titles / chapters / tracks.
InDVDMenuorSetupMenu,presstoscroll
right.
SEARCH button
Press to scroll down, press and hold to
perform fast reverse playback during CD
playback.
InDVDMenu,SetupMenu orJPGMenu,press
to scroll down.
8. Disc Door
Push to close the disc door.
9. OPEN knob
Press the open knob to open the disc door.
10. Remote sensor
Senses the remote control's signals.
11. ON indicator
12. CHARGING indicator
Charge the rechargeable battery before
using it for the rst time. Complete charging
typically takes approximately 4-5 hours. The
charging light will go out when the battery
becomes fully charged.
Watching a DVD on your TV
1. Turn on the unit.
2. TurnontheTVandfollowthe instructionsincludedwithittowatchvideofromexternalsources.
A.ConnectingaTV
IfyourTVhasaudio/videoinputs,youcanconnecttheunittoyourTVusingstandardAudio/Videocables.
To AUDIO / VIDEO OUT jacks
Audio / Video cable
(not included)
White Red Yellow
B.UsingHeadphones/Earphones
• Turn downthevolumebefore connecting, and thenadjust
the level.
• Whenheadphones/earphonesareconnected,nosoundwill
be emitted from the unit's speaker.
Headphones/Earphones
(3.5mm diameter plug)
(not included)
Headphone Splitter
(included)
Caution:
Avoid listening to sound at levels which may be harmful to your
ears.
1
To AC pow er
outlet
2
To D C IN 9V
jack
3
Slide the switch
to CHARGE
4
Cha rg in g
light ON
5
R ec hargi n g is
completed when
cha rg in g li gh t
goes out
AC power
adapter
TV
White Red Yellow
E- 1
E- 5
E- 9
E- 4
E-8
E- 2
E- 6
E- 10
E- 3
E- 7
E- 11