Do you have a question about the Ridetech RidePRO e3 and is the answer not in the manual?
Details the automated calibration sequence for optimal system performance.
Explains how to defer calibration until the vehicle build is complete.
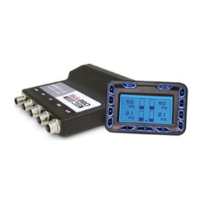
Instructions for securely mounting the central AirPod unit to the vehicle.
Guidance on properly cutting and connecting air suspension lines.
Details for connecting the unit's power and ground wires.
Information on connecting external ride height sensors for LevelPro systems.
Instructions for connecting the user interface and control panel.
Guidelines for selecting an optimal location and mounting the air compressor.
Instructions for securely mounting the air storage tank and pressure sensor.
Guidance on mounting the air distribution block and valve assembly.
How to install air pressure sensors and connect level sensors.
Instructions for mounting the main control unit and its panel.
Steps for installing external ride height sensors on suspension components.
Information on using integrated ride height sensors within ShockWave units.
Visual examples of sensor link rod assembly and mounting points.
Explains manual control of individual air springs using inflate/deflate buttons.
Overview of the three preset buttons for saving and recalling ride heights.
Procedure for adjusting vehicle height and saving it as a preset.
How to activate a saved preset height for the vehicle.
Functionality for viewing current air tank pressure.
Overview of the menu navigation and hierarchy.
Configuration for automatic vehicle leveling upon ignition start.
Setting for automatic height adjustment when load changes.
Controls screen brightness, timeout, and keypad intensity.
Adjustments for system accuracy, compressor pressure, and recalibration.
Pairing remote key fobs and using the double preset feature.
Accessing the system's error log for diagnostic assistance.
Access to system tools and utilities requiring a passcode.
Details the automated calibration sequence for optimal system performance.
Explains how to defer calibration until the vehicle build is complete.
Instructions for securely mounting the central AirPod unit to the vehicle.
Guidance on properly cutting and connecting air suspension lines.
Details for connecting the unit's power and ground wires.
Information on connecting external ride height sensors for LevelPro systems.
Instructions for connecting the user interface and control panel.
Guidelines for selecting an optimal location and mounting the air compressor.
Instructions for securely mounting the air storage tank and pressure sensor.
Guidance on mounting the air distribution block and valve assembly.
How to install air pressure sensors and connect level sensors.
Instructions for mounting the main control unit and its panel.
Steps for installing external ride height sensors on suspension components.
Information on using integrated ride height sensors within ShockWave units.
Visual examples of sensor link rod assembly and mounting points.
Explains manual control of individual air springs using inflate/deflate buttons.
Overview of the three preset buttons for saving and recalling ride heights.
Procedure for adjusting vehicle height and saving it as a preset.
How to activate a saved preset height for the vehicle.
Functionality for viewing current air tank pressure.
Overview of the menu navigation and hierarchy.
Configuration for automatic vehicle leveling upon ignition start.
Setting for automatic height adjustment when load changes.
Controls screen brightness, timeout, and keypad intensity.
Adjustments for system accuracy, compressor pressure, and recalibration.
Pairing remote key fobs and using the double preset feature.
Accessing the system's error log for diagnostic assistance.
Access to system tools and utilities requiring a passcode.
The document describes the RidePRO e3 Air Suspension Control System, including its installation, operation, and maintenance. This system is designed to provide precise control over a vehicle's air suspension, offering both manual and automated adjustments for ride height and comfort.
The RidePRO e3 is an advanced air suspension control system that allows users to manage their vehicle's ride height. It utilizes either air pressure sensors alone (RidePRO e3 systems) or a combination of air pressure and level sensors (LevelPRO systems) to achieve accurate and intelligent suspension control. The system's core function is to inflate and deflate air springs to reach desired preset heights, adapting to vehicle load changes and user preferences.
Key components include:
The system performs a Calibration Sequence upon initial installation to learn vehicle-specific characteristics such as inflate/deflate speeds, compressor fill times, and front/rear weight distribution. This data allows the e3 to achieve preset heights efficiently and intelligently.
| Brand | Ridetech |
|---|---|
| Model | RidePRO e3 |
| Category | Control Systems |
| Language | English |