46
Chapter 3. Sampling
1.
Go to the Play screen (p. 15).
2.
Press [SAMPLING] to get the SAMPLING MENU screen.
[SAMPLING] will blink.
3.
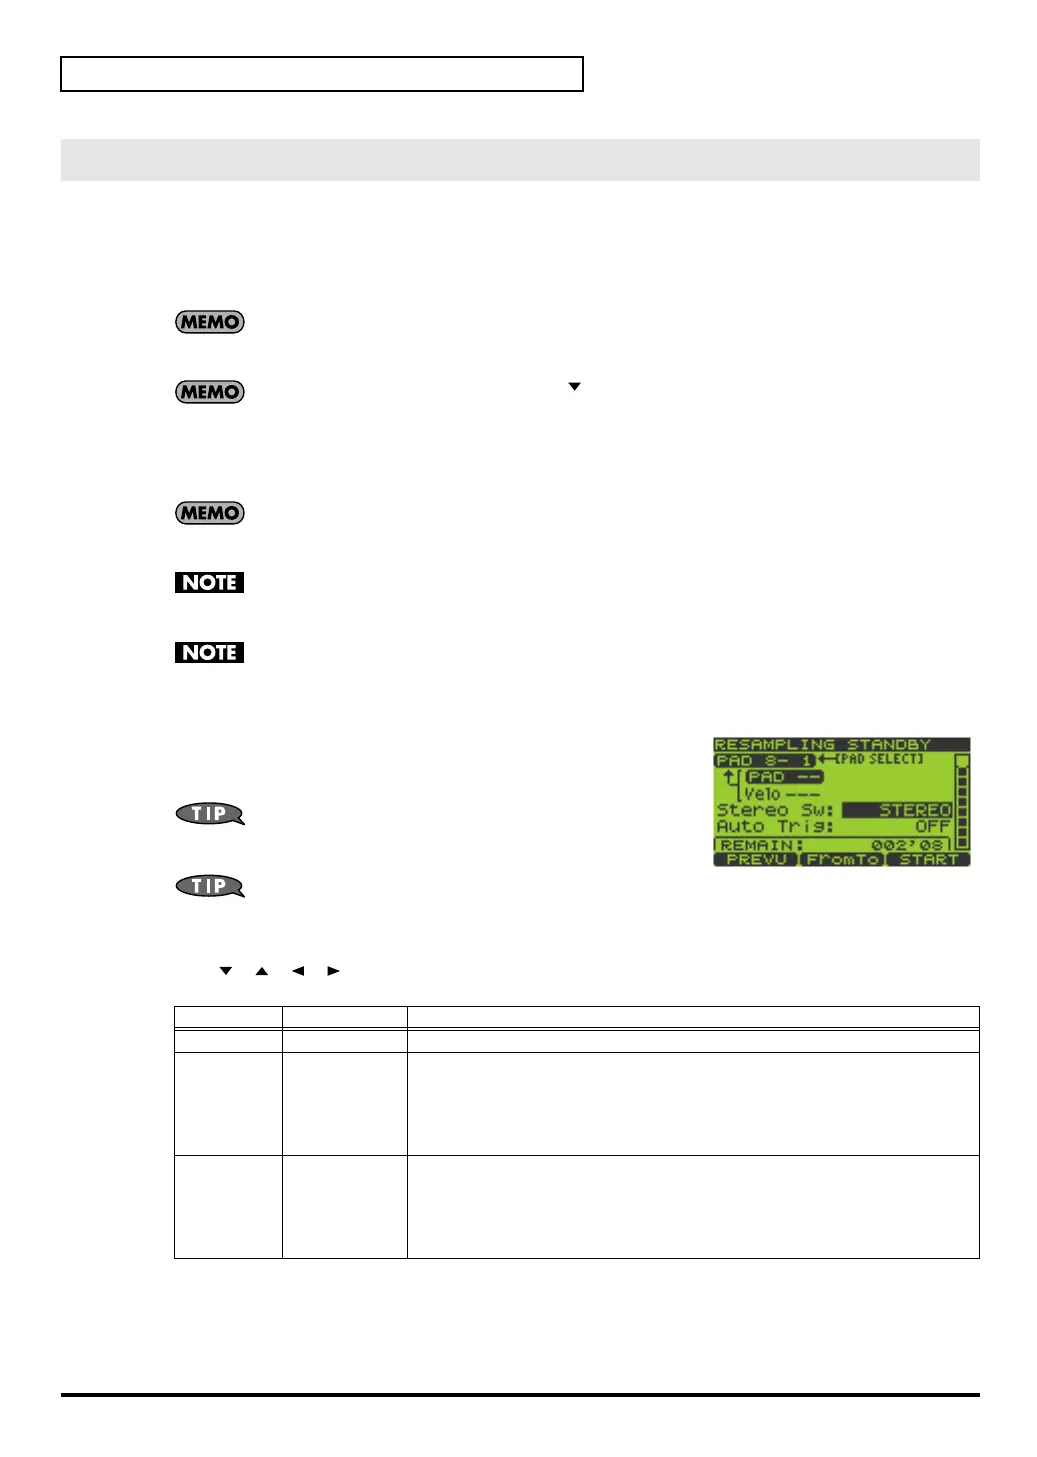
Press [F2] (RESMPL) to get the RESAMPLING STANDBY screen.
In the lower line of the screen, REMAIN indicates the length (remaining time) available for
resampling. This time will change depending on the Stereo Sw (p. 46) and Sampling Grade (p. 43)
setting. It is shown in minutes and seconds.
From the screen of step 2, you can press [ ] to move the cursor to “Resampling” and then press
[ENTER] or [SAMPLING] to obtain the same result.
4.
The display will indicate “Select Pad”; press the desired pad to select it as the resampling destination.
Turn the VALUE dial or use [DEC][INC] to switch pad banks.
At this time, pads that do not contain samples will blink.
If the selected pad already contains a sample, the message “A Sample Already Exists! Overwrite?”
will appear. If you are sure you want to resample into that pad, press [F3] (EXEC). If you decide to
cancel, press [F2] (CANCEL).
Resampling can be performed only within the same pad bank. You cannot resample within a pad
bank that contains no samples. If you press a pad in an empty pad bank, the screen will indicate
“Empty Pad Bank,” and the pad cannot be selected.
If the Pad Bank Protect setting is turned on for a bank, a lock symbol is displayed at the right of the
pad bank number shown in the upper left of the screen. If you press a pad of such a bank, the screen
will indicate “Protected Pad Bank!”, and the pad cannot be selected. If you want to sample into a pad
of this bank, you will have to turn off the Protect setting (p. 31).
5.
Select the resampling source pad(s).
You can select up to four pads, except for the pad you selected in step 4.
Each time you press a pad, you will alternately select or de-select it.
You can press [F1] (PREVU) to preview the sound that will
be resampled.
Press [F2] (FromTo) to toggle between selection of the
resampling source and destination pads. This changes the item to which the [PAD SELECT] arrow
in the screen is pointing. The upper line is the resampling-destination pad, and the lower line is the
resampling-source pad.
6.
Use [ ][ ][ ][ ] to select the parameter you want to edit.
Turn the VALUE dial or use [DEC][INC] to edit the value of the parameter.
7.
Press [F3] (START) or [SAMPLING] to begin resampling automatically.
If you decide to cancel the resampling procedure, press [EXIT].
8.
Resampling will end automatically, and you will return to the Play screen.
Resampling Up to Four Existing Samples in Combination
Parameter
Value Explanation
Velo
1–127 Specifies the volume of the sample in the resampling-source pad.
Stereo Sw STEREO,
MONO(L+R),
MONO(L)
Selects stereo or monaural recording.
STEREO
: Stereo recording.
MONO(L+R)
: The left and right channels of the stereo sample will be mixed,
and recorded in monaural.
MONO(L)
: Monaural recording.
Auto Trig OFF,
1–14
This setting causes resampling to start automatically when the audio signal
from the source sample(s) exceeds the level you specify.
OFF
: The level is not specified.
1–14
: Resampling will start automatically when the source signal exceeds
the specified level. Level 1 is the lowest.
SP-606_e.book 46 ページ 2004年6月21日 月曜日 午前10時8分
 Loading...