3
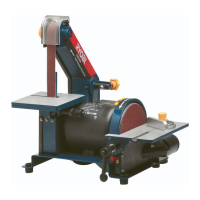
SWITCH (2)
This tool is equipped with a simple switch control. To turn
the sander "ON", slide the switch to the left.
Slide the switch to the right to turn the sander "OFF".
WARNING
Do not allow familiarity with your sander to make
you careless. Remember, a careless fraction of a
second is sufficient to inflict severe injury.
VARIABLE SPEED CONTROL (ESS2513VK)
Your sander has advanced electronic features, designed
to assist you in getting the maximum use from your
sander. By making proper speed selections, your sander
can be adjusted to specific sanding needs.
The variable speed control alows the sander to develop a
no load speed that can be adjusted from 6,000 to 12,000
min^-1. The variable speed control selector is
conveniently located on the front of the sander.
The electronic feature of your sander introduces the
flexibility of adjusting the motor speed to required job
conditions. An electronic speed control module senses
the load applied to the motor, and increases or decreases
motor voltage to compensate for and maintain desired
RPM. Speed can be set according to the sanding
purpose or work-piece's surface you will be using.
Selector clockwise to increase speed for the rough
surface or for quick removal of stock, and anti-clockwise
to decrease speed for the smaller delicate sanding
applications.
OPERATION
WARNING
Your sander should never be connected to power
supply when you are assembling parts, making
adjustments, assembling or replacing sandpaper,
cleaning, or when not in use. Disconnecting
sander will prevent accidental starting that could
cause serious personal injury.
INSTALLING SANDPAPER (Fig. 5)
Inspect sandpaper before installing. DO NOT us e if
broken of defective.
INSTALLING ADHESIVE (HOOK & LOOP)
SANDPAPER
■ Unplug the sander.
■ Align holes in hook and loop type sanding disc with
holes in pad, then carefully press fuzzy side of
sanding disc against pad as tightly as possible.
Note: Hook and loop type sanding discs can be
reused for the life of the sanding abrasive. It is
recommended that you keep the sanding disc backing
pad clean to provide for best adhesion. Clean
occasionally by brushing lightly with a small brush.
WARNING
Failure to unplug your sander could result in
accidental starting causing possible serious
personal injury.
INSTALLING NON-ADHESIVE SANDPAPER
■ Unplug the sander.
■ If replacing sandpaper, remove old sandpaper.
To remove paper, release paper clamp by lifting up on
lever, and disengaging it from the tab, and allowing
the lever to lower.
■ Insert end of new 1/3 sheet sandpaper approximately
12.7 mm under the paper clamp.
Note: 12.7 mm clamping of sandpaper is necessary
for multi-sheet stacking of paper.
■ Lift up on lever and lock into place. Apply downward
pressure to conform sandpaper to base.
■ Wrap sandpaper around cushion. Lift lever on
opposite end of sander and insert loose end of
sandpaper under paper clamp. Fit sandpaper tight
against cushion.
■ Lift up on lever and lock into place.
■ Multiple sheets of sandpaper can be installed at one
time for convenience.
PAPER PUNCH (Fig. 6)
A paper punch template has been supplied with your sander
for aligning and punching holes in sandpaper. The punched
holes must align with the holes in the sander cushion.
■ Install sandpaper on your sander.
■ Align sander cushion over the paper punch.
■ Push down on sander
SANDPAPER SELECTION
Selecting the correct size grit and type sandpaper is an
extremely important step in achieving a high quality
sanded finish. Aluminum oxide, silicon carbide, and other
synthetic abrasives are best for power sanding. Natural
abrasives, such as flint and garnet are too soft for
economical use in power sanding.
ESS1813-ESS2513VK Englishmanual.qxd 6/19/04 1:59 PM Page 3
 Loading...