EasyManua.ls Logo

Ryobi P440 User Manual

Ryobi P440
28 pages
To Next Page IconTo Next Page
To Previous Page IconTo Previous Page
Page #6 background imageLoading...
Page #6 background image
6 - English
FEATURES
PRODUCT SPECIFICATIONS
Size of Paper ........................................................1/4 Sheet
Motion ........................................................... Orbital Action
Orbit Diameter ......................................................... 1/16 in.
No Load Speed ...................................12,000 r/min. (RPM)
ASSEMBLY
WARNING:
Do not use this product if it is not completely assembled
or if any parts appear to be missing or damaged. Use of
a product that is not properly and completely assembled
or with damaged or missing parts could result in serious
personal injury.
WARNING:
Do not attempt to modify this product or create acces-
sories or attachments not recommended for use with this
product. Any such alteration or modification is misuse
and could result in a hazardous condition leading to
possible serious personal injury.
If any parts are damaged or missing, please call 1-800-525-2579 for assistance.
OPERATION
WARNING:
Do not allow familiarity with this product to make you
careless. Remember that a careless fraction of a second is
sufficient to inflict serious injury.
WARNING:
Always remove battery pack from the tool when you are
assembling parts, making adjustments, cleaning, or when
not in use. Removing battery pack will prevent accidental
starting that could cause serious personal injury.
WARNING:
Always wear eye protection with side shields marked to
comply with ANSI Z87.1. Failure to do so could result in
objects being thrown into your eyes resulting in possible
serious injury.
WARNING:
Do not use any attachments or accessories not
recommended by the manufacturer of this product. The
use of attachments or accessories not recommended
can result in serious personal injury.
APPLICATIONS
You may use this product for the purposes listed below:
Sanding on wood surfaces
Removing rust from and sanding steel surfaces
Sanding plastics
WARNING:
Battery products are always in operating condition.
Therefore, the switch should always be in the OFF
position when not in use or carrying at your side.
INSTALLING/REMOVING BATTERY PACK
See Figure 1, page 10.
To install:
Insert the battery pack.
Make sure the latches on each side of the battery pack
snap into place and the battery pack is secured in the
product before beginning operation.
To remove:
Depress the latches on each side of the battery pack.
INSTALLING SANDPAPER
The cushion on the sander gives you the option of using
either non-adhesive sandpaper that clamps to the platen or
adhesive backed sandpaper with pressure sensitive adhesive
backing that sticks to the cushion.
Question and Answer IconNeed help?

Do you have a question about the Ryobi P440 and is the answer not in the manual?
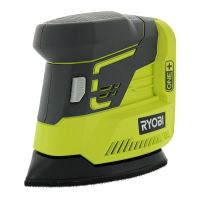
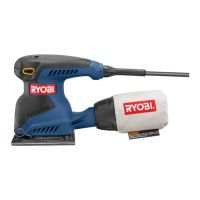
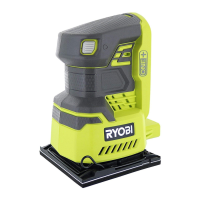
Ryobi P440 Specifications

General IconGeneral
Power SourceCordless
Voltage18V
Pad Size5 inches
Weight3.5 lbs
Dust CollectionYes

Summary

General Power Tool Safety Warnings

Work Area Safety

Guidelines for maintaining a safe working environment, free from hazards.

Electrical Safety

Precautions related to electrical hazards, including grounding and cord use.

Personal Safety

Recommendations for operator's personal safety, including alertness and PPE.

Power Tool Use and Care

Proper usage, maintenance, and care for safe tool operation.

Battery Tool Use and Care

Safety guidelines for handling, charging, and using battery-powered tools.

Service

Instructions for proper servicing and use of replacement parts.

Sander Safety Warnings

California Proposition 65

Information on chemicals in product/dust, including cancer and reproductive risks.

Symbols

Signal Word Meanings

Explains risk levels associated with signal words like DANGER, WARNING, CAUTION.

Product Symbols

Explains common symbols used on the product for safe operation.

Features

Product Specifications

Details on paper size, motion, orbit diameter, and no load speed.

Assembly

Instructions for assembling the sander.

Operation

Installing Non-Adhesive Sandpaper

Steps for fitting sandpaper without adhesive backing.

Installing Adhesive Sandpaper

Steps for fitting sandpaper with adhesive backing.

Paper Punch

Instructions for using the paper punch for dustless sanding.

Sandpaper Selection

Guidance on choosing the correct grit and type of sandpaper.

Sanding

Techniques and precautions for the sanding process.

Using the Dust Bag

Explanation of the dust collection system.

Attaching the Dust Bag Assembly

Steps for connecting the dust bag.

Cleaning the Dust Bag

How to empty and clean the dust collection bag.

Attaching Sander to Vacuum

Instructions for connecting the sander to a vacuum cleaner.

Maintenance

General Maintenance

Routine cleaning and care for the sander.

Accessories

Information about available accessories for the sander.

Related product manuals