6
Never use blades, ailing devices, wire, or rope on this
product. Do not use any attachments or accessories not
recommended by the manufacturer of this product. The
use of attachments or accessories not recommended
can result in serious personal injury.
For complete charging instructions, refer to the Operator’s
Manuals for your Ryobi battery pack and charger models.
To avoid serious personal injury, always remove
the battery pack and keep hands clear of the lock-out
button when carrying or transporting the tool.
See Figure 5.
■ Place the battery pack in the trimmer. Align raised ribs
on battery pack with grooves in the trimmer’s battery
port.
■ Make sure the latch on bottom of the battery pack
snaps in place and that battery pack is fully seated
and secure in the trimmer before beginning operation.
See Figure 5.
■ Release the variable speed control trigger to stop the
trimmer.
■ Press and hold the battery latch button at the bottom
of the battery pack.
■ Remove battery pack from the trimmer.
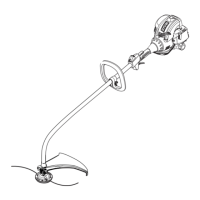
See Figure 6.
The shaft's length cannot be adjusted.
■ Insert the curved shaft into the shaft coupling on the
upper shaft.
■ Tighten the coupling by turning clockwise. Make
sure the upper and lower part of shafts are securely
tightened before reinstalling the battery pack.
See Figure 7.
■ To start the trimmer, grip the front handle with one
hand while holding the rear handle with your other
hand making sure to depress the lock-out trigger while
squeezing the variable speed trigger.
■ To stop the trimmer, just release the variable speed
control trigger.
See Figure 9.
Follow these tips when using the trimmer:
25. Eyelet
26. Slots
27. Anchor hole
28. Charger
29. Charger cable
See Figure 2.
■ Remove the bolts and bracket from the front handle.
■ Install the front handle onto the upper shaft.
■ Place the bolt through the front handle and securely
tighten them into the captive nuts on the bracket.
See Figure 3 - 4.
The line cut-off blade on the grass deector is sharp.
Avoid contact with the blade. Failure to avoid contact
can result in serious personal injury.
■ Remove supplied screws from the motor housing.
■ Fit the plant protector into the slots around the base of
the motor housing.
■ Fit the grass deflector into the slots on trimmer head.
■ Turn counterclockwise to lock grass deflector into
place.
■ Line up the screw holes in the grass deflector with the
holes in the motor housing head.
■ Install supplied screws and tighten by turning
clockwise with a phillips screwdriver.
Do not allow familiarity with products to make you
careless. Remember that a careless fraction of a
second is sufcient to inict serious injury.
Always wear eye protection. Failure to do so could
result in objects being thrown into your eyes resulting
in possible serious injury.
 Loading...