EasyManua.ls Logo

Sanyo ECD-T1820 User Manual

Sanyo ECD-T1820
50 pages
To Next Page IconTo Next Page
To Previous Page IconTo Previous Page
Page #44 background imageLoading...
Page #44 background image
-43-
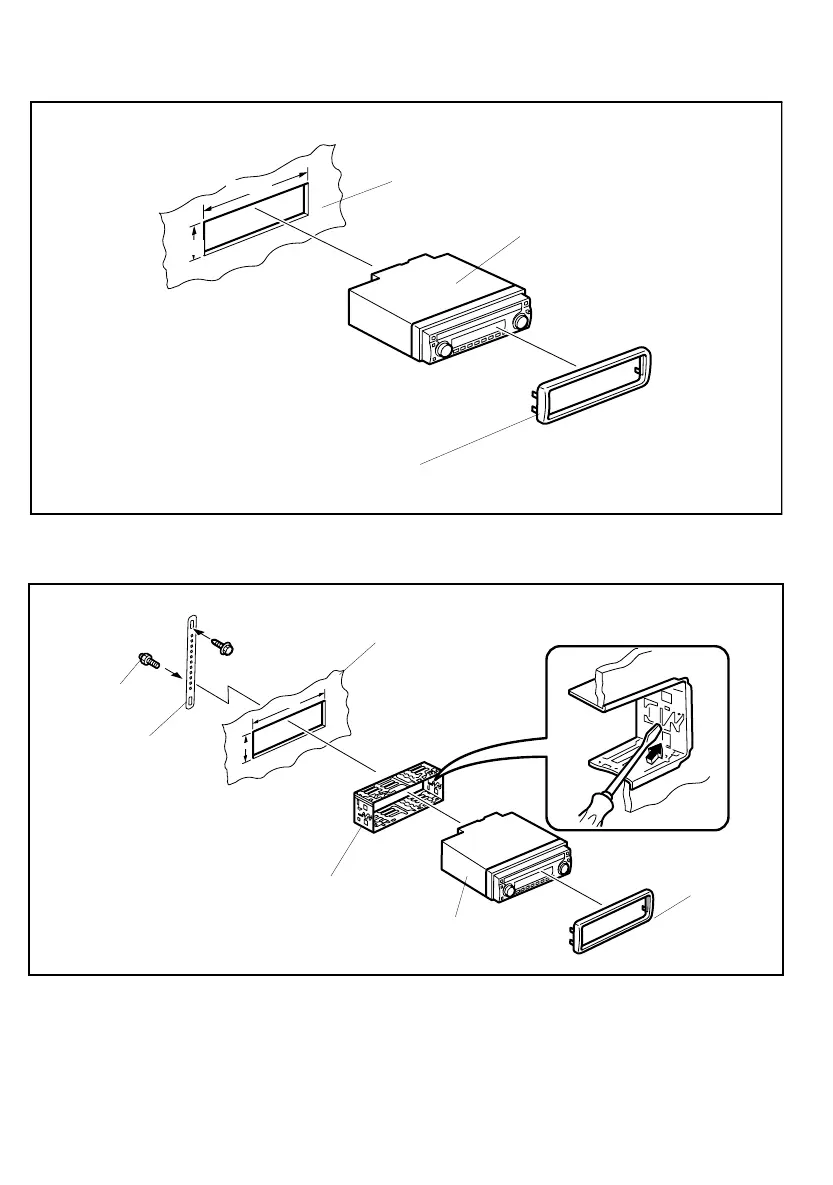
2. MONTAJE ISO CON MARCO DE ADORNO REMOVIBLE
Cuando se monte la unidad en un receptáculo estándar DIN (182 x 53 mm) en el tablero de instrumentos o
en la consola, instale el marco de adorno removible en la unidad.
3. PROCEDIMIENTOS DE INSTALACION
1. Inserte el bastidor de montaje en la abertura DIN-estándar (182 x 53 mm) del tablero de instrumentos
o de la consola.
2. Doble los topes del bastidor de montaje hacia afuera hasta que el bastidor quede encajado
exactamente en la abertura.
3. Introduzca el aparato de audio en el bastidor de montaje hasta que esté correctamente colocado y fijo.
4. Asegure la banda posterior al aparato de audio y el tablero de instrumentos del vehículo.
182 mm
53 mm
TABLERO DE INSTRUMENTOS
O CONSOLA
APARATO DE AUDIO
MARCO DE ADORNO REMOVIBLE
TABLERO DE
INSTRUMENTOS
O CONSOLA
TORNILLO
HEXAGONAL
BASTIDOR DE MONTAJE
(SEMIPROTECTOR)
APARATO DE AUDIO
MARCO DE
ADORNO
REMOVIBLE
BANDA
POSTERIOR
(LLAVE)
M5 x 14
182 mm
53 mm
ECD-T1820_S.fm Page 43 Tuesday, December 14, 2004 8:35 AM

Questions and Answers:

Sanyo ECD-T1820 Specifications

General IconGeneral
BrandSanyo
ModelECD-T1820
CategoryCar Receiver
LanguageEnglish

Summary

CD Care and Handling

Disc Compatibility and Playback

Unit compatibility with discs and potential playback problems.

Prohibited Disc Types and Handling

Avoid non-conventional discs and cracked discs. Do not write on discs.

Disc Cleaning and Storage

Proper cleaning with a soft cloth and storing away from heat and humidity.

Chemical Cleaning and Storage

Avoid chemicals for cleaning. Store discs properly when not in use.

Special CD Types

Explains limitations with mixed-mode and copy-protected CDs.

Digital Display Guide

Display Indicators and Segments

Details the meaning of indicators like EQ, AUX, D SHF, RPT, SCN, BASS, ATP.

Displayable Information

Covers what information can be shown: radio frequency, time, track number, error signs.

Front Panel Management

Detaching the Front Panel

Step-by-step instructions on how to remove the front panel from the unit.

Replacing the Front Panel

Instructions for correctly reinstalling the front panel onto the unit.

Securing the Front Panel

Method to fix the front panel permanently to prevent theft.

Front Panel Handling Precautions

Warnings and cautions related to handling and installing the front panel.

Basic Operations and Controls

Powering the Unit On/Off

How to turn the car audio unit's power on and off.

Electronic Controls

Explanation of audio adjustments like bass, treble, balance, fade, and volume.

Sound Effect Button

How to cycle through sound effect modes like ROCK, CLASSIC, JAZZ.

Bass Xpander Function

How to activate and use the bass enhancement feature.

Radio Selection Button

Switching between radio bands like FM1, FM2, FM3, and AM.

CD/AUX Selection

Switching between CD player and AUX input modes.

Clock Button Function

Switching the display between clock and audio information.

Canceling Beep Tones

Procedure to disable or enable system beep sounds.

Demo Mode On/Off

How to turn the unit's demonstration mode on or off.

Radio Tuning and Presets

Selecting Radio Mode

How to switch to radio mode and select bands (FM1, FM2, FM3, AM).

Radio Tuning Methods

Instructions for automatic and manual tuning to find stations.

Storing Preset Stations

How to program and store favorite radio stations into memory presets.

Auto Travel Preset (ATP)

Function to automatically search and store strongest stations.

Preset-Scan Button Operation

How to scan through stored preset stations.

CD Playback Features

Loading and Ejecting CDs

Instructions for inserting and removing compact discs from the unit.

Switching to CD Mode

How to select CD player mode from other audio sources.

Skipping Tracks

How to move between tracks, including fast search.

Shuffle Mode

Playing CD tracks in a random order.

Repeat Mode

Playing a track or the entire disc repeatedly.

Scan Mode

Playing the beginning of each track for preview.

Track Number and Time Displays

Switching the display between track number and playback time.

AUX Input Usage

AUX Connection

Connecting an external audio device via the AUX IN jack.

Selecting AUX Mode

Switching the unit to auxiliary input mode.

AUX Operation Precautions

Safety and handling advice for using the AUX input.

Error Codes and Solutions

CD Player Error Codes

Lists error codes (E01, E07, E10, E99, no Cd) and their causes/solutions.

Clock Settings and Display

Display Mode Change

Switching the display between clock and audio information.

Adjusting the Time

Step-by-step guide to setting the correct time.

Clock Reset

How to reset the clock to the nearest half-hour.

Safety and Operational Tips

Condensation Issues

How to handle condensation affecting the CD player's function.

Temperature Considerations

Operating limitations in extreme hot or cold temperatures.

Sound Interruptions

Reasons for sound skipping on rough roads and remedies.

Safety and Volume

Maintaining moderate volume for driving safety.

Unit Cleaning

Proper methods for cleaning the unit's exterior.

Disc Care During Non-Use

How to care for discs when the player is not in use.

Servicing Information

When and how to seek professional servicing for the unit.

Troubleshooting Guide

Disc Playback and Sound Issues

Solutions for problems like no disc playback, no sound, or skipping.

Power and Reception Issues

Troubleshooting for no power, improper operation, and no radio reception.

Installation Components and Guidelines

Installation Components

Identification of parts like mounting bracket, rear strap, screws, and trim ring.

Mounting Angle Guidelines

Recommendations for the maximum tilt angle during installation.

ISO Mounting Procedure

Step-by-step guide for installing the unit into a DIN-standard cutout.

Securing the Unit

How to properly secure the audio unit and rear strap during installation.

Installation for Toyota/Nissan Vehicles

Specific instructions for mounting the unit in Toyota/Nissan vehicles.

Removing the Unit

Removing Unit with Trim Ring

Steps to remove the unit when the removable trim ring is attached.

Removing Unit without Trim Ring

Steps to remove the unit when the trim ring is not used.

Wiring and Connections Guide

Speaker System Wiring

Correctly connecting the four speakers to the unit.

Power and Ground Connections

Wiring for constant power, accessory power, and ground.

Accessory Connections

Connecting power antenna and amplifier turn-on wires.

Antenna Socket Connection

Connecting the vehicle's antenna to the unit.

Wiring Precautions

Important cautions regarding speaker wire connections.

Line Out Connections

How to connect the unit's line outputs to an external amplifier.

Fuse Replacement

Instructions for replacing a blown fuse.

Two-Speaker Installation Notes

Specific wiring notes for two-speaker setups.

Unit Specifications

FM/AM Tuner Specifications

Performance metrics for the radio tuner section.

CD Player Specifications

Technical details of the compact disc playback capabilities.

Audio Section Specifications

Power output and impedance ratings.

General Specifications

Operating voltage and current requirements.

Related product manuals