Making Use of Time Shift Function
Select
Move
MENU
Return
Check File System
USB Disk
Speed
SELECT
MOVE
Menu
RETURN
Programme Edit
Auto Tuning
DTV Manual Tuning
ATV Manual Tuning
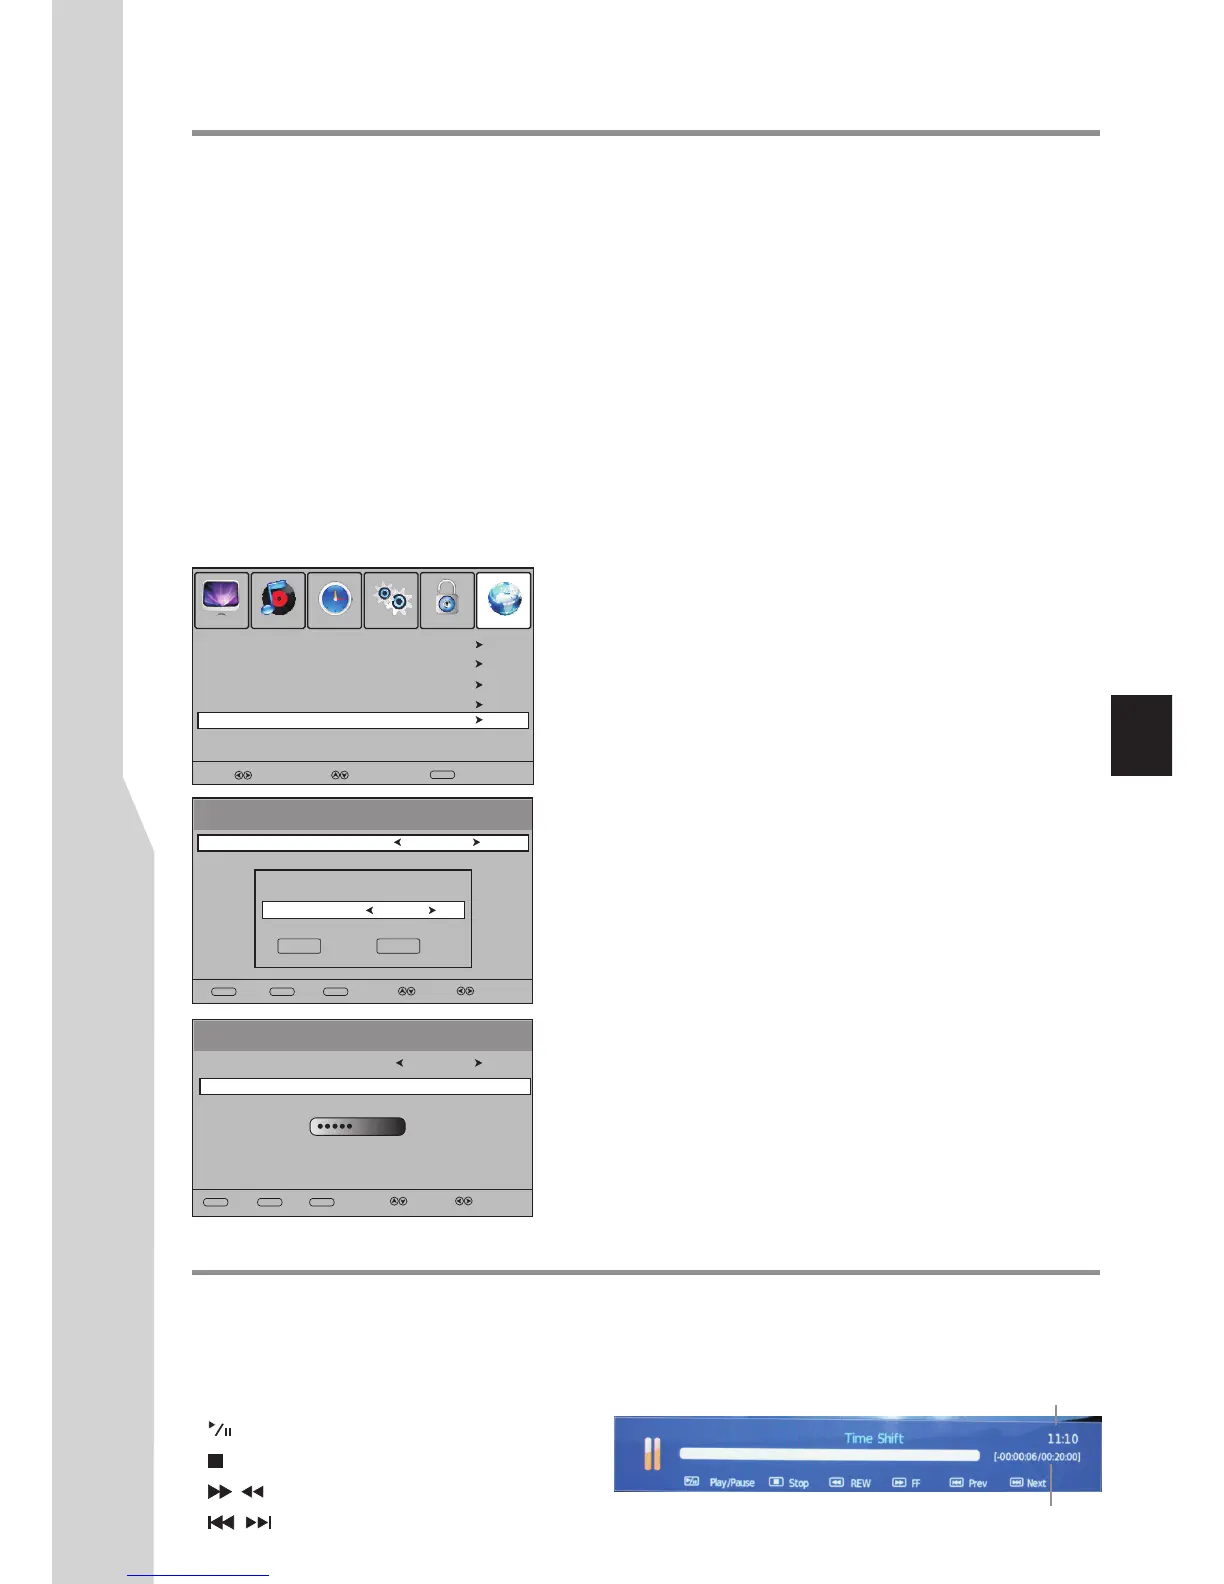
PICTURE SOUND TIME OPTION LOCK CHANNEL
File System
Select Disk
USB Disk
Speed
2112KB/s
Select Disk
Checking File System before Time Shift
Time Shift function is the recording of DTV programme to an external memory device (portable hard disk or USB
device) to be viewed at a later time more convenient to the user. But before operation you must pay attention to the
following notes:
! Before Time Shift, you need to check the File System successfully.
! During Time Shift, do not unplug the external memory device from the TV. When the memory device is removed then
the data is lost.
! When Time Shifting, a directory will be automatically created at the external memory device to temporarily save the data.
! The data cannot be played on any other product or computer.
! The recorder once in time shift mode will continue recording what you are watching and overwrite any information already
on the memory device.
! If malfunction, then information already on the memory device may lose. So please back up your memory device data.
! The FAT32 file system is supported. So it is recommended to use external memory device in FAT32 file system, otherwise a
disk formatting is required and all data will lose.
! The external memory device must have enough free space (at least 512MB) for time shift. Recording capacity varies
depending on the memory device’s file system, the maximum capacity is 8GB while for the FAT32 file system the maximum
capacity is 4GB.
To check File System before Time Shift
1
Connect your USB device or portable hard disk to the USB port on
TV side firstly.
2
Navigate to CHANNEL-File System menu to check file system.
(Press MENU, then use 3or4to select CHANNEL menu, press
6 to access. Press 5or6 to highlight File System, then press 4to
access.) Now do the following to check file system.
A. Select Disk:
From File System menu, highlight Select Disk, press 4to access.
Use 3or4to select a disk, then move the highlight to OK box and
press OK to confirm. (To cancel, select EXIT to exit).
B. Check File System
From File System menu, highlight Check File System, press 4to
begin checking. It may take several minutes, please wait. When
finished, if SUCCESS appears at the Check File System line then
you can start time shift function.
(At File System menu bottom screen, USB Disk state and speed
information will appear, they can not be adjusted)
Making use of Time Shift function – digital only –
After successful File System check, you can use Time Shift function now. Press T.SHIFT button to start time shifting.
The live programme stops at the current state. At the bottom screen, an information box will appear for your help.
After some time, this information box will be minimized in size and glitter on the screen. To restore, please press OK.
Now you can use below buttons to operate:
! : PLAY/PAUSE button
! : STOP button.
! / : Fast forward/fast reverse
! / : Previous/next
29
Current time
Duration
C:
Start
Select Disk
OK EXIT
Disk C:
Check File System
SUCCESS
EXIT
EXIT
OK
OK
Pass
HD support
SELECT
MOVE
MENU
RETURN
EXIT
EXIT
OK
OK
C:
File System
Note:
! If your external memory device is not in FAT32 file system, then during
the process of File System checking, a message appears prompting you to
start to create disk partition. If you want to proceed, operate
according to on-screen instructions to format the disk.
! After File System checking, if “SD Fail” appears on the screen, that
indicates this external memory device is not suitable to be used for time
shift, please replace with other one and try it again. If “SD Safe” appears,
that means this external device is suitable to time shift SD program, but
not HD program. If “HD Support” appears, then both SD and HD
programs are OK.
File System
 Loading...