ADJUSTMENT PRECAUTIONS
n SERVICE MODE
This model’s settings are adjusted in two different ways: through the
PC
bus control and in the conventional analog
manner. The adjustment via the
PC
bus control includes preset-only items and variable data.
1. Calling the service mode by the microprocessor
@
Set the switch S1006 to the service mode position, and the microprocessor is put in the service mode
(adjustment through the
PC
bus control).
@ Press the
CH
UP/DOWN keys on the remote controller to select the modes one by one.
@
Press the CH UP/DOWN keys on the remote controller to select the modes in the order opposite to the
above step
0.
@
Using the VOLUME UP/DOWN keys on the remote controller, the data can be modified.
@ Set the switch
S1006
to the normal mode (OFF) position, and the microprocessor is put out of the
service mode.
2. Factory presettings
@
Set the switch S1006 to the service mode position and turn on the main power switch. Initial values are
automatically preset only when a new
E2PROM
is used (judgment with the first 4 bytes).
@
The initial data are preset as listed on pages 4 and 5.
@
Keep in mind that some settings should be modified, and the others should remain as preset.
Once the chassis has been put together, be sure to set the switch S1006 to the service mode position
first and then turn on the main power switch (see the step
2.-@
above). Turning on the power without
initializing the E*PROM may cause a flow of excess beam current.
c4.3
3. The accompanying memory map (12-page document for the RH-iX2938CE) is for your
reference.
3-1
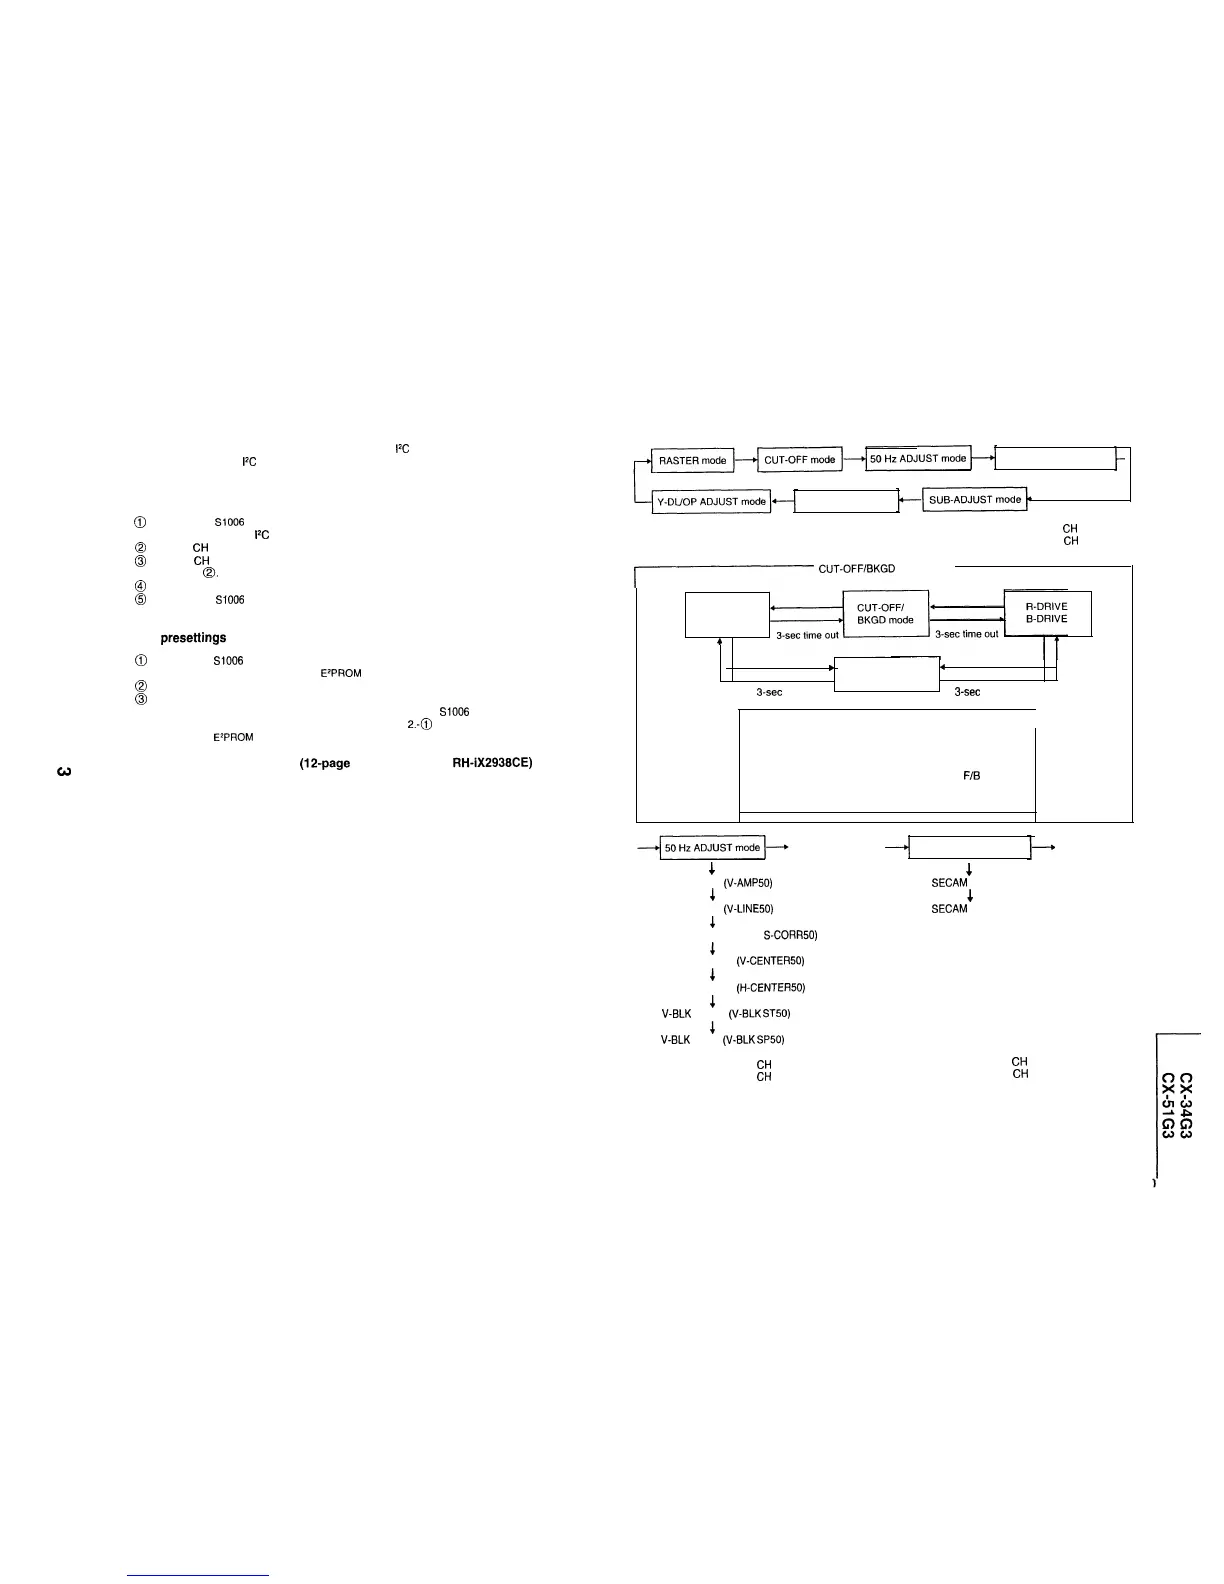
(1) Press the specific keys to change the modes as follows.
COLOUR ADJUST mode
60 Hz ADJUST mode
In the direction of arrow :
CH
DOWN key
In the opposite direction :
CH
UP key
{
CUT-OFF/BKGD
mode
R-CUT OFF
G-CUT OFF
B-CUT OFF
4
,
b
4
HORIZONTAL mode
3-set
time out
3-set time out
KEY
R-CUT OFF
G-CUT OFF
B-CUT OFF
R-DRIVE
B-DRIVE
HORIZONTAL mode
UP
DOWN
1
KEY
4
KEY
2
KEY
5
KEY
3
KEY
6
KEY
7 KEY
F/B
KEY
8
KEY
0
KEY
9 KEY
COLOUR ADJUST mode
4
V-AMP 50 Hz
(V-AMPSO)
4
V-LINE 50 Hz
(V-LINE50)
4
S-CORRECT 50 Hz (V
S-CORRSO)
4
V-PHASE 50 Hz
(V-CENTER50)
4
H-PHASE 50 Hz (H-CENTER50)
4
V-BLK
START
(V-BLK
ST50)
4
V-BLK
STOP
(V-BLK
SP50)
4
SECAM
R-Y (R-Y)
4
SECAM
B-Y (R-Y)
In the direction of arrow :
CH
DOWN key
In the direction of arrow :
CH
DOWN key
In the opposite direction : CH UP key
In the opposite direction :
CH
UP key
l
The characters in parentheses appear on the on-screen display.
3-2
 Loading...