15
While TV is in standby mode:
• short press of control stick - Power On
While watching TV:
• RIGHT/LEFT – volume up/volume down
• UP/DOWN – changes channel up/down
• long press UP (or DOWN) – Displays Sources/Inputs menu
• short press – Displays Menu
• long press – Standby Power O
While in menu:
• RIGHT/LEFT/UP/DOWN – navigation of cursor in on-screen menus
• short press – OK/Con rm selected item
long press – Back to previous menu
Choosing Mode Input/Source
To switch between the di erent input/connections.
a) Using the buttons on the remote control:
1. Press [SOURCE] - The source menu will appear.
2. Press [▲] or [▼] to select the input you require.
3. Press [OK].
b) Using the TV control stick:
1. Press control stick UP (or DOWN) for few seconds to enter SOURCES
menu.
2. With control stick choose the input/source you require.
3. By short press of control stick to center, you will change input/
source to the one selected.
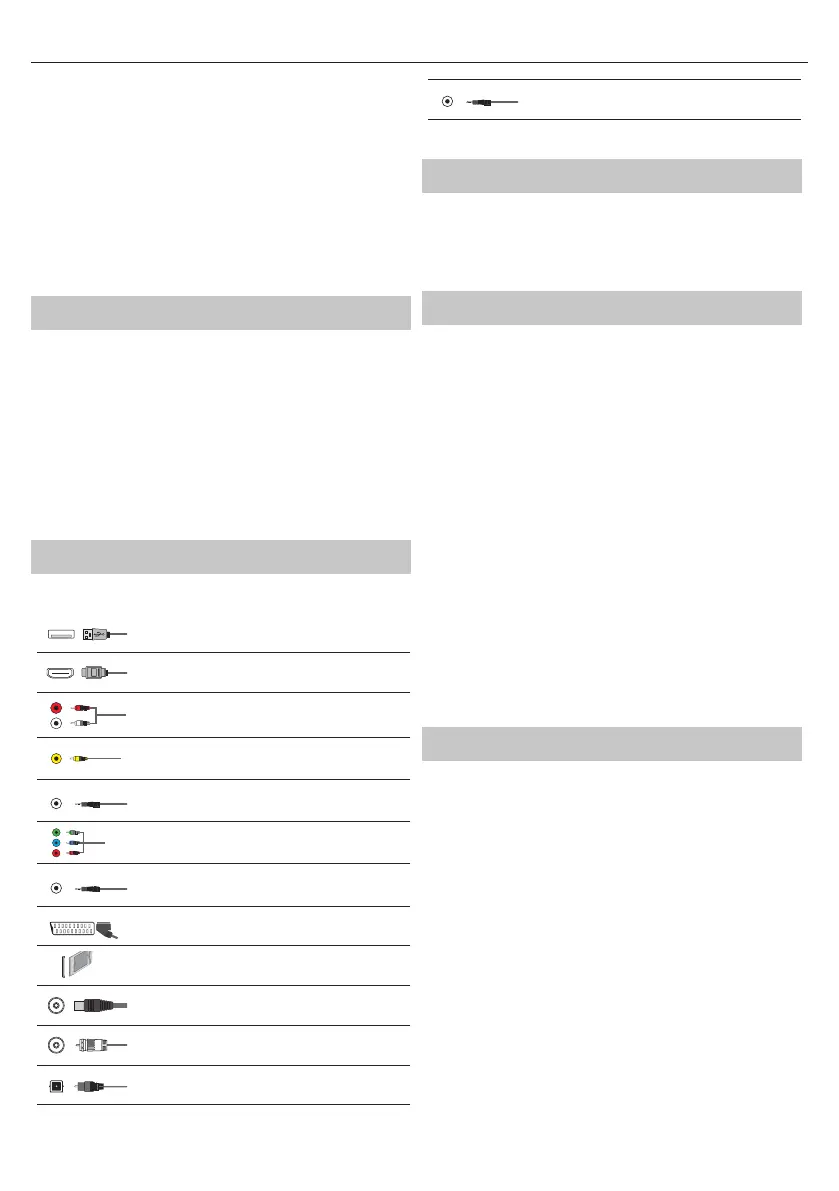
Connections
Please see the exact connectors layout on the page 20.
USB
USB-Input 1, 2
HDMI 1, 2, 3 in
HDMI-Input 1, 2, 3
L
R
W R
R/L - Video & YPbPr audio In*
Component / Video audio input
Y
Video (CVBS)*
VIDEO input
Mini AV*
Video Input & Component/Video audio input
R
G
B
Component / YPbPr*
Component HD Input
Mini YPbPr*
Mini Component HD Input
SCART
SCART-Input
CI Card IN
CI input
RF In
RF / TV Aerial Input
Sat In*
Satellite Input
Digital Optical Audio Out
Digital optical output
HEADPHONES
3.5mm Headphone output
* - Only on supported devices
TV Menu navigation
To access this menu, press [MENU] button on the remote control. To enter
amenu press [OK]. If you wish to make changes to any of the default
settings, use the scroll (▲/▼/◄/►) buttons. To con rm any settings press
[OK] button. To exit this menu at anytime, press [EXIT] button.
Channel
Auto Tuning - Allows you to retune the television for all digital
channels, digital radio stations and analogue channels.
Analogue Manual Tuning - Allows you to
manually tune your analogue signal.
Digital Manual Tuning - Allows you to manually tune your digital signal.
Channel Edit - Allows you to delete, skip and add favourite channels.
Red Button - delete selected channel.
Green Button - rename selected channel.
Yellow Button - Move selected channel. Go with cursor to
channel, which you wish to move to di erent position, then
press YELLOW button. Now move selected channel with UP/
DOWN arrow to desired position and press YELLOW button
again to con rm its new position in channel list.
Blue Button - Skip selected channel. Channels selected to Skip
will not be displayed while pressing CH+ or CH- buttons.
Schedule List - Lists your programme reminders.
Signal Information - Information about DVB signal.
CI Information - Pay per view services require a“smartcard” to be
inserted into the TV. If you subscribe to apay per view service the
provider will issue you with a‘CAM’ and a“smartcard”. The CAM can
then be inserted into the COMMON INTERFACE PORT (CI Card In).
Satellite Setup - This menu is only available in DVB-S2 mode. You can
select the type of satellite, your transponder and your LNB type, etc.
Picture
Picture Mode - Choose from the following presets.
Standard - Default settings
Dynamic - Recommended settings for fast moving pictures
Mild - Set to be lighter in colour and less bright
Personal - Lets you manually alter all the settings
Eco - Consume 15% less energy.
Contrast - Switch the balance between black and white.
Brightness - Increase or decrease the brightness of the picture.
Colour - Increases the colour from black and white.
Tint - Lets you increase or decrease the level of tint
within the picture (for NTSC signal only)
Sharpness - Increase or decrease the sharpness of the picture.
Colour Temperature - Choose from the following presets.
Normal - Default settings
Warm - Increases red within the picture
Cold - Increases blue within the picture
Noise Reduction - Filters and reduces the
noise (interference) of the picture
Aspect Ratio - Picture format varies depending on the channel/broadcast.
There are a number of di erent options to best meet your needs.
Auto - Automatically displays the best picture format.
So the picture is in the correct position. May have
 Loading...