DTV
1
Press MENU and the MENU screen displays.
2
Press
c
/
d
to select “Programme setup”.
3
Press
a
/
b
to select “Digital setting”, and then
press ENTER.
4
Press
a
/
b
to select “Signal information”, and
then press ENTER.
• The “Signal information” screen will appear.
Auto installation
You can run auto installation again, even after setting
up the preset channels.
1
Press MENU and the MENU screen displays.
2
Press
c
/
d
to select “Programme setup”.
3
Press
a
/
b
to select “Auto installation”, and then
press ENTER.
If you have already set the password, enter it here.
• See page 7 for setting a password.
4
Press
a
/
b
to select your country channels listed
on the screen, and then press ENTER.
Press
a
/
b
to select the desired language, and
then press ENTER.
*
Press
a
/
b
to select “DTV”, “ATV” or
“DTV + ATV”, and then press ENTER.
You do not need to do anything during the auto
search. Press MENU to exit.
*
NOTE
• In the setting of some country, selecting of “DTV”, “ATV” or
“DTV + ATV” may not be shown.
• A region or service selection screen may display depending
on the country settings or cable providers selections. Follow
the screen prompts to make the selections.
Turning the TV on/off
Turning on/off the power
• To turn on the power
Press POWER on the TV. (After a few seconds, an image
appears with sound.)
• To turn off the power
Switch it off by pressing POWER on the TV.
Standby mode
• To standby mode
If the TV is switched on, you can switch it to standby by
pressing POWER on the remote control.
• Switching on from standby
From standby, press POWER on the remote control.
NOTE
• If you are not going to use this TV for a long period of time,
be sure to remove the AC cord from the AC outlet.
• Minor power is consumed when the unit is in standby mode.
Initial auto installation
When the TV powers on for the first time after
purchase, the initial auto installation wizard appears.
Follow the menu and make the necessary settings
one after another.
1
Press POWER on the TV.
• The initial auto installation wizard appears.
2
Press
a
/
b
to select your country channels listed
on the screen, and then press ENTER.
Press
a
/
b
to select the desired language, and
then press ENTER.
Press
a
/
b
to select “HOME” or “STORE”, and
then press ENTER.
HOME:
• “STANDARD” will be the default value for the “AV mode”
setting.
STORE:
• “DYNAMIC (FIXED)” will be the default value for the
“AV mode” setting. If the “AV mode” is changed, the TV
will automatically switch back to “DYNAMIC (FIXED)”
when there is no further change to TV setting for 30
minutes.
• The confi rmation screen appears only when selecting
“STORE”. Press
a
/
b
to select “Yes” or “No”.
• To change the STORE mode to HOME mode, please
refer to page 9 to reset the unit.
*
Press
a
/
b
to select “DTV”, “ATV” or
“DTV + ATV”, and then press ENTER.
• Auto installation will be executed.
• You do not need to do anything during the auto search.
• If you select “Others” country, some of DTV channel
may not tune properly.
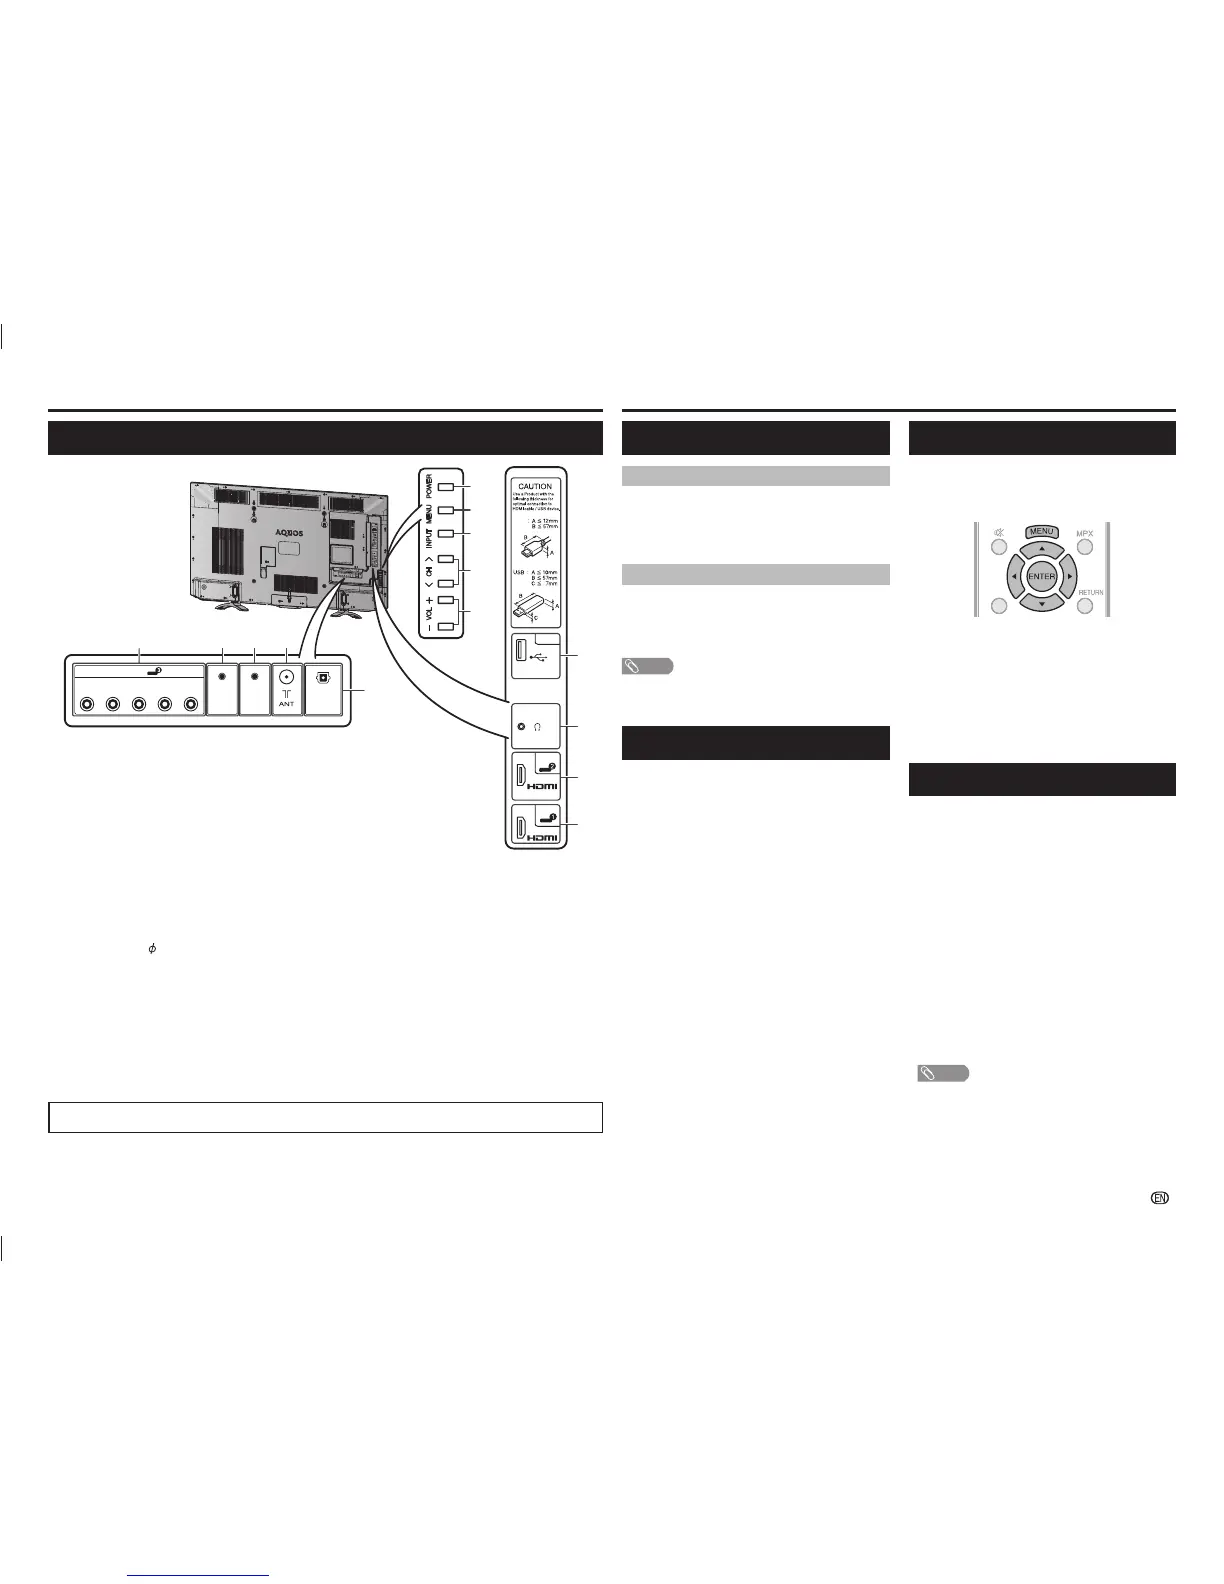
Part names and functions
TV (Rear)
USB
DC5V 0.5A
DIGITAL
A
U
DIO
O
UTP
UT
AUDIO
OUT
(
R/L)
S
E
RV
I
C
E
ONLY
HD
M
I
1
HDM
I 2
MHL
(
D
C5
V
9
00mA
)
ARS
COMP
O
N
E
NT/AV
IN
P
UT
INPUT
3
L - A
U
D
IO
- R
P
R
(C
R
)
P
B
(C
B
)
V
I
D
EO/Y
HDM
I 2
14 13 12 11
10
DIGITAL
AUDIO
OUTPUT
AUDIO
OUT
(R/L)
SERVICE
ONLY
COMPONENT/AV INPUT
INPUT 3
L - AUDIO - R
P
R
(C
R
)
P
B
(C
B
)
VIDEO/Y
7
6
8
9
HDMI 1
ARC
USB
DC5V 1.5A
HDMI 2
MHL
(DC5V 900mA)
1
2
3
4
5
HDMI
1 POWER (On/Off) button
2 MENU button
3 INPUT button
4 Channel up (
r
)/down (
s
) buttons
5 Volume up (
e
)/down (
f
) buttons
6 USB terminal
7 Headphone jack (
3.5 mm)
• The speakers do not output volume when
headphones are plugged in.
8 INPUT 2 (HDMI/MHL) terminal
9 INPUT 1 (HDMI/ARC) terminal
10 DIGITAL AUDIO OUTPUT terminal
11 Antenna input terminal
12 SERVICE ONLY terminal*
13 AUDIO OUT terminal
14 INPUT 3 terminals
* Usually do not connect anything to this terminal as it is reserved only for service personnel.
• The illustrations in this operation manual are for explanation purposes and may vary slightly from the actual operations.
• The illustrations used throughout this manual are based on LC-50LE275X.
LC-505865LE275X_EN_G446.indd 5LC-505865LE275X_EN_G446.indd 5 5/18/2015 5:44:46 PM5/18/2015 5:44:46 PM
 Loading...