R-4H5.5
R-4X55
R-PX55B
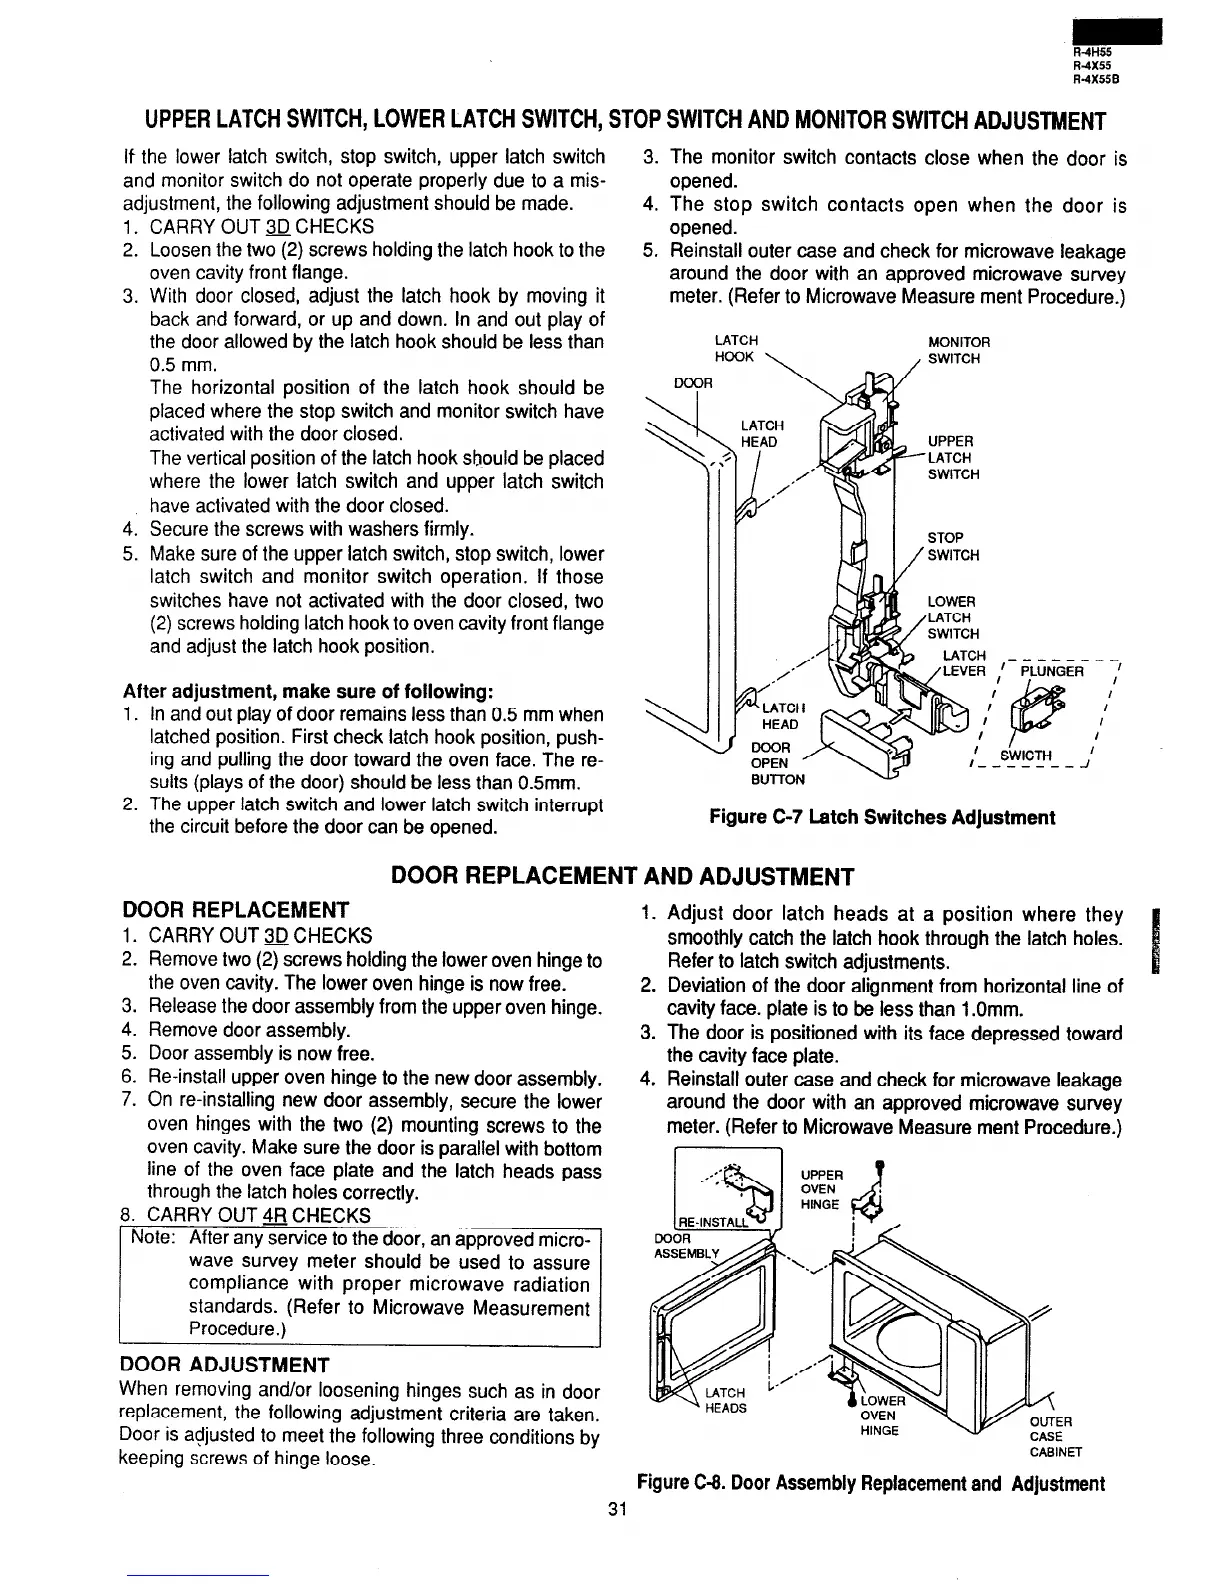
UPPER LATCH SWITCH, LOWER LATCH SWITCH, STOP SWITCH AND MONITOR SWITCH ADJUSTMENT
If the lower latch switch, stop switch, upper latch switch
and monitor switch do not operate properly due to a mis-
adjustment, the following adjustment should be made.
1.
2.
3.
4.
5.
CARRY OUT 3D CH&&
Loosen the two (2) screws holding the latch hook to the
oven cavity front flange.
With door closed, adjust the latch hook by moving it
back and forward, or up and down. In and out play of
the door allowed by the latch hook should be less than
0.5 mm.
The horizontal position of the latch hook should be
placed where the stop switch and monitor switch have
activated with the door closed.
The vertical position of the latch hook should be placed
where the lower latch switch and upper latch switch
have activated with the door closed.
Secure the screws with washers firmly.
Make sure of the upper latch switch, stop switch, lower
latch switch and monitor switch operation. If those
switches have not activated with the door closed, two
(2) screws holding latch hook to oven cavity front flange
and adjust the latch hook position.
After adjustment, make sure of following:
1. In and out play of door remains less than 0.5 mm when
latched position. First check latch hook position, push-
ing and pulling the door toward the oven face. The re-
sults (plays of the door) should be less than 0.5mm.
2. The upper latch switch and lower latch switch interrupt
the circuit before the door can be opened.
3. The monitor switch contacts close when the door is
opened.
4. The stop switch contacts open when the door is
opened.
5. Reinstall outer case and check for microwave leakage
around the door with an approved microwave survey
meter. (Refer to Microwave Measure ment Procedure.)
LATCH
MONITOR
HOOK \
, SWITCH
LEJ
V
SWITCH
Figure C-7 Latch Switches Adjustment
DOOR REPLACEMENT AND ADJUSTMENT
DOOR REPLACEMENT
1. CARRY OUT 3D CHECKS
2. Remove two (2) screws holding the lower oven hinge to
the oven cavity. The lower oven hinge is now free.
3. Release the door assembly from the upper oven hinge.
4. Remove door assembly.
5. Door assembly is now free.
6. Re-install upper oven hinge to the new door assembly.
7. On re-installing new door assembly, secure the lower
oven hinges with the two (2) mounting screws to the
oven cavity. Make sure the door is parallel with bottom
line of the oven face plate and the latch heads pass
through the latch holes correctly.
DOOR ADJUSTMENT
When removing and/or loosening hinges such as in door
replacement, the following adjustment criteria are taken.
Door is agjusted to meet the following three conditions by
keeping screws of hinge loose.
LOWER
LATCH
SWITCH
LATCH ____----
1. Adjust door latch heads at a position where they
smoothly catch the latch hook through the latch holes.
Refer to latch switch adjustments.
2. Deviation of the door alignment from horizontal line of
cavity face. plate is to be less than 1 .Omm.
3. The door is positioned with its face depressed toward
the cavity face plate.
4. Reinstall outer case and check for microwave leakage
around the door with an approved microwave survey
meter. (Refer to Microwave Measure ment Procedure.)
r
ER
E
CABINET
Figure C-8. Door Assembly Replacement and Adjustment
31
 Loading...