EasyManua.ls Logo

Skil 1810 User Manual

Skil 1810
52 pages
To Next Page IconTo Next Page
To Previous Page IconTo Previous Page
Page #42 background imageLoading...
Page #42 background image
-42-
INSTALACIÓN DEL RAS140
ADAPTADOR DE GUÍAS DE PLANTILLA
(no incluido, disponible como accesorio)
Coloque el adaptador de guías de plantilla sobre los
agujeros ubicados en el centro de la subbase y alinee
los dos agujeros roscados ubicados en la parte inferior
del adaptador con los agujeros avellanados ubicados
en la subbase. Sujete el adaptador con los tornillos
suministrados (Fig. 9).
Las fresadoras Skil están diseñadas para brindar
velocidad, precisión y conveniencia en la realización de
trabajo de ebanistería, fresado, estriado, ribeteado,
corte de molduras ncavas, colas de milano, etc.
Estas fresadoras le permitin realizar trabajo de
incrustación, bordes decorativos y muchos tipos de
tallado especial.
AJUSTE DE PROFUNDIDAD CON POMO
DE AJUSTE FINO DE LA BASE FIJA
El pomo ascendente de ajuste fino de la profundidad
permite realizar ajustes precisos de la altura de la broca
en la fresadora.
Para utilizar el dispositivo de ajuste fino, suelte la
palanca de fijacn de la base, tire hacia arriba del
pomo de ajuste fino y gire dicho pomo en el sentido de
las agujas del reloj para bajar la broca, o en sentido
contrario al de las agujas del reloj para subirla (Fig. 2).
Tenga presente que una vuelta completa del pomo
subirá o bajará la broca aproximadamente 1/16 de
pulgada. Después de realizar ajustes de profundidad,
fije de nuevo el motor.
NOTA: Todos los ajustes de profundidad se deben
realizar teniendo suelta la palanca de fijación de la base.
CORTES PROFUNDOS
Para realizar cortes s profundos, haga varios cortes
progresivamente más profundos comenzando a una
profundidad y haciendo luego varias pasadas
subsiguientes, aumentado la profundidad de corte con
cada pasada. Para asegurarse de que los ajustes de
profundidad sean los deseados, es posible que quiera
hacer cortes de prueba en material de desecho antes de
comenzar el trabajo.
Instrucciones de funcionamiento
DEFLECTOR DE VIRUTAS
Use siempre protección de los
ojos. El deflector de virutas no
está disado para utilizarse como protector de
seguridad.
Los deflectores de virutas ayudan a mantener el polvo y
las virutas alejados de la cara del operador. No detienen
objetos de tamaño mayor que el polvo que es lanzado
por la broca.
Para quitar el protector antivirutas de las bases,
presione hacia adentro sobre el deflector hasta que
éste se suelte de la base y quítelo. Para instalar el
deflector, coquelo en la posición correcta de la
manera que se muestra en la Fig. 10. Luego, flexione
los lados del deflector mientras empuja hasta que el
deflector se acople a presión en su sitio.
A
DAPTADOR
D
E GUÍAS DE
PLANTILLA
TORNILLOS DE
MONTAJE
B
ASE DE LA
FRESADORA
F
IG. 9
ADVERTENCIA
!
DEFLECTOR
DE VIRUTAS
FIG. 10
SM 1619X03874 04-09:SM 1619X03874 04-09 4/20/09 9:45 AM Page 42
Question and Answer IconNeed help?

Do you have a question about the Skil 1810 and is the answer not in the manual?

Skil 1810 Specifications

General IconGeneral
BrandSkil
Model1810
CategoryNetwork Router
LanguageEnglish

Summary

Operating and Safety Instructions

General Power Tool Safety Warnings

Work Area Safety

Guidelines for maintaining a safe and organized workspace.

Electrical Safety

Critical instructions for preventing electric shock and hazards.

Personal Safety

User precautions for alertness, protection, and avoiding injury.

Additional Safety Warnings

GFCI and Personal Protection Devices

Using GFCI protection and personal gear to enhance safety.

Risk of Injury to User

Warnings on power cord servicing and exposure to hazardous chemicals.

Safety Rules for Routers

Workpiece Handling and Securing

Proper methods for securing workpieces and ensuring a stable work area.

Tool Operation and Control

Guidelines for safe tool handling, startup, and feed direction.

Bit and Accessory Safety

Precautions regarding router bits, their condition, and usage.

Personal Protective Equipment

Recommendations for safety goggles and dust masks.

Symbols

Functional Description and Specifications

Assembly

Installing a Router Bit

Step-by-step guide for inserting a router bit into the tool.

Removing the Router Bit

Procedure for safely detaching a router bit from the tool.

Collet Chuck Care

Maintenance instructions for the collet chuck assembly.

Removing Motor From Base

Steps to detach the motor unit from the router base.

Installing Motor In Base

Steps to attach the motor unit to the router base.

Installing RAS140 Template Guide Adapter

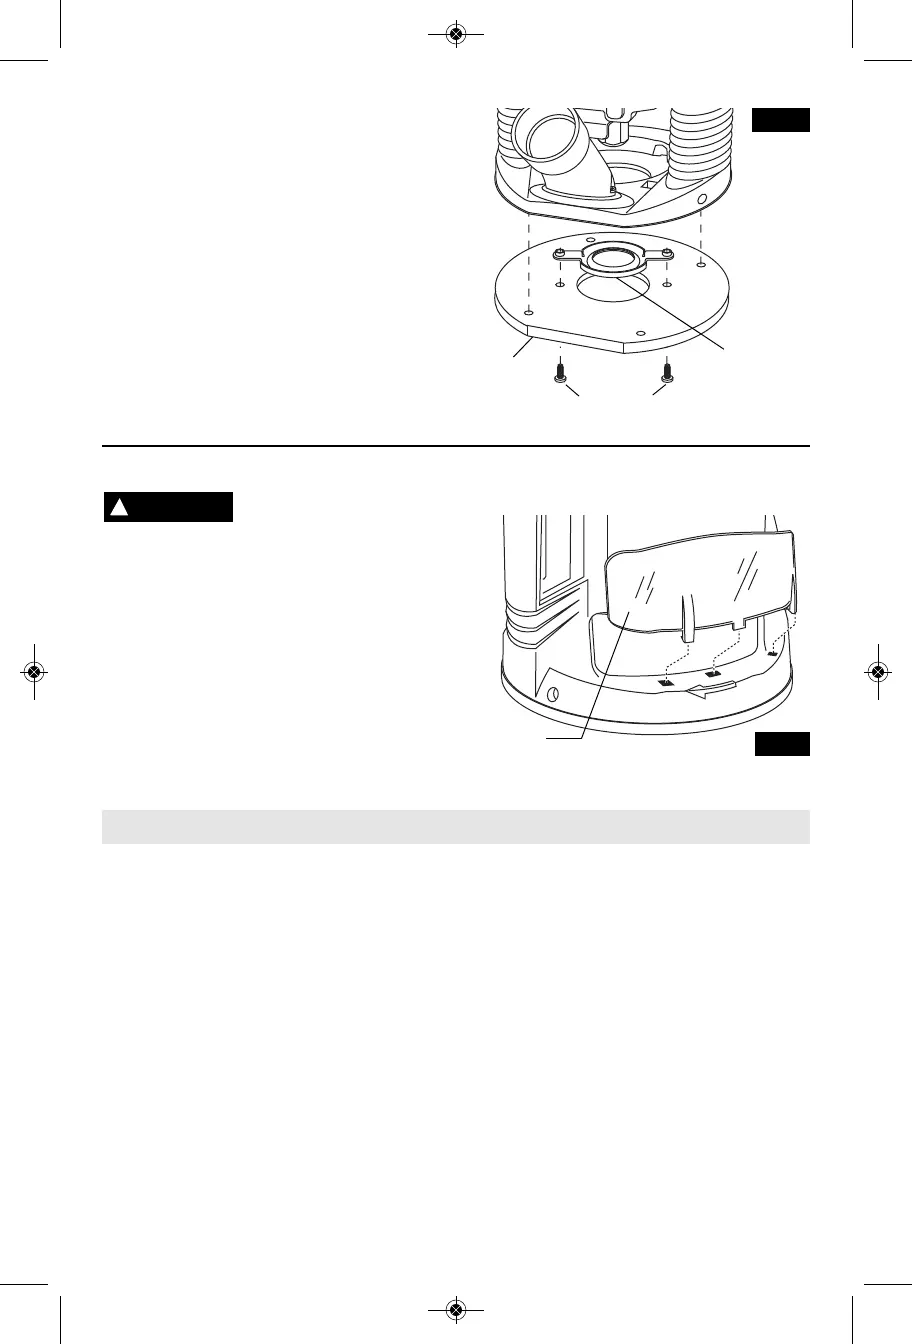
Guide for attaching the template guide adapter accessory.

Chip Deflector

Information on the chip deflector's function and attachment.

Operating Instructions

Depth Adjustment with Fixed Base Fine Adjustment Knob

How to precisely adjust depth on fixed base models using the knob.

Deep Cuts

Technique for making deep cuts progressively in multiple passes.

Depth Adjustment with Plunge Base Plunging Action

Using the plunge feature for controlled depth adjustment.

Depth Adjustment with Plunge Base Fine Adjustment Knob

Fine-tuning depth settings on plunge base models.

Trigger Switch and 'Lock-On' Button

Operation of the power switch and the continuous run lock-on feature.

Site-Light™

Explanation and use of the integrated tool illumination feature.

Feeding the Router

Guidance on correct direction and technique for feeding the router into material.

Rate of Feed

Recommended feed rates based on material type and bit size.

Guiding the Router

Methods and techniques for guiding the router for precise cuts.

Straight and Circular Edge Guide

Using the edge guide accessory for making curved and straight cuts.

Pilot Tipped and Bearing Guide Bits

Information on specific types of router bits and their pilot features.

Templates

Using template patterns for duplicating designs and achieving uniform results.

Template Guides

How to use template guides with adapters for precise routing.

Router Dust Collection

Instructions for attaching dust collection accessories to the router.

Maintenance

Service

Recommendations for professional tool servicing and repairs.

Tool Lubrication

Information on tool lubrication needs and greasing procedures.

Carbon Brushes

Guidance on examining and replacing carbon brushes for motor efficiency.

Bearings

Information on bearing replacement based on usage hours or noise.

Cleaning

Safe methods and precautions for cleaning the power tool.

Accessories

Trouble Shooting

Tool Will Not Start

Reasons and solutions for the tool failing to power on.

Tool Does Not Come Up to Speed

Causes and fixes for the tool not reaching its intended operating speed.

Accessory Binds, Stalls Motor, or Kicks Back When Routing

Troubleshooting binding, stalling, or kickback issues during operation.

Limited Warranty

Related product manuals