3
Application
Bus custom-t door loudspeaker
with bus call button matrix for instal-
lation in the customer’s intercom
compartments, door constructions,
letterboxes, etc.
Up to 12 of the customer’s call but-
tons can be directly connected to
the BRMA050-… bus call button
matrix.
Performance features:
• Loudspeaker, voice volume can be
adjusted
• Durable electret microphone
• Potential-free work contact for
door release, can be controlled
without additional wiring via existing
bus line
• Integrated camera actuation
• Universal fastening options, when
used with the ZJ051-… grille, it can
be screwed onto this directly
1BTLE050-… corresponds to
2system users.
Electrical voltage
Mounting, installation and servicing
work on electrical devices may only
be performed by a suitably qualied
electrician.
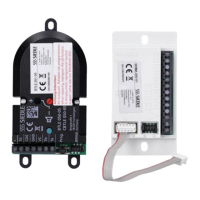
Scope of supply BTLE 051-…
• Bus custom-t door loudspeaker
BTLE050-…
• Bus call button matrix
BRMA050-…
• this product information
Scope of supply BTLE 050-…
• Bus custom-t door loudspeaker
BTLE050-…
• This product information
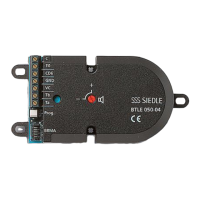
Mounting
1a Dimensions of the BTLE050-…
1b Position of microphone (Mic) and
loudspeaker (Ls)
1c Dimensions of the bus call button
matrix BRMA050-… The call button
matrix can be xed in the housing
using double-sided adhesive tape
or screws.
English
2 Mounting in letterbox systems
with intercom compartment. The
front panel must be detachable or
alternatively access afforded from
behind. Mount the bus custom-
t door loudspeaker behind the
intercom opening (70x40mm or
larger) using the fastening tabs or
holes. If fastened centrally, the tabs
can be broken off to save space.
Remarks
• The microphone and loud-
speaker have to lie ush with
the intercom louvre to prevent
feedback.
• The BTLE050-… must not be laid
on the housing oor and must be
protected by the user where neces-
sary against the ingress of water.
Mounting with louvre ZJ051-01
3 Breakthrough in the front panel,
WxH 71x50mm
4 Insert the louvre and fasten.
5 At the BTLE050-… replace the
two fastening screws 2.9x22mm
by screws 2.9x16mm. These are
enclosed with the louvre. Fasten the
BTLE050-… to the louvre.
6 Press the Electret microphone tight
up against the front panel.
Installation
Installation, commissioning and pro-
gramming are described in the rel-
evant system manual and enclosed
with the line rectier/server.
Commissioning
7 Volume control
Using the potentiometer, it is pos-
sible to change the volume to the
door. If acoustic feedback occurs,
the volume of the door loudspeaker
must be turned down.
8 The “Prog.” button is used to acti-
vate the programming mode.
Programming is described in the
system manual In-Home bus.
The programming mode can also
be activated by pressing the top bell
button for 4seconds.
9 Connection of the BRMA050-…
to BTLE050-…
A maximum of 14BRMA050-…
units can be connected to one
BTLE050-…
Specications BTLE 051-…
Contact type: 2contact 15VAC,
30VDC, 2A
Switching time: 3sec
Protection system: Dependent on
the mounting conditions
Dimensions (mm) WxHxD:
BTLE050-04124x60x31,
BRMA050-0153x100x17
Dimensions housing (mm)
WxHxD: 100x60x31
Specications BTLE 050-…
Protection system: Dependent on
the mounting conditions
Dimensions (mm) WxHxD:
124x60x31
Dimensions housing (mm)
WxHxD: 100x60x31
 Loading...