MAINTENANCE AND STORAGE 13
EN
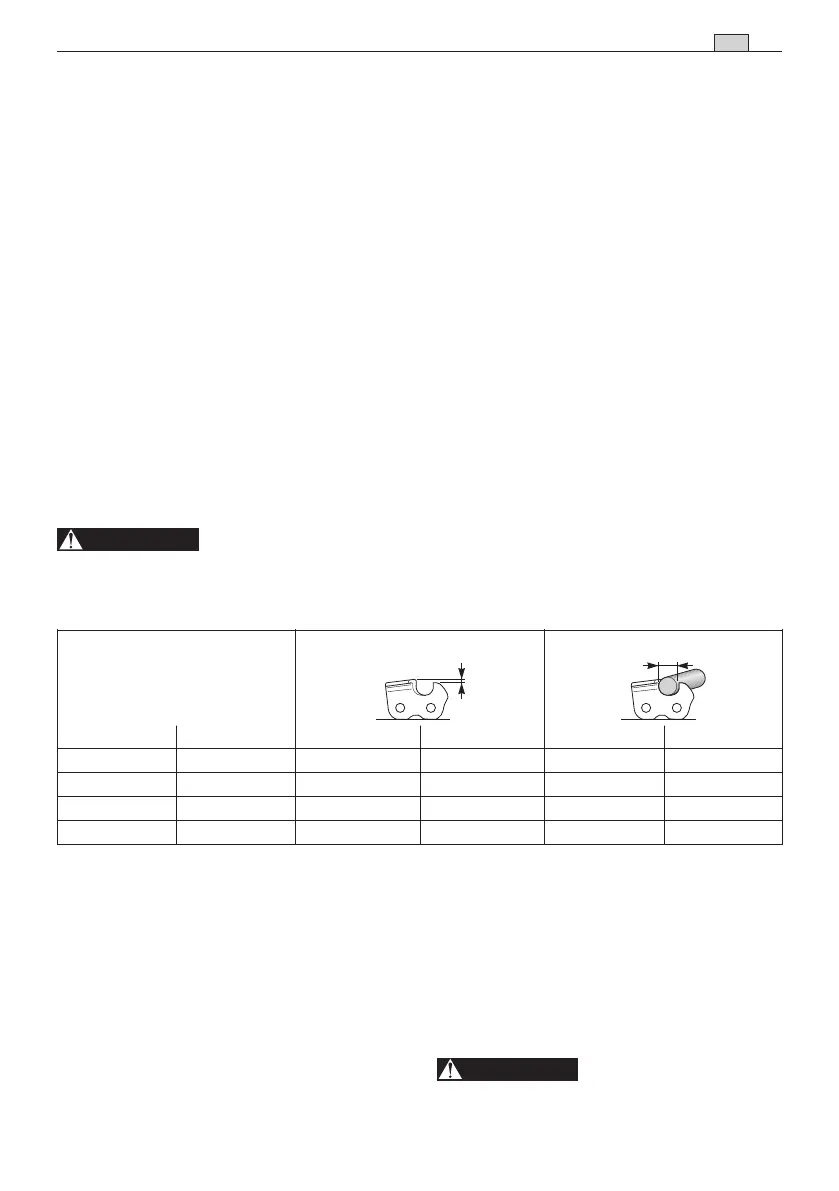
Chain maintenance table
The table gives the sharpening data for dierent types of chains, but this
does not mean you can use chains other than those approved and listed in the “Correct bar
and chain combination table”.
WARNING!
Chain pitch Limiter tooth level (a) File diameter (d)
inches mm inches mm inches mm
3/8 Mini 9.32 0.018 0.45 5/32 4.0
0.325 8.25 0.026 0.65 3/16 4.8
3/8 9.32 0.026 0.65 13/64 5.2
0.404 10.26 0.031 0.80 7/32 5.6
same way (right or left).
– Turn the bar over in the vice and repeat on all the
other cutting edges.
– Check that the limiter tooth does not stick out
further than the inspection instrument and le
any projecting parts with a at le, rounding o
the edge.
– After sharpening, remove all traces of ling and
dust and lubricate the chain in an oil bath.
Replace the chain whenever:
– The length of the cutting edges reduces to 5
mm or less;
– There is too much play between the links and
the rivets.
7. BAR MAINTENANCE (Fig. 22)
To avoid asymmetrical wear on the bar, make sure
it is turned over periodically.
To keep the bar in perfect working order, proceed
as follows:
– Grease the bearings on the nose sprocket (if
pre sent) with the syringe.
– Clean the bar groove with the scraper.
– Clean the lubrication holes.
– With a at le, remove burr from the edges and
level o the guides.
Replace the bar whenever:
– the groove is not as deep as the height of the
drive links (which must never touch the bottom);
– the inside of the guide is worn enough to make
the chain lean to one side.
8. EMPTYING AND FLUSHING
THE OIL TANK
(Only if organic oil is used for the chain)
The use of some types of organic oil may cause
deposits or fouling after a certain period of use.
If this happens, before leaving the machine unu-
sed for a long period of time:
– disassemble the chain and the bar;
– empty the oil tank;
– pour a specic liquid cleanser in the tank, to
about half the maximum level;
– close the tank cap and operate the machine until
all the cleanser runs out.
Remember to ll with oil, before using the machine
again.
9. ELECTRIC CABLES
Check the condition of the
electric cables regularly and replace them if
they are worn or their insulation looks dam-
aged.
WARNING!
 Loading...