7
suitable clothing, gloves and glasses
before performing any maintenance.
• The frequency and type of procedures
are outlined in the "Maintenance table".
• The use of non-original parts and accessories
could have negative eects on machine
operation and safety. The manufacturer
declines any responsibility for damage
or injury caused by said products.
• Original parts are supplied by assistance
shops and authorised dealers.
IMPORTANT All maintenance and adjustment
oper
ations that are not described in this manual must
be carried out by your Dealer or by a Specialised Centre.
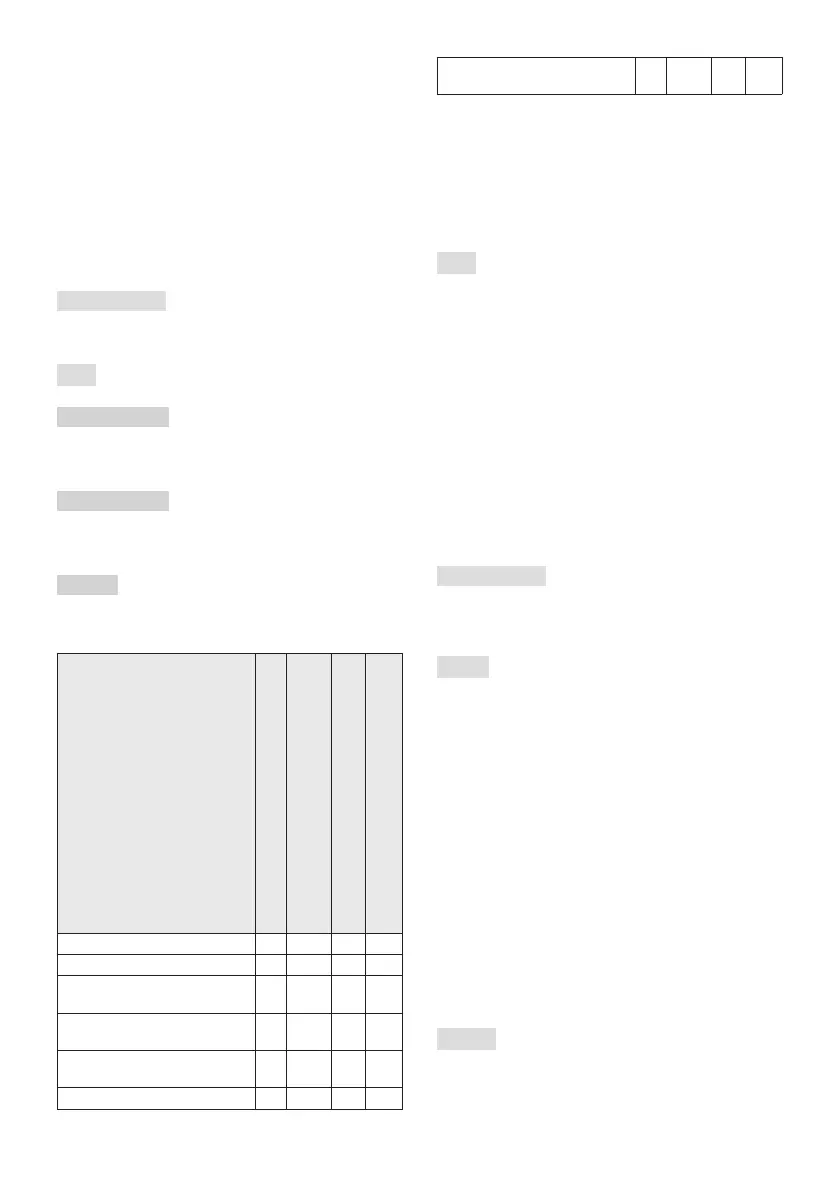
5.2 MAINTENANCE TABLE
IMPORTANT It is the responsibility of the
owner to perform the machine maintenance
operations described in the table below.
IMPORTANT Clean more frequently when
operating in particularly demanding conditions or
when there is debris in the air.
NOTE Filters should be cleaned / replaced
more often if the machine is used on very dusty
ground.
Operation
Oil level check (par. 4.1.1) - √ - -
Oil change
1
(par. 5.4) √ - √ -
Cleaning the silencer and
the engine (par. 5.5)
- √ - -
Checking and cleaning
the air lter
2
(par. 5.6)
- √ - -
Changing the air
lter (par. 5.6)
3
- - -
Spark plug check (par. 5.7) - - √ -
Changing spark
plugs (par. 5.7)
- - - √
1
Change the oil every 25 hours if the engine is
operating under heavy load or in hot weather.
2
Clean the air lter more frequently if the
machine is operating in dusty areas.
3
Only for the ltering element provided
in the form of a cartridge.
5.3
To ensure long life to the battery it is
essential to keep it carefully maintained.
The machine battery must always be charged:
• before using the machine for the
rst time after purchase;
• before leaving the machine disused for
a long period (over 30 days) (par. 4.5);
• before starting up the machine after
a prolonged period of inactivity.
Failure in following the procedure or in
charging the battery could permanently
damage the battery elements. A at battery
must be recharged as soon as possible.
IMPORTANT Recharging must be
done using a battery charger at constant
voltage. Other recharging systems can
irreversibly damage the battery.
5.3.1
To remove the battery:
• Push the button placed above the battery
by making it slide upwards (g. 6.A).
To recharge the battery:
• Remove the rubber cap placed on
the battery's lower side (g 7.B)
• connect the battery charger (g. 7.C)
to a power socket with the voltage
indicated on the rating plate.
• Once the battery is connected the
battery charger's light will light up (g
7.C): a red light means that the battery
is recharging, whereas a green light
means that the recharging is complete.
NOTE
The battery is equipped with a guard
that inhibits recharging if the environmental
temperature is not between 0 and +45 °C.
 Loading...