EN2
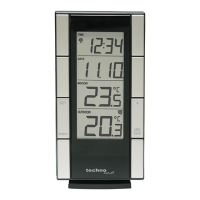
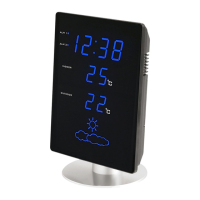
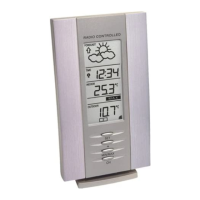
A – Front / display
A1 – PM/AM icon A6 – Time
A2 – MIN/MAX icon (indoor) A7 – Low battery icon (station)
A3 – Indoor temperature A8 – Low battery icon (sensor)
A4 – MIN/MAX icon (outdoor) A9 – Sensor reception icon
A5 – Outdoor temperature
B – Back / buttons and case
B1 – Hanging hole B4 – “°C/°F / SET” button
B2 – Ventilation holes B5 – Battery compartment
B3 – “MAX/MIN / +” button
C – Outdoor sensor
C1 – Radio signal LED C4 – Battery compartment
C2 – Hanging hole C5 – Standing foot
C3 – Channel switch
Functions
Manual time setting
Temperature alternatively in °C or °F.
12/24 hour time display.
Display of indoor/outdoor temperature and MIN/MAX indoor/outdoor
temperature
Low battery indicators for station and sensor
Wall mounting or table standing.
Initial operation
Place the station and the sensor next to each other on a flat surface
and open the battery compartment of both station and sensor. Leave
the sensor on the channel set as factory setting for this station (A).
Insert 2x AAA batteries observing correct polarity (+/- icons) into the
outdoor sensor and shortly after (within 30 seconds) insert 2x AAA
batteries observing correct polarity (+/- icons) into the base station.
The LCD of the station will show all segments for 2 seconds and then
start to work. Once the outdoor temperature is received, close the
battery compartment covers again. Place the sensor and the station
accordingly to safety hints.
Notes
Place the outdoor sensor protected from rain, wind and direct sunlight
 Loading...