Do you have a question about the Toyota PT949-34222 and is the answer not in the manual?
Avoid high-voltage systems on Hybrid vehicles; only disconnect the 12V Battery.
Remove parcel shelf and access panel, then loosen 10mm nut to disconnect negative cable.
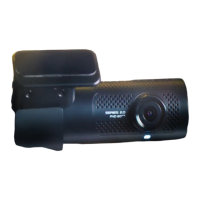
Verify the dashcam kit for missing contents or any damage before proceeding.
Ensure the camera angle position is correct with two visible recessed lines below the lens.
Protect front seats, dashboard, and center console using appropriate covers.
Ensure windshield is at least 50°F (10°C) and use the correct template (3D or paper).
Attach the mounting plate to the windshield, reducing air pockets and ensuring proper alignment.
Twist and pull visor hooks from the map light console to allow headliner access.
Release tabs after hook removal and pull out the base using needle nose pliers.
Pull down the roof console firmly, releasing clips and sliding it forwards and downwards.
Disconnect the wire harness from the roof console and place it safely.
Rotate the mirror to access, then move the TSS cover downwards to reach the mirror mount area.
Detach the mirror mount cover and slide the main TSS cover towards the wiper cowl area.
Find the headliner notch and route the dashcam pigtail into the headliner without creasing.
Feed the dashcam harness through to the open Map Light Console area for connection.
Push the TSS cover up towards the headliner to engage mounting clips into the cover base.
Hook the front hooks of the mirror cover plate into the TSS main cover opening and push.
Do not remove hang tag; remove lens protective film carefully and discard.
Observe T-hook shape and face them upwards; align dashcam unit to the 4 T-hooks.
Protect connectors with foam tape and secure harnesses, orienting zip tie block upright.
Ensure console connection is free and bundled harnesses do not obstruct the map light connector.
Reconnect harness, test map lights and sunroof control after battery reconnection.
Insert rear tabs, rotate up to engage front clips, and push to lock console securely.
Reconnect the negative battery cable and torque it to 5.4 N•m (48 in•lbsf).
Avoid high-voltage systems on Hybrid vehicles; only disconnect the 12V Battery.
Remove parcel shelf and access panel, then loosen 10mm nut to disconnect negative cable.
Verify the dashcam kit for missing contents or any damage before proceeding.
Ensure the camera angle position is correct with two visible recessed lines below the lens.
Protect front seats, dashboard, and center console using appropriate covers.
Ensure windshield is at least 50°F (10°C) and use the correct template (3D or paper).
Attach the mounting plate to the windshield, reducing air pockets and ensuring proper alignment.
Twist and pull visor hooks from the map light console to allow headliner access.
Release tabs after hook removal and pull out the base using needle nose pliers.
Pull down the roof console firmly, releasing clips and sliding it forwards and downwards.
Disconnect the wire harness from the roof console and place it safely.
Rotate the mirror to access, then move the TSS cover downwards to reach the mirror mount area.
Detach the mirror mount cover and slide the main TSS cover towards the wiper cowl area.
Find the headliner notch and route the dashcam pigtail into the headliner without creasing.
Feed the dashcam harness through to the open Map Light Console area for connection.
Push the TSS cover up towards the headliner to engage mounting clips into the cover base.
Hook the front hooks of the mirror cover plate into the TSS main cover opening and push.
Do not remove hang tag; remove lens protective film carefully and discard.
Observe T-hook shape and face them upwards; align dashcam unit to the 4 T-hooks.
Protect connectors with foam tape and secure harnesses, orienting zip tie block upright.
Ensure console connection is free and bundled harnesses do not obstruct the map light connector.
Reconnect harness, test map lights and sunroof control after battery reconnection.
Insert rear tabs, rotate up to engage front clips, and push to lock console securely.
Reconnect the negative battery cable and torque it to 5.4 N•m (48 in•lbsf).
The document describes the installation and features of a Toyota Integrated Dashcam (Digital Video Recorder), part number PT949-34222, designed for the Toyota Sequoia 2023+ model.
The Toyota Integrated Dashcam is a digital video recorder designed to be seamlessly integrated into the vehicle. Its primary function is to record video, likely for security, accident documentation, or general driving footage. The system includes a main camera unit, an SD card for storage, and a mounting plate for the windshield. The installation process emphasizes careful handling to avoid damage to the vehicle and ensures a quality installation by following approved guidelines.
| Brand | Toyota |
|---|---|
| Model | PT949-34222 |
| Category | Dash Cameras |
| Language | English |