Page 6 of 10 TFP1112_EN
Accelerator reset/inspected according to
the instructions given in the Setting Proce‑
dure Section.
The rate‑of‑ow through the Restriction
has been set such that the Model ACC‑1
Accelerator provides the maximum practi‑
cal sensitivity to a loss in system pressure
due to a sprinkler operation while still be‑
ing capable of automatically compensating
for normal variations in system pressure
such as are caused by environmental tem‑
perature changes. A test for verifying that
the rate‑of‑ow through the Restriction is
within the range for optimum Accelerator
performance is given in the Setting Proce‑
dure Section.
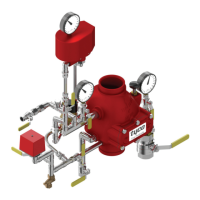
Installation
The Model ACC‑1 Accelerator must be in‑
stalled in accordance with the following
instructions:
NOTE
Failure to follow these instructions can result
in ooding of the Accelerator and accidental
tripping due to closure of the ball oat.
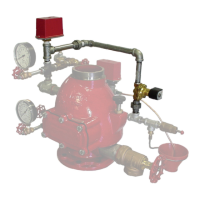
Step 1. The Accelerator must be positioned
vertically and trimmed per the arrange‑
ment shown in Figure 4. Apply pipe thread
sealant sparingly to male threads only.
Step 2. The Strainer located at the Accel‑
erator Inlet must be installed with its arrow
pointed towards the Accelerator.
Step 3.
The Check Valve located in the line
between the Accelerator Outlet and the in‑
termediate chamber of the dry pipe valve
must be installed horizontally with its arrow
pointed in the direction of ow to the inter‑
mediate chamber.
Step 4.
The connection to the system pip‑
ing must be located so that drain back wa‑
ter will not ow into the Accelerator piping
and it must be located at a point above the
maximum expected level of the drain back/
condensate water.
If the connection is made to the riser, it must
be located at least two feet above the level
of the dry pipe valve priming water. Con‑
nections to a feed or cross main must be
made either to the side or top of the main.
Step 5. The accelerator/dry pipe valve com‑
bination must be installed in a heated en‑
closure which is maintained at a minimum
temperature of 4°C (40°F). Heat tracing is
not permitted.
Step 6. Close the Accelerator Control Valve
until the Model ACC‑1 Accelerator is ready
to be placed in service.
The Accelerator Control Valve must be
closed during hydrostatic testing of the
system in order to prevent damage to the
Ball Float. After the system is hydrostatically
tested and drained, the Accelerator connec‑
tion to the system must be independently
drained through the Strainer clean‑out
plug by rst removing the Strainer clean‑
out plug and then opening the Accelerator
Control Valve to vent the line.
Setting Procedure
The Model ACC‑1 Accelerator and Dry Pipe
Valve must be reset and restored to service
as soon as possible after an operation.
Follow the procedure indicated below.
Step 1. Close the system main control valve,
the air supply control valve (to the system)
and the Accelerator Control Valve.
Step 2. Open the Inspector’s Test Connec‑
tion and then open the main drain valve as
well as all auxiliary (low point) drains.
Step 3.
After the system has been drained,
close the Inspector’s Test Connection and
all auxiliary drain valves. Leave the main
drain valve open.
Step 4.
Set the dry pipe valve in accordance
with the instructions given in the appropri‑
ate technical data sheet. Restore normal
system air pressure. Leave the main con‑
trol valve closed and the main drain valve
open.
Step 5. While holding the plunger of the
dry pipe valve’s automatic drain valve de‑
pressed, partially open the Accelerator
Control Valve one‑quarter turn and allow
the water in the Accelerator piping to blow
out. After water spray stops discharging,
close the Accelerator Control Valve and
then release the plunger. (This instruction
does not apply when the Model ACC‑1 Ac‑
celerator is being set for the rst time, since
the Accelerator is shipped in the set posi‑
tion. Proceed to Step 6.)
Step 6. Clean out the Strainer at the Accel‑
erator Inlet.
NOTE
A clogged strainer can prevent the Accelera‑
tor from properly tripping the dry pipe valve.
Step 7. Slowly remove the Vent Plug locat‑
ed in the front of the Accelerator Cover and
bleed o any residual air pressure in the Dif‑
ferential Chamber.
Step 8. Unscrew (counter‑clockwise rota‑
tion) the knurled Reset Knob at the front of
the Accelerator until it resists further turn‑
ing. A click, which is the sound of the Lever
snapping back into the Set Position, may be
heard. Screw the Reset Knob back in until it
is nger tight.
NOTE
Do not wrench on the reset Knob, since dam‑
age may result. The Reset Knob will turn with
nger torque only.
Step 9. Replace the Vent Plug.
Step 10. Verify that the system air pressure
has returned to normal.
Step 11. Partially open the Accelerator Con‑
trol Valve just enough to allow air to slowly
pass through the Accelerator Control Valve.
Using a watch, note the time for the pres‑
sure in the Dierential Chamber of the Ac‑
celerator to increase to 0,7 bar (10 psi) after
the Accelerator Control Valve is opened.
The time should be within the range of val‑
ues indicated in Table A for optimum per‑
formance of the Accelerator.
NOTE
If the time to pressurize the Dierential Cham‑
ber to 0,7 bar (10 psi) is not within the range
of values given in the Table A, then the Ac‑
celerator control Valve should be closed and
the corrective procedure described in the Care
and Maintenance Section followed.
Step 12. When the air pressure in the Dier‑
ential Chamber of the Accelerator is equal
to that in the system, then the Accelerator
is set and ready for service.
Step 13.
Close the Accelerator Control
Valve and then slowly open the dry pipe
Pressure
(bar)
Pressure
(psi)
Minimum
(seconds)
Maximum
(seconds)
1,4 20 24 160
1,7 25 18 116
2,1 30 15 92
2,8 40 10 60
3,5 50 8 48
4,1 60 6 36
TABLE A
DIFFERENTIAL CHAMBER FILL TIMES TO 0,7 bar (10 psi)
 Loading...