Step 3. Check for any sign of external
leakage past the Accelerator Pressure
Gauge, Vent, and Restriction Access
Plug connections.
Step 4. Check for any sign of external
leakage past the Reset Knob and
Cover Gasket.
Step 5. Close the Accelerator Control
Valve.
Step 6. Gently insert a 3/32 inch or
smaller diameter probe into the Relief
Port. If the probe can be inserted more
than 1/4 inch then the Lever has not
reset and the Accelerator must be dis-
assembled for internal inspection. See
the instructions for Accelerator Disas-
sembly and Reassembly.
Step 7. Slowly remove the Accelerator
Vent Plug to bleed all pressure from
the Differential Chamber and then
slowly remove the Restriction Access
Plug to bleed all pressure from the
Pilot Chamber.
Step 8. Replace the Restriction and
then the Restriction Access Plug.
Step 9. Place the fire protection sys-
tem back in service in accordance with
Steps 9 through 14 of the Setting Pro-
cedure Section.
Unexplained Accelerator Trip
Use the following instructions if there
is an unexplained accidental trip of the
Accelerator.
Step 1. Verify that the connection from
the Accelerator to the system piping is
installed in accordance with Step 4 of
the Installation Section. Correct if nec-
essary.
Step 2. Verify the time to fill the Differ-
ential Chamber as described in Step
11 of the Setting Procedure Section. If
the time to fill the Differential Chamber
to 10 psi is longer than the maximum
indicated value, then follow the in-
structions given under “Slow Fill of Dif-
ferential Chamber”.
Step 3. If the time to fill the Differential
Chamber is within the indicated range
of values, then investigate for and cor-
rect any condition which could result in
excessive leakage of system air pres-
sure.
Fast Fill of Differential Chamber
or Long Time to Accelerator Trip
Use the following instructions if the
time to fill the Differential Chamber is
shorter than the minimum value indi-
cated in Step 11 of the Setting Proce-
dure Section. This procedure should
also be followed if the time to Accel-
erator trip (following opening of the
Inspector’s Test Connection) is signifi-
cantly longer than expected.
Step 1. Close the system’s main con-
trol valve and open the main drain
valve.
Step 2. Close the Accelerator Control
Valve.
Step 3. Slowly remove the Accelerator
Vent Plug to bleed all pressure from
the Differential Chamber and then
slowly remove the Restriction Access
Plug to bleed all pressure from the
Pilot Chamber.
Step 4. Using a slotted screw driver,
check the tightness of the Restriction.
Step 5. Inspect the Restriction’s O-
ring seal. The O-ring must be replaced
if there are any signs of nicks, cuts, or
deterioration due to age. Replace the
Restriction after cleaning and lubricat-
ing its O-ring with a non-petroleum
based grease (such as Dow Corning
FS3452). Replace the Vent Plug and
Restriction Access Plug.
Step 6. If the Restriction and its O-ring
are found to be in good condition, then
it is likely that there is leakage past the
Plunger. Remove the Cover from the
Base. Check that the six screws secur-
ing the Upper Diaphragm Plate to the
Cover are tight.
Inspect the Upper Diaphragm for any
sign of cracks, pin holes or deteriora-
tion due to age. Replace the Plunger if
there is any possibility of leakage past
the Upper Diaphragm.
Step 7. Reassemble the Accelerator
and place the fire protection system
back in service in accordance with
Steps 10 through 14 of the Setting
Procedure Section.
Air Leakage Out Automatic Drain
If there is leakage of air out the Auto-
matic Drain of the dry pipe valve, after
the Accelerator and dry pipe valve
have been placed in service, then it
will be necessary to first determine
whether the leakage is past the Accel-
erator or the dry pipe valve.
Close the Accelerator Control Valve.
Slowly remove the Accelerator Vent
Plug to bleed all pressure from the
Differential Chamber and then slowly
remove the Restriction Access Plug to
bleed all pressure from the Pilot
Chamber.
If leakage out the Automatic Drain per-
sists then refer to the dry pipe valve
Technical Data Sheet for maintenance
instructions. If leakage out of the Auto-
matic Drain stops, then the Accelera-
tor will have to be taken out of service
and the Accelerator Plug Seat re-
moved for cleaning of the seat and the
lower O-ring area on the Exhaust
Valve.
Accelerator Disassembly and Re-
assembly (For Internal Inspection
As Necessary)
Step 1. Close the system’s main con-
trol valve and open the main drain
valve.
Step 2. Close the Accelerator Control
Valve.
Step 3. Slowly remove the Accelerator
Vent Plug to bleed all pressure from
the Differential Chamber and then
slowly remove the Restriction Access
Plug to bleed all pressure from the
Pilot Chamber.
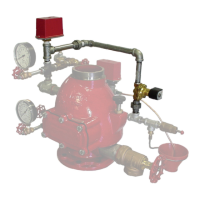
Step 4. Break the union connections
at the Inlet and Outlet of the Accelera-
tor and remove it from the line. Plug
the connection to the intermediate
chamber of the dry pipe valve and
place the fire protection system in
service while the Accelerator is out for
maintenance.
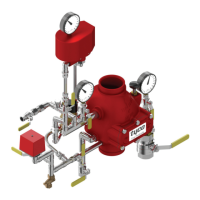
Step 5. Remove the eight screws hold-
ing the Cover to the Base and remove
the Cover.
Step 6. Remove the six screws hold-
ing the Upper Diaphragm Plate to the
Cover. Remove the Plunger and in-
spect the Upper Diaphragm to be sure
that it is flexible and free from physical
damage or deterioration due to age.
Check the Jam Nut to assure that it is
assembled tightly to its Screw. Re-
mount the Plunger and Upper Dia-
phragm Plate taking care to cross-
tighten the screws uniformly.
Step 7. Replace the Restriction if it
has been wetted. Clean and lubricate
the Restriction O-ring seal with a non-
petroleum based grease (such as Dow
Corning FS3452).
Replace the Vent Plug and Restriction
Access Plug.
Step 8. Remove the Retaining Ring
from the Upper Plug portion of the
Exhaust Valve. Remove the four
screws holding the Pivot Plate. Re-
move the sub-assembly of the Lever
and Pivot Plate, the Exhaust Valve,
the Anti-Flood Valve and the Relief
Valve.
Step 9. Inspect the Lower Diaphragm
to be sure that it is flexible and free
from physical damage or deterioration
duetoage.
Step 10. Check to see that the Ex-
haust Valve components are securely
assembled together. Only tighten by
gripping the flats using an open end
type wrench.
Page8of10
TFP1112
 Loading...