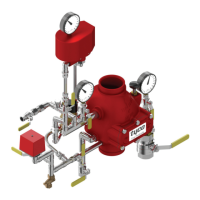
Step 11. Inspect the O-ring on the
Lower Plug. It must be replaced if
there are any signs of nicks, cuts or
deterioration.
Step 12. Inspect the Relief and Anti-
Flood Valves. If either is bent or nicked
it must be replaced.
Step 13. Remove and inspect the
Latch. The catch leaf should extend
5/16 to 3/8 inches in the free state.
Step 14. Remove the Relief Valve
Seat. Remove the O-ring and Seal
Washer. Carefully clean the O-ring
and Seal Washer seating surfaces in
the valve seat and Accelerator Base.
If the O-ring or Seal Washer is nicked,
cut, or shows signs of deterioration, it
must be replaced.
Step 15. Replace the Seal Washer in
the Accelerator Base. Apply a thin film
of Dow Corning FS3452 Fluorosili-
cone Grease to the valve seat. Place
the O-ring in its seat (the lubricant will
hold it in place) and then thread the
Relief Valve Seat into the Body with 10
to 15 ft.lbs. of torque.
Step 16. Remove the Anti-Flood Seat
Assembly w/Ball Float. Check for dam-
aged parts and for freedom of Ball
movement. If parts are damaged or
inoperative, the Assembly must be re-
placed.
Step 17. After checking the Anti-Flood
Seat Assembly w/Ball Float, lubricate
theO-ringwithathinfilmofDowCorn-
ing FS3452 Fluorosilicone Grease,
and thread the Assembly into the Body
with 10 to 15 ft.lbs. of torque.
Step 18. Remove the Reset Knob.
Carefully clean the O-ring and its seat-
ing surface. If the O-ring is cut, nicked,
or shows signs of deterioration it must
be replaced. Lubricate the O-ring with
a thin film of Dow Corning FS3452
Fluorosilicone Grease.
Step 19. Reassemble the Accelerator
in the following order.
a. Thread the Reset Knob into the
Base finger tight.
b. Set the Anti-Flood Valve (with
Retaining Ring in place) and the
Compression Spring into their
seat.
c. Set the Exhaust Valve in place.
d. Slide the Relief Valve into the
slot at the end of the Lever and
then remount the sub-assembly
of the Lever and Pivot Plate in
the Base, taking care to cross-
tighten the screws uniformly.
e. Replace the Retaining Ring on
the Upper Plug.
f. Push the Anti-Flood Valve end
of the Lever down and release it
twice to assure that there is no
binding.
g. Replace the Latch making sure
that the notch in the bottom
straddles the Reset Knob and
that the tabs at the top are
seated in the Base. Place the
Lever in the Tripped (latched)
position.
h. Place the Cover upside down.
Set the Cover Gasket in place
and then push all eight screws
through the Gasket to assist in
assembling the Cover to the
Base.
i. Align the Cover with the Base
and tighten all of the screws uni-
formly.
j. Replace the Vent Plug and the
Restriction Access Plug.
k. Reinstall the Accelerator and re-
turn the system to service in ac-
cordance with the Setting Pro-
cedure Section.
Limited
Warranty
Products manufactured by Tyco Fire &
Building Products (TFBP) are war-
ranted solely to the original Buyer for
ten (10) years against defects in ma-
terial and workmanship when paid for
and properly installed and maintained
under normal use and service. This
warranty will expire ten (10) years
from date of shipment by TFBP. No
warranty is given for products or com-
ponents manufactured by companies
not affiliated by ownership with TFBP
or for products and components which
have been subject to misuse, im-
proper installation, corrosion, or which
have not been installed, maintained,
modified or repaired in accordance
with applicable Standards of the Na-
tional Fire Protection Association,
and/or the standards of any other
Authorities Having Jurisdiction. Mate-
rials found by TFBP to be defective
shall be either repaired or replaced, at
TFBP’s sole option. TFBP neither as-
sumes, nor authorizes any person to
assume for it, any other obligation in
connection with the sale of products or
parts of products. TFBP shall not be
responsible for sprinkler system de-
sign errors or inaccurate or incomplete
information supplied by Buyer or
Buyer’s representatives.
In no event shall TFBP be liable, in
contract, tort, strict liability or under
any other legal theory, for incidental,
indirect, special or consequential
damages, including but not limited to
labor charges, regardless of whether
TFBP was informed about the possibil-
ity of such damages, and in no event
shall TFBP’s liability exceed an
amount equal to the sales price.
The foregoing warranty is made in lieu
of any and all other warranties, ex-
press or implied, including warranties
of merchantability and fitness for a
particular purpose.
This limited warranty sets forth the ex-
clusive remedy for claims based on
failure of or defect in products, materi-
als or components, whether the claim
is made in contract, tort, strict liability
or any other legal theory.
This warranty will apply to the full ex-
tent permitted by law. The invalidity, in
whole or part, of any portion of this
warranty will not affect the remainder.
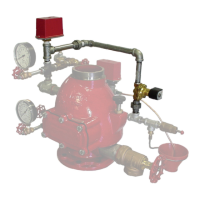
Ordering
Information
Orders for the ACC-1 Accelerator, trim
and replacement parts must include
the description and Part Number
(P/N). The Complete Model ACC-1
Accelerator Package includes the Ac-
celerator and Basic Galvanized Trim.
Complete Package:
Specify: Complete Model ACC-1 Ac-
celerator Package, P/N 52-311-2-002.
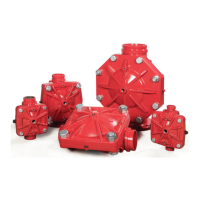
Accelerator Only:
Specify: Model ACC-1 Accelerator,
P/N 52-311-1-001.
Basic Galvanized Trim Only:
Specify: Model ACC-1 Accelerator,
Basic Galvanized Trim for 2-1/2 thru 6
inch Model DPV-1 Dry Pipe Valves,
P/N 52-311-2-010.
Replacement Parts for
Accelerator:
(Specify description) for use with
Model ACC-1 Accelerator,
P/N (see Figure 3).
Replacement Trim Parts:
Specify: (specify description),
P/N (see Figure 4).
Page 9 of 10
TFP1112
 Loading...