66250250 - V4.1 - 31/03/21Art.4842 .. 4845 - Installation instructions
- 1 -
4000 Series
DESCRIPTION
Push button modules allow the expansion of the number of call
buttons. Available in versions with 2, 3, 4 or 5 call push buttons.
Each button has its own connection terminals, but the module
can be congured to have a single common terminal for all but-
tons. The common terminals conguration can be selecting on
the 4 jumpers, accessible from the rear of the module.
Depending on the number of push buttons available, the module
can have 2 or 4 illumination LED’s for the card name holder. Look-
ing at the module from the front, push buttons are numbered as
shown in the drawing. Each button has the relevant terminals:
button 1-terminals 1,1C, button 2-terminals 2,2C etc.
AVAILABLE VERSIONS
1
2
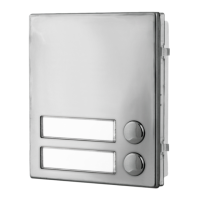
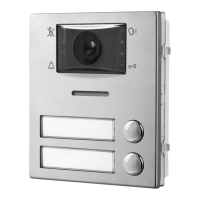
Art.4842
2 call button
1
3
2
Art.4843
3 call button
1
3
2
4
Art.4844
4 call button
1
3
2
4
5
Art.4845
5 call button
COMMON TERMINAL SETTING
Settings referred to the module with the maximum number of
push buttons: Art.4845 – 5 push buttons.
The settings shown are for all buttons common together to 1C
or all buttons individual, but you can choose any combination
of this for each button.
2C
4C
3C
5C
1C
All push button common terminals are linked to
common terminal 1C.
2C
4C
3C
5C
1C
Each button has its own common terminal.
HOW TO REMOVE/INSERT THE CARD NAME HOLDER
• To avoid damage to the module front plate, mask the side that
will be in contact with the screwdriver blade;
• Insert the screwdriver (at side) into the card-holder hole as
shown in Fig. 1;
• Move the screwdriver to the left as shown in Fig. 2 to extract
the card name holder;
• Edit the card name then replace it inside the holder and ret:
insert the holder inside its housing from the left or right side
then push the other side until it clips into place.
Fig. 1 Fig. 2
ADHESIVE GASKET PLACEMENT
Apply the
Y
seal as shown in Fig. 3.
ANTITAMPERING LOCKS FIXING
Fit the anti-tampering locks
W
as shown in Fig. 4.
Y
G
Fig. 3
W
Fig. 4
CONNECTION TERMINALS SIGNALS
–
12Vdc power input for illumination LED’s supply
+
1C Push button 1 common
1 Push button 1
2C Push button 2 common
2 Push button 2
3C Push button 3 common
3 Push button 3
4C Push button 4 common
4 Push button 4
5C Push button 5 common
5 Push button 5
TECHNICAL SPECIFICATIONS
Power Supply: 12Vdc
Power Consumption: 45mA max
Working Temperature: -20 +60 °C
CLEANING OF THE PLATE
Use a clean and soft cloth. Use moderate warm water or non-ag-
gressive cleansers.
Do not use:
• abrasive liquids;
• chlorine-based liquids;
• metal cleaning products.
Art.4842 .. 4845 Button expansion modules