THE ENGRAVERS JOURNAL/JUNE 07 www.engraversjournal.com
4
openers, charms and medals.
The vise has an 18-inch wide open-
ing capacity, a spindle clearance of
seven inches and can be opened and
closed either automatically by pressing
the shift and arrow keys on the pendant
or manually by using the adjustment
wheel. You can also tilt the vise 15 de-
grees to the left or right to improve the
cut with tapered items such as pilsner
glasses. Note, too, that you can select
the “vise rotated” driver in the soft-
ware when holding items sideways in
the vise and the software will automati-
cally rotate the layout 90 degrees.
Roundwork
The MAX Pro’s built-in roundwork
engraving capabilities add to the versa-
tility of this machine, enabling you to
engrave mugs, glasses, vases and more.
To switch to roundwork engraving on
this unit, remove the T-slot table or any
jigs from the vise and slip on the hold
-
ing cones. A flat cone mounts on the
follower side of the vise (right side)
and a tapered cone slips onto the gear-
box side.
This system is capable of engrav-
ing round items measuring up to six
inches in diameter and 12 inches long,
which encompasses most round gift
and award items. To clamp an item,
simply open the vise, position the item
on the cones and then close the vise by
using either the motorized feature or
the manual hand wheel. When doing
this, I did break a couple of glasses.
While I obviously over-tightened the
vise, it may not have been so “touchy”
if I had cushioned the tapered cone (or
both) with foam, rubber or some other
“springy” material.
Setting up to do cylindrical en
-
graving is straightforward and quick.
Simply select the “rotary axis” key on
the pendant, choose between “standard
mode” and “ring mode” and enter the
diameter of the object to be engraved.
Note that Vision provides some nifty
digital calipers for doing this accurate-
ly and easily.
The built-in self-contained coolant
system for engraving glass is another
nice feature. The system has a recir-
culating coolant pump and a trough to
catch the coolant. A tube connects to a
plastic nose cone on the spindle, which
streams water or other water-based
coolants over the item during engrav
-
ing. You can also adjust the liquid flow
as needed. As a side note, the machine
is manufactured with all stainless steel
machine components, including the
rotary spindle, so there are no wor-
ries about rust when using the coolant
system. With the exception of a few
broken glasses, I found this glass en-
graving setup to be one of easiest I’ve
ever used and the results were very at-
tractive. Vision also throws in tubes
of Gold Leaf, Silver Leaf and Antique
Silver Rub ‘n Buff to color fill the en-
graved glass.
Ring Engraving
For $1,995 you can add ring en-
graving capabilities to this machine,
allowing you to engrave the inside and
outside of most rings and bracelets.
The ring accessory consists of a three-
jaw chuck that holds the ring/bracelet
and an L-shaped diamond graver used
to do the actual engraving. To set up
the machine, you secure the chuck to
the gearbox side of the vise using set
-
screws and mount the diamond adaptor
to a bracket located next to the spindle.
Next, set the position of the cutter by
lowering it until the end of it touches
one of the holding pegs in the chuck.
Several holding pegs are provided
with the chuck to accommodate differ-
ent sizes of rings. The ring or brace-
let can be positioned over or under the
pegs, depending on whether you are
engraving the inside or outside of the
ring. The remainder of the setup is a
snap thanks to the “Ring Wizard” in
the Vision Pro software. The wizard
takes you step by step through the set-
up process and even includes illustra-
tions showing you where and how to
measure the ring and where on the ring
the engraving will be placed.
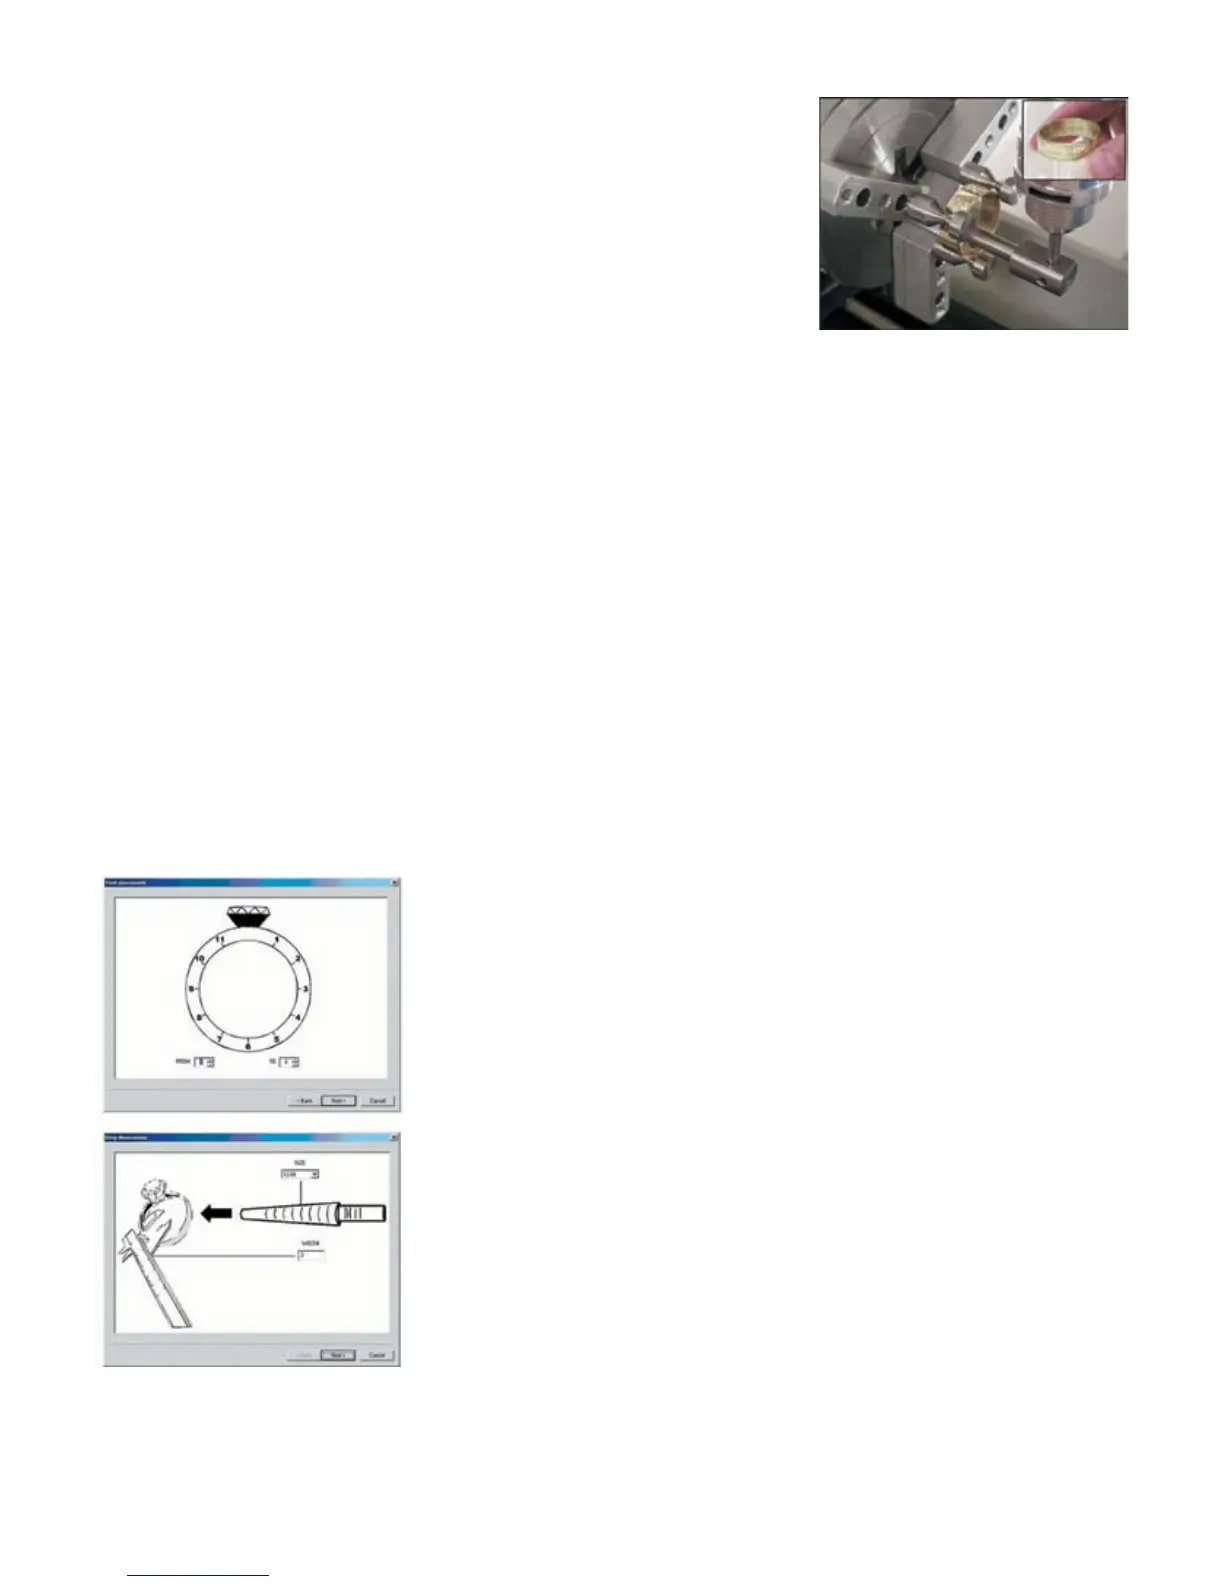
After selecting inside or outside en
-
graving, the software prompts you to
measure the size of the ring with the
ring size tool provided, as well as the
width of the ring with the digital cali-
pers. Next, you can select where within
the circle the engraving will be placed
by entering a “from” and “to” point on
the ring. Then enter the text, includ-
ing the font, character size and the top
and bottom margins. For the text size
and top and bottom margins, you enter
a percentage of the ring width (shank
thickness). So, for example, if the ring
width is .25" and you enter 50% for
the text size, then the text height will
be .125". If you enter 10% for the mar-
gins, then the margins will be .25".
You can also enter a second line of text
if desired in the same manner. This
step-by-step guidance is a great feature
for jewelers who can’t afford to make
an engraving mistake on an expensive
ring.
Impressive Engraving Features
For many non-rotating engraving
jobs, MAX Pro has a built-in proximity
sensor to set the engraving depth. With
this feature, the cutter automatically
lowers and detects the material surface
so you don’t have to “set the surface”
manually, which was standard practice
in rotary engraving for many years.
This surface-sensing feature automati-
cally adjusts the cutter throughout the
entire engraving process to maintain a
uniform engraving depth, an especially
The optional ring accessory allows
you to engrave the inside and out-
side of most rings and bracelets.
The Ring Wizard in the Vision Pro
software takes you step-by-step
through the ring engraving process.
 Loading...