EasyManua.ls Logo

Webasto Mercedes-Benz E-Class BR 211 User Manual

Webasto Mercedes-Benz E-Class BR 211
24 pages
To Next Page IconTo Next Page
Page #1 background imageLoading...
Page #1 background image
WARNING!
Hazard warning:
Incorrect installation or repair of Webasto heating systems may cause a fire or result
in the emission of carbon monoxide, which can be fatal. Serious or fatal injuries can
be caused as a result.
Specialist company training, technical documentation, specialized tools and
equipment are required to install and repair Webasto heating and cooling systems.
NEVER attempt to install or repair Webasto heating or cooling systems if you have not
successfully completed the company training and thereby acquired the required
technical skills or if you do not have access to the required technical documentation,
tools and equipment needed to carry out correct installation and repairs.
ALWAYS follow all Webasto installation and repair instructions and observe all
warning instructions.
Webasto does not accept any liability for defects and damage that are attributable to
an installation by untrained staff.
Feel the drive
Mercedes-Benz E-Class BR 211 / CLS BR 219
Gasoline and diesel
from the 2003 model
For left-hand drive vehicles only
Not for AMG or AMG look
Doc. No.: 5001169A Kit No.: 5001168A
Water Heater Unit
Thermo Top C Auxiliary
Heating
Installation Instructions
e1
00 0002

Table of Contents

Question and Answer IconNeed help?

Do you have a question about the Webasto Mercedes-Benz E-Class BR 211 and is the answer not in the manual?

Webasto Mercedes-Benz E-Class BR 211 Specifications

General IconGeneral
BrandWebasto
ModelMercedes-Benz E-Class BR 211
CategoryWater Heater
LanguageEnglish

Summary

Installation Instructions

Heater Unit / Installation Kit

Preliminary Work

Heater Unit Installation Location

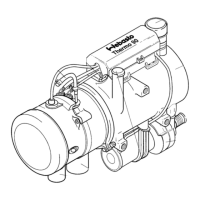
Details the specific location within the vehicle where the heater unit is to be installed.

Preparing the Heater Unit

Connecting the solenoid valve

Instructions for connecting the solenoid valve and its associated bracket and hose.

Connecting the fuel line

Procedure for connecting the mecanyl fuel line to the heater fuel line nipple.

Electrical Connections

CAN junction

Details the CAN junction connection for the heater wiring harness and CAN plug connector.

Wiring Harness Installation

Make electrical connection

Steps for making electrical connections in the passenger compartment, including CAN plug and ground cable.

Fuel Pump Wiring

Water Connection

Water installation diagram

Schematic diagram illustrating the water circuit connections for all vehicles.

Water Pump and Coolant Lines

Coolant Hose Assembly

Assembling the coolant hoses

Connecting the coolant hoses, filling with coolant, and attaching to solenoid valve and water pump.

Switch Valve and Hose Routing

Replacing the Switch Valve

Steps to loosen and remove the switch valve and its connections.

Switch valve assembly

Instructions for filling coolant hoses, installing new switch valve, and reassembling coolant hose.

Final Coolant Hose Connections

Coolant hose connection

Connecting the coolant hose to the preassembled hose on the solenoid valve.

Fuel Connection

Fuel Line Installation (Frame Side Rail)

Removing rubber sleeves, punching holes, and inserting fuel line into frame side rail.

Fuel Pump Assembly

Fuel pump pre-assembly

Assembling the fuel pump with fuel line coupler, fuel pump, rubber bracket, and clamps.

Installing the fuel pump mounting bracket

Installing the fuel pump mounting bracket onto original vehicle bolts with plastic nuts.

Assembling the fuel pump

Securing the fuel pump bracket to the M6x25 collar bolt with the provided nut.

Cutting off the end of the fuel nipple

Removing the fuel nipple cap, cutting the end, and connecting the fuel line to the fuel pump.

Final Work and System Checks

Reassembly and Component Checks

Reassembling components, checking hose/wire connections, and adjusting headlights.

Coolant Circuit and Leak Verification

Bleeding coolant circuit, topping up coolant, and checking for leaks.

Auxiliary Heater Activation and Testing

Activating auxiliary heater via STAR diagnostics and checking its operation.

Related product manuals