EasyManua.ls Logo

Winegard Gateway Pro GW-PRO1 - User Manual

Winegard Gateway Pro GW-PRO1
24 pages
Print Icon
To Next Page IconTo Next Page
Loading...
Place label here
User Guide
4G LTE WIFI ROUTER
AIR
360
Plus ANTENNA REQUIRED FOR USE
2452438
Rev3 11-22
Models: GW-1000, GW-PRO1
WINEGARD
®
Gateway & Gateway Pro
Question and Answer IconNeed help?

Do you have a question about the Winegard Gateway Pro GW-PRO1 and is the answer not in the manual?

Winegard Gateway Pro GW-PRO1 Specifications

General IconGeneral
Product TypeWireless Router
ModelGW-PRO1
ManufacturerWinegard
Wireless Standard802.11ac
Frequency Bands2.4 GHz, 5 GHz
USB Ports1
SecurityWPA2
Antennas2
Weight1.2 lbs
Power Supply12V DC
Maximum Data Rate867 Mbps (5 GHz) / 300 Mbps (2.4 GHz)
Ethernet Ports4
Cellular ConnectivityLTE

Summary

Gateway Specifications

Installation Steps: Initial Mounting

Accessing Ceiling Connections

Steps 1-2: Removing ceiling cap, pulling cables, and mounting the bracket.

Installation Steps: Wiring and Power

Power Wiring and Switch Installation

Steps 3-10: Connecting power cables, installing the wall switch, and making wiring connections.

Installation Steps: Final Connections

Connecting Antennas and Securing Unit

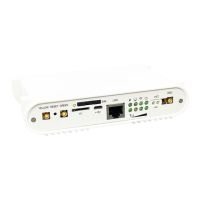
Steps 11-16: Connecting antennas, power, and securing the Gateway unit into place.

Gateway Installation Diagram

Web Operation: Initial Setup

Connecting and Logging Into Gateway

Steps 1-3: Powering on, connecting a device, and accessing the admin login page.

Web Operation: Network Connection

Connecting to Local WiFi Networks

Steps 4-5: Scanning for WiFi networks and entering the password to connect.

Web Operation: Cellular and Data

Connecting to 4 G LTE and Data Plans

Steps 6-7: Connecting via 4G LTE and managing data plan subscriptions.

Web Operation: Interface Navigation

Web Operation: Network Settings

Web Operation: Advanced Settings

Web Operation: Monitoring and Services

Web Operation: System Updates

Web Operation: Support

Adding a SIM Card: Installation

SIM Card Physical Installation

Steps 1-3: Removing the Gateway, locating the SIM slot, and inserting the new SIM card.

Adding a SIM Card: Verification

Troubleshooting: Connectivity Issues

Troubleshooting: Data and SIM Errors

Related product manuals