Communicating
Yaesu C4FM digital amateur transceivers can
communicate digitally with each other, and also use FM to
communicate with analog amateur transceivers.
By selecting the AMS mode (
/ / ), the transceiver
can automatically match the communication mode of the
received signals, and recognize both C4FM digital and
FM analog signals for communication purposes.
When operating in the digital fixed mode (DN/VW), Always
be aware of the FM analog users on the frequency.
Do not transmit digital signals or interfere with FM
communications in progress.
*Select the mode according to the operating situation.
Send
Speak into the microphone from a distance of about 5 cm
while pressing
.
The BUSY/TX LED lights up red and the PO meter on the
LCD visually displays the transmit power level.
Receive
Release [
] to return to receive mode. Upon receiving a
C4FM digital signal, the call sign or name of the sending
station is displayed.
* The period of time that the call sign of the sending
station is displayed may be changed. Press the
key for one second or longer to display the
“SETUP MENU”, and change the setting in [TX/RX]→
[2 Digital]→[2 Pop-up Setting].
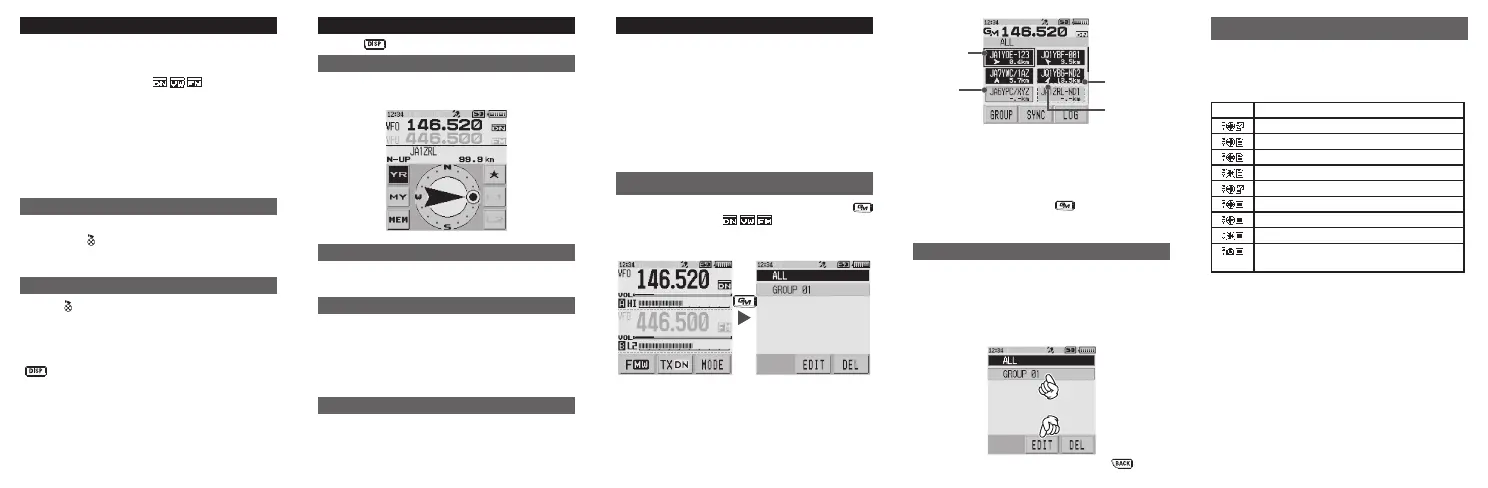
Using Position Information and BACKTRACK
Press the key to display the BACKTRACK screen.
Displaying the Received Station’s Position
Touch [YR] to display the direction and distance to the
sending station when receiving the digital information.
Displaying My Station Direction of Travel
Touch [MY] to display the direction of travel of your own
station.
Registering Position Information
Touch [MEM] to enter the memory mode and save the
position information being displayed,
[
★
], [L1] and [L2]
will flash. Touch either [YR] or [MY] to save the respective
position information into the corresponding [YR] or [MY]
memory register.
Using BACKTRACK
After registering the position to a memory, the direction
and distance from your present location to the registered
point will be displayed when [
★
], [L1] or [L2] is touched
(BACKTRACK function).
Operating GM
In GM mode, group members are shown divided into
those within the sphere of communication and those
outside. The direction and distance from your own station
to members within the sphere of communication will be
shown in real time. In addition, messages and images
may be sent to and received from other group members.
* A microSD memory card is required for data management
purposes. See the instructions in the section on “Using
a microSD memory card” of the instruction manual to
install a microSD memory card in the transceiver.
Displaying Within Range/Out-of-range Stations in the
“ALL” Operation Function (no group setting is required)
Set Band A to the desired frequency and press the
key in the AMS mode (
/ / ) or digital mode (DN/
VW) to display the operating group select/create new
group screen.
Press [ALL] to display up to 24 stations that are operating
in the GM mode on the same frequency within the sphere
of communication.
In range
Out of
range
Distance
Direction
When a station displayed on the screen is touched, it will be
selected and start flashing (multiple selections are allowed).
The selected stations may be added to a group by touching
[GROUP], and then touching any of the groups displayed to
add the selected stations to that group.
* During GM operations, if the
key is pressed, GM
operations will terminate and the display will return to the
VFO or memory mode operating screen.
Creating a Group
Select “GROUP 01” and then touch [EDIT] in the Select
Operating Group Select / Create New Group screen. Up
to 16 groups (with a maximum of 24 members each) may
be created. When a group is selected, the members will be
shown separately from those in the operation under “ALL”.
1 Select “GROUP 01” and touch [EDIT].
2 Input the group name and then press the key.
Viewing Transmitted and Received Messages and
Images
Touch [FMW] followed by [LOG] to select [MESSAGE]
or [PICT] and view the message list or the image list. In
addition, new messages may be created/sent, replied to,
and forwarded.
NEW Creating and sending a new message
Received messages (unread)
Received messages (read)
Transmitted messages
Transmission failure messages
Received images (unread)
Received images (read)
Transmitted images
Transmission failure images
Photos taken with the optional camera
microphone
* Refer to the GM Edition of the instruction manual for
details on: message creation; editing and deletion of
groups/members; SYNC function, synchronizing the
operating group members with other stations by radio;
transferring of group information via a microSD memory
card and so on (download the information from the Yaesu
website).
 Loading...