Do you have a question about the Yamaha MT8X and is the answer not in the manual?
| Brand | Yamaha |
|---|---|
| Model | MT8X |
| Category | Cassette Player |
| Language | English |
Essential safety and operating instructions for appliance use, environment, and maintenance.
Explains the meaning of warning symbols like lightning flash and exclamation point.
Covers power sources, grounding, cord protection, cleaning, and servicing guidelines.
Warning against modifying the unit, which may void FCC authorization.
Instructions for connecting the mains lead in the UK, matching wire colors to terminals.
Statement of compliance with Canadian radio noise emission limits for digital apparatus.
Welcomes the user to the MT8X recorder and encourages reading the manual.
Covers environmental factors, physical handling, connections, cleaning, tape type, and dbx usage.
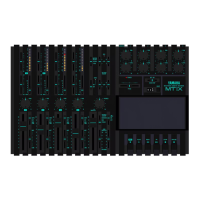
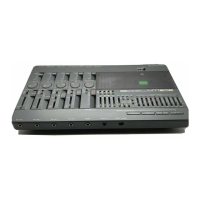
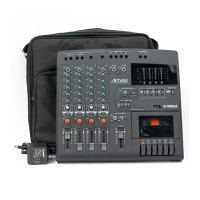
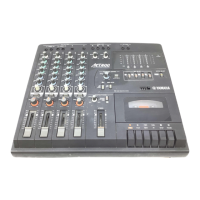
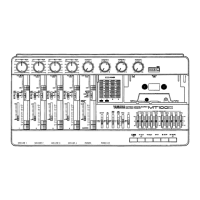
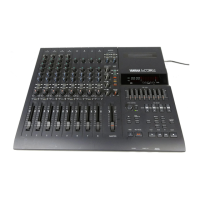
Describes the MT8X as an 8-channel mixer and 8-track recorder in a compact enclosure.
Details features like stereo buses, gain controls, insert I/O, AUX send/return, and 2TR IN jacks.
Highlights dbx noise reduction, punch-in/out, pitch control, display, and locate functions.
Explains the 8 input channels, signal routing to bus lines, and input selection.
Describes the 4 main bus lines (group buses) for mixing signals from multiple channels.
Details how the recorder receives signals from bus lines and the track assignment.
Details GAIN, CLIP Indicator, Equalizer Controls, AUX Controls, ASSIGN Switches, PAN Control, and Input Selector.
Adjusts the level of each group bus for recording to tape via REC SELECT switches.
Adjusts the overall level of the stereo bus signals.
Adjusts the sound output level for headphones and monitor outputs.
Allows monitoring of group bus, stereo bus, 2TR IN, and playback signals.
Enables or disables the internal dbx noise reduction system for substantial noise reduction.
Used for SYNC recording or playback with MIDI instruments, records FSK signals on track 8.
Allows pseudo-recording for practicing punch-in/out and checking levels.
Clears memory point settings and automatic punch-in/out settings.
Buttons for rewinding, fast-forwarding, and stopping the tape.
Controls for setting, locating, repeating, and checking tape memory points.
Buttons for starting, pausing, stopping, and managing automatic punch-in/out recording.
Switches for track selection, pitch control, and cue level adjustment.
The slot where the cassette tape is inserted.
Illuminates when the dbx system is active.
Illuminates when the SYNC switch is turned on.
Displays the status of automatic punch-in/out recording.
Illuminate when respective memory points have been set.
Illuminates during repeat playback.
Illuminates when a cassette tape is inserted.
Indicate which track is selected for recording.
Displays the recording or playback level for each track and stereo buses.
Displays the tape position in minutes and seconds.
Connects headphones (8-40 Ω) for monitoring.
Connects a footswitch for punch-in/out recording operations.
Connects a remote controller for operating the recorder.
Provides input for microphones, line-level sources, and insert points for processors.
Outputs signals to external signal processors for effects.
Turns the unit's power supply on and off.
Outputs the same signal as the PHONES jack, for connecting speakers.
Connects the supplied power cord for AC power.
Outputs the stereo mixdown signal to a stereo tape deck.
Inputs signals from external signal processors back into the mixer.
Inputs signals from a tape deck for monitoring or mixdown.
Outputs individual track signals for playback or recording.
Explains various ways to monitor signals during recording and mixing.
Describes the first recording process on an empty tape.
Recording new tracks while listening to previously recorded ones.
A technique to record more than 8 parts by mixing and re-recording tracks.
Re-recording a short segment of a track to correct mistakes.
Recording synchronized with MIDI instruments using a SYNC signal.
Blending and polishing all tracks to create the final stereo master tape.
Method for recording at the optimum level to achieve best sound quality.
Steps for setting up input, groups, tracks, and monitoring before initial recording.
Steps for starting and executing the initial recording process.
How to play back and check the results of the initial recording.
Step-by-step guide for overdubbing a new track while monitoring others.
Performing a pseudo-recording to practice overdubbing.
Compensates for pitch differences between instruments and recorded tracks.
Steps for performing ping-pong recording, mixing and re-recording tracks.
Setting up input selectors, group buses, and monitor switches for ping-pong recording.
Practicing ping-pong recording to adjust levels and timing.
Steps to perform the actual ping-pong recording.
How to play back and check the results of ping-pong recording.
Important notes on avoiding oscillation, monitoring, and overuse of ping-pong recording.
Lists the four main methods for punch-in/out recording.
Step-by-step guide for manual punch-in/out using buttons.
Guide for punch-in/out using the track selection switches.
Instructions for punch-in/out using an external footswitch.
Selecting the track where automatic punch-in/out will be performed.
Setting pre-roll, punch-in, and punch-out points for automatic operation.
Performing a pseudo-recording to check and set timing for auto punch-in/out.
Steps to initiate the automatic punch-in/out recording.
How to play back and check the results of automatic punch-in/out.
Explains indicator lights for automatic punch-in/out status.
Connecting MIDI instruments and converters to record FSK signals for synchronization.
Specific instruction to record FSK signals on track 8, noting dbx interaction.
Specific control settings for mixer channels during sync recording.
Settings for the master section and recorder for sync operations.
Setting up mixer channels for recording audio signals from MIDI instruments.
Performing a rehearsal for sync recording to adjust levels and timing.
Steps for performing the actual sync recording.
Diagrams for connecting MIDI instruments and converters for synchronized performance.
Steps for powering on, preparing MIDI instruments, and setting up the mixer.
Detailed steps for rehearsing sync recording, including tape playback and level adjustment.
Steps to perform the actual sync recording after rehearsal.
How to play back and check the results of the sync recording.
Using sync recording for mixdown to achieve higher quality with more tracks.
Diagrams illustrating connections for mixdown with a stereo tape deck and signal processors.
Steps for setting up and performing the mixdown recording onto a stereo tape deck.
Setting input selectors and monitor switches for mixdown.
Steps for starting and performing the mixdown recording onto a stereo tape deck.
How to play back and check the results of the mixdown.
Explains the function and interpretation of the unit's level meters.
Step-by-step guide to setting optimal recording levels using gain and faders.
A guide for a basic recording session using overdubbing techniques.
Guide for advanced recording using ping-pong and SYNC methods.
Importance of planning multi-track recording sessions considering instruments and arrangement.
Steps to determine instrument organization and final track designation.
Outlines the flow for ordinary recording, from rhythm to melody parts.
Explains the utility of the attached planning sheet for recording operations.
Steps to determine instrument positions and track designation for basic recording.
Step-by-step guide for recording rhythm, backing, and vocal parts.
Example planning sheet entries for recording rhythm parts.
Example planning sheet entries for recording chord backing.
Example planning sheet entries for recording vocals.
Example planning sheet entries for recording guitar solo.
Example planning sheet entries for the mixdown stage.
Figures showing how to connect rhythm machine, guitar, and microphone.
Steps for turning on the unit and preparing the cassette tape.
Detailed settings and steps for recording rhythm parts.
Steps for selecting tracks, setting levels, and recording rhythm parts.
Steps for recording the guitar backing part.
Steps for recording vocals using a microphone, noting specific settings.
Steps for recording the guitar solo part.
Determining instrument organization and track designation for advanced recording.
Assigning tracks to various instruments and parts in an advanced setup.
Recording drum, bass, and FSK sync signals simultaneously.
Recording the guitar part while listening to drums and bass.
Mixing and ping-ponging synchronized rhythm parts in stereo.
Recording the guitar backing part while listening to rhythm parts.
Mixing and ping-ponging guitar and synthesizer backing parts in stereo.
Recording the lead vocal part while listening to rhythm and backing tracks.
Recording the first backing vocal part.
Recording the second backing vocal part.
Recording the guitar solo part while listening to all other tracks.
Performing the final mixdown, adjusting sound orientation and effects.
Examples of planning sheets for various recording steps in advanced setup.
Planning sheet example for ping-ponging backing parts.
Planning sheet example for recording the lead vocal part.
Planning sheet example for recording backing vocal 1.
Planning sheet example for recording backing vocal 2.
Planning sheet example for recording the guitar solo part.
Planning sheet example for the mixdown stage.
Diagrams for connecting MIDI instruments and converters for synchronized performance.
Refers to recording example 1, planning sheets, and ping-pong/sync methods.
Detailed diagram showing connections of various instruments, processors, and tape decks.
Lists common problems, their probable causes, and suggested remedies.
Instructions for cleaning the heads, capstan, and pinch rollers.
Procedure for demagnetizing heads to prevent deterioration.
Steps to lift the head for cleaning and returning it to its original position.
Lists overall specifications like model, tape transport, and heads.
Details input/output impedances and rated levels for various connectors.
Lists specifications for MIC/LINE, INSERT, AUX, STEREO OUT, etc.
Details frequency response, noise level, and S/N ratio for mixer sections.
Specifies frequency ranges and variable ranges for equalizer controls.
Details overall frequency response, S/N ratio, distortion, and channel separation.
Visual representation of the unit's internal signal flow and component connections.
A template for planning and documenting track assignments and settings for recordings.