 Loading...
Do you have a question about the Asus P5QC - Motherboard - ATX and is the answer not in the manual?
| Product Type | Motherboard |
|---|---|
| Form Factor | ATX |
| CPU Socket | LGA 775 |
| Chipset | Intel P45 / ICH10R |
| Memory Slots | 4 |
| Max Memory | 16 GB |
| USB Ports | 12 x USB 2.0 |
| LAN Controller | Realtek RTL8111C |
| Audio | 8-channel HD Audio |
| Supported RAM Technology | DDR2, DDR3 |
| Supported RAM Speed | DDR3 1333/1066/800 MHz, DDR2 1066/800/667 MHz |
| Expansion Slots | 2 x PCIe x1, 2 x PCI |
| Storage Interface | SATA 3.0 Gb/s |
| LAN | Gigabit Ethernet |
| Audio Output | 8-channel |
| RAID Support | 0, 1, 5, 10 |
Welcome message and overview of the motherboard's features and technologies.
Lists all items included in the motherboard package for verification.
Details the unique features and technologies of the ASUS P5QC motherboard.
Precautions and safety guidelines before installing motherboard components or settings.
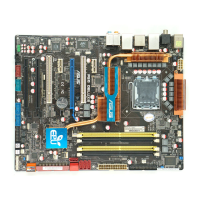
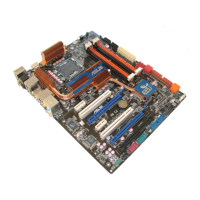
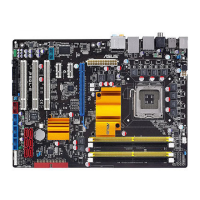
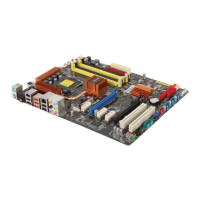
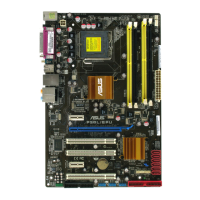
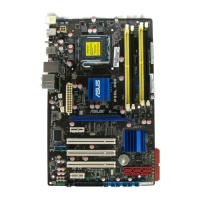
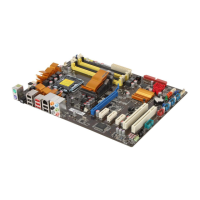
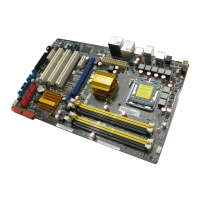
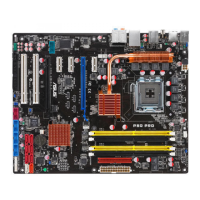
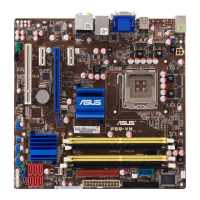
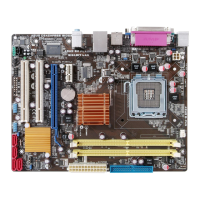
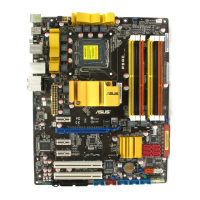
Detailed layout and identification of motherboard components, connectors, and slots.
Information and installation guide for the CPU socket and processor.
Details on DIMM sockets, memory configurations, and installation procedures.
Description of PCI and PCI Express slots and their usage for expansion cards.
Configuration of motherboard jumpers for specific functions like CMOS clearing.
Detailed information on rear panel and internal connectors for system peripherals.
Step-by-step guide for the initial system startup and POST.
Instructions on how to properly shut down the computer system.
Utilities and procedures for updating and managing the motherboard's BIOS.
Introduction to the BIOS Setup utility and navigation methods.
Overview of the BIOS Main menu, system information, and basic settings.
Configuration options for overclocking-related items and performance tuning.
Settings for CPU, chipset, and other system devices for advanced configuration.
Options for managing Advanced Power Management (APM) features and system states.
Configuration of system boot options, including boot device priority.
Access to special function utilities like EZ Flash, Drive Xpert, and O.C. Profile.
Options for saving, discarding changes, or loading default BIOS settings.
Guidance on installing compatible operating systems and necessary updates.
Details on the contents of the motherboard support DVD, including drivers and utilities.
Overview of applications and software utilities available on the support DVD.
Information on setting up RAID arrays using the Intel ICH10R controller.
Instructions for creating a RAID driver disk for OS installation.
Details on Intel EM64T feature support and system requirements.
Information on Intel EIST feature support and system requirements.
Explanation of Intel Hyper-Threading Technology support and usage.
Precautions to prevent electrical shock hazards during installation and use.
Guidelines for safe operation and handling of the motherboard and components.
Highlights of special ASUS technologies and features for the motherboard.
Details on advanced overclocking capabilities and tuning utilities.
Description of all connectors and ports located on the motherboard's rear panel.
List and description of internal connectors on the motherboard for system components.
Overview of BIOS capabilities, manageability features, and support DVD contents.
Specifications of the motherboard's physical dimensions and form factor.
Highlights of the motherboard's special features and technologies, including Intel processors.
Details on Green ASUS, Intel Core 2 processor support, P45 chipset, and DDR3 memory.
Description of ASUS unique features like Express Gate, power saving, and quiet thermal solutions.
Details on ASUS 8-Phase Power Design and the new EPU for energy efficiency.
Information on fanless design, Fan Xpert for fan speed control, and AI Audio 2 for enhanced sound.
Overview of ASUS EZ DIY features like Drive Xpert, AI Direct Link, Q-Shield, and Q-Connector.
Details on AI Booster, Precision Tweaker 2, and CPU Parameter Recall for performance tuning.
Precautions and safety guidelines before installing motherboard components or settings.
Detailed layout and identification of motherboard components, connectors, and slots.
Information and installation guide for the CPU socket and processor.
Details on DIMM sockets, memory configurations, and installation procedures.
Description of PCI and PCI Express slots and their usage for expansion cards.
Configuration of motherboard jumpers for specific functions like CMOS clearing.
Detailed information on rear panel and internal connectors for system peripherals.
Step-by-step guide for the initial system startup and POST.
Instructions on how to properly shut down the computer system.
Information on the LGA775 socket and compatible Intel processors.
Step-by-step guide for safely installing the CPU into the motherboard socket.
Instructions on applying thermal paste to the CPU for effective heat dissipation.
Final steps for securing the CPU and load lever after installation.
Procedure for installing the CPU heatsink and fan assembly for thermal management.
Steps for safely removing the CPU heatsink and fan assembly.
Details on DDR3 and DDR2 DIMM sockets and their physical characteristics.
Guidelines for installing memory modules, including size, type, and OS limitations.
Step-by-step guide for inserting memory modules (DIMMs) into the motherboard sockets.
Procedure for safely removing memory modules (DIMMs) from the motherboard sockets.
List of tested and qualified vendors for DDR3 memory modules at specific speeds.
List of tested and qualified vendors for DDR2 memory modules at 1066MHz.
List of tested and qualified vendors for DDR2 memory modules at 800MHz.
List of tested and qualified vendors for DDR2 memory modules at 667MHz.
Steps for physically installing an expansion card into a motherboard slot.
Steps for configuring installed expansion cards through BIOS and software drivers.
Table detailing IRQ assignments for various motherboard devices and slots.
Description of PCI and various PCI Express slots on the motherboard.
Instructions for clearing CMOS settings using the CLRTC jumper.
Configuration of jumpers for keyboard/USB wake-up from sleep modes.
Enabling/disabling advanced CPU and Northbridge overvoltage settings via jumpers.
Description and function of PS/2, IEEE 1394a, and Gigabit LAN ports.
Details on USB 2.0 ports, S/PDIF out, and PS/2 keyboard port functions.
Information on the floppy disk drive and TPM connectors.
Details on the IDE connector and drive jumper settings for PATA devices.
Information on ICH10R SATA connectors for hard drives and optical drives, including RAID setup.
Details on Silicon Image SATA connectors for Drive Xpert technology.
Description of internal USB connectors for front panel connections.
Information on the IEEE 1394a port connector for high-speed connectivity.
Details on CPU, chassis, and power fan connectors, including Q-Fan feature.
Information on chassis intrusion detection and serial port connectors.
Details on the front panel audio connector for HD Audio or AC'97 standards.
Information on connecting ATX power supply plugs to the motherboard.
Details on optical drive audio and digital S/PDIF audio connectors.
Description of the system panel connector for power buttons, LEDs, and reset switches.
Instructions for installing the ASUS Q-Connector for easier front panel cable management.
Step-by-step guide for the initial system startup and POST.
Instructions on how to properly shut down the computer system using OS or power switch.
Utilities and procedures for updating and managing the motherboard's BIOS.
Introduction to the BIOS Setup utility and navigation methods.
Overview of the BIOS Main menu, system information, and basic settings.
Configuration options for overclocking-related items and performance tuning.
Settings for CPU, chipset, and other system devices for advanced configuration.
Options for managing Advanced Power Management (APM) features and system states.
Configuration of system boot options, including boot device priority.
Access to special function utilities like EZ Flash, Drive Xpert, and O.C. Profile.
Options for saving, discarding changes, or loading default BIOS settings.
Introduction to the BIOS Setup utility, its purpose, and access methods.
Explanation of the BIOS Setup utility's menu bar, navigation keys, and screen layout.
Description of the main menu items available in the BIOS Setup utility.
Explanation of the keys used to navigate and make selections within the BIOS menus.
Explanation of menu items, sub-menus, configuration fields, pop-up windows, and scroll bars.
Location and function of the general help text within the BIOS setup screen.
How to set the system time within the BIOS Main menu.
How to set the system date within the BIOS Main menu.
Configuring the type of floppy drive installed for legacy support.
Choosing the display language for the BIOS setup screen.
Configuring SATA device types, LBA mode, PIO mode, and DMA mode.
Setting up SATA configurations, including IDE, RAID, and AHCI modes.
Configuring AHCI settings for SATA devices, including boot time out and port status.
Viewing system specifications like BIOS version, CPU details, and memory information.
Selecting CPU overclocking options like Manual or Auto for performance tuning.
Adjusting CPU ratio and FSB frequency for system performance.
Automatic adjustment of FSB Strap based on FSB and DRAM frequency.
Setting DDR2/DDR3 operating frequency based on installed memory modules.
Detailed configuration of DRAM timings for optimizing memory performance.
Settings for DRAM static read control and dynamic write control for overclocking.
Enabling DRAM read training for optimizing read data timing and performance.
Settings for DRAM write training, OC charger, and clock twister for performance.
Adjusting system performance by tuning transaction booster settings.
Adjusting CPU VCore voltage for overclocking and system stability.
Configuring CPU PLL, FSB termination, and DRAM voltages for system tuning.
Adjusting North Bridge voltage for system stability and overclocking.
Settings for South Bridge, PCIE SATA voltages, and spread spectrum features.
Enabling or disabling CPU load-line calibration for VDroop management.
Viewing and configuring CPU-related settings like ratio, C1E, and virtualization.
Configuration of C1E, Virtualization, TM function, Execute Disable Bit, SpeedStep, and C-STATE.
Advanced settings for chipset configuration, including North Bridge features.
Enabling/disabling onboard devices like HD Audio, Marvell IDE, and Atheros LAN.
Settings for USB functions, controller mode, and legacy USB support.
Adjusting advanced settings for PCI/PnP devices, including Plug and Play OS support.
Selecting the ACPI state for system suspend (S1 or S3).
Determining whether to invoke VGA BIOS POST on S3/STR resume.
Enabling ACPI 2.0 and APIC support for interrupt controller functionality.
Settings for AC power loss recovery, RTC alarms, and device wake-up features.
Displaying CPU/MB temperature, fan speeds, and system voltages.
Monitoring chassis and power fan speeds, and CPU Q-Fan control.
Setting the sequence of devices for system boot-up.
Configuring boot options like Quick Boot, Full Screen Logo, and Bootup Num-Lock.
Setting or changing the supervisor password for BIOS access control.
Setting user access level and changing/clearing the user password.
Accessing the ASUS EZ Flash 2 utility for BIOS updates.
Enabling or disabling the ASUS Drive Xpert feature for data security.
Configuring Drive Xpert modes like Super Speed and EZ Backup.
Enabling/disabling ASUS Express Gate for instant-on internet access.
Storing and loading multiple BIOS settings using the O.C. Profile utility.
Enabling or disabling Atheros LAN cable check during Power-On Self-Test.
Options for saving/discarding changes, loading defaults, and exiting the BIOS.
Guidance on installing compatible operating systems and necessary updates.
Details on the contents of the motherboard support DVD, including drivers and utilities.
Overview of applications and software utilities available on the support DVD.
Information on setting up RAID arrays using the Intel ICH10R controller.
Instructions for creating a RAID driver disk for OS installation.
Utility for customizing the motherboard boot logo image.
Using the Marvell Virtual Cable Tester for LAN cable diagnostics.
Utility for monitoring system vital components like fan speed and CPU temperature.
Understanding sensor alerts and customizing PC Probe II application preferences.
Display modes and positioning of hardware monitor panels for system sensor values.
Accessing Windows Management Instrumentation and Desktop Management Interface data.
Viewing PCI device information and real-time CPU, disk, and memory usage.
Adjusting sensor threshold values and customizing application preferences in PC Probe II.
Instructions for installing the ASUS AI Suite for overclocking and system tuning.
Using AI Suite buttons to launch utilities like EPU-6 Engine and Fan Xpert.
Enabling AI Nap for minimum power consumption and quiet system operation.
Adjusting CPU and chassis fan speeds for optimal cooling and quiet operation.
Description of fan profile modes like Standard, Silent, Turbo, and Intelligent.
Overclocking the CPU speed in Windows using the AI Booster utility.
Using the EPU-6 Engine for energy-efficient operation and performance optimization.
Configuration options for CPU Frequency, Voltage Downgrade, Loadline, and Fan Control.
Setting up AI Direct Link for computer-to-computer file sharing via network cable.
Overview of the Realtek HD Audio Manager for configuring audio settings.
Accessing audio driver info, advanced settings, connector settings, and exiting the manager.
Setting up digital audio output options, including listening environment and karaoke.
Configuring audio output settings for analog speaker ports and channel options.
Setting up analog line-in port for audio input and recording.
Configuring microphone input settings and checking connection.
Steps to install SATA hard disks for Drive Xpert configuration.
How to launch Drive Xpert from the Windows notification area.
Steps to set up EZ Backup for automatic hard disk data backup.
Steps to set up Super Speed for simultaneous hard disk data access.
Steps to partition hard disk volumes using Disk Management in Windows.
Setting up drive verification schedules and accessing other Drive Xpert features.
Viewing event logs and updating firmware using Drive Xpert utilities.
Installing Drive Xpert for use within the Express Gate environment.
Accessing and modifying Express Gate settings within the BIOS Setup.
Step-by-step guide for installing the ASUS Express Gate application.
Navigating the Express Gate first screen and initial environment setup wizard.
Customizing Express Gate settings like Date/Time, Input Method, and Network.
Using LaunchBar icons for system status, software access, and settings configuration.
Troubleshooting internet connectivity issues within the Express Gate environment.
Using the Photo Manager to view and organize pictures in Express Gate.
Explanation of RAID levels 0, 1, 5, and 10 for data redundancy and performance.
Steps for installing SATA hard disks for creating a RAID array.
Configuring the SATA mode to RAID within the BIOS Setup.
Overview of the Intel Matrix Storage Manager utility for RAID volume creation.
Step-by-step guide to creating a RAID 0 volume for striping.
Step-by-step guide to creating a RAID 1 volume for mirroring.
Step-by-step guide to creating a RAID 10 volume for combined striping and mirroring.
Step-by-step guide to creating a RAID 5 volume for data striping with parity.
Steps to create a RAID driver disk using BIOS setup and a floppy drive.
Steps to create a RAID driver disk using the support DVD in Windows.
Details on Intel EM64T feature support and system requirements.
Information on Intel EIST feature support and system requirements.
Explanation of Intel Hyper-Threading Technology support and usage.
Details on Intel EM64T feature support and system requirements.
Information on Intel EIST feature support and system requirements.
Guide on how to enable and use the Intel Enhanced SpeedStep Technology (EIST).
Explanation of Intel Hyper-Threading Technology support and usage.