10
- CLONIX/TRC/MITTO - Ver. 02
D811324_02
SW2
for CH2 output chanel
1
1
SW1
for CH1output chanel
2 blinks followed by a
pause of about 1 second.
1
1
3 blinks followed by a
pause of about 1 second.
4 blinks followed by a
pause of about1 second.
5 blinks followed by a
pause of about1 second.
6 blinks followed by a pause
of about 1 second.
1
1
NUMBER OF LED DL1 BLINKING SIGNALS
1
1
1
1
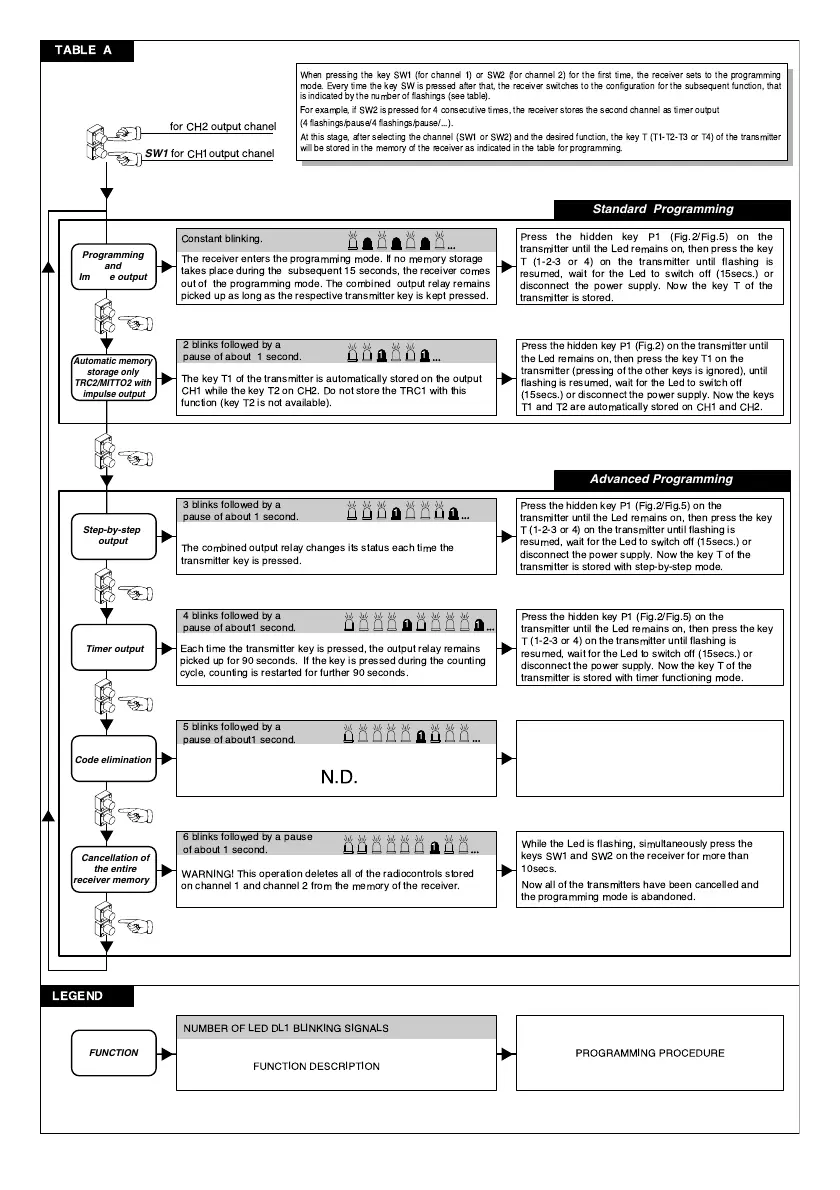
When pressing the key SW1 (for channel 1) or SW2 (for channel 2) for the first time, the receiver sets to the programming
mode. Every time the key SW is pressed after that, the receiver switches to the configuration for the subsequent function, that
is indicated by the number of flashings (see table).
For example, if SW2 is pressed for 4 consecutive times, the receiver stores the second channel as timer output
(4 flashings/pause/4 flashings/pause/...).
At this stage, after selecting the channel (SW1 or SW2) and the desired function, the key T (T1-T2-T3 or T4) of the transmitter
will be stored in the memory of the receiver as indicated in the table for programming.
Programming
and
Impulse output
The receiver enters the programming mode. If no memory storage
takes place during the subsequent 15 seconds, the receiver comes
out of the programming mode. The combined output relay remains
picked up as long as the respective transmitter key is kept pressed.
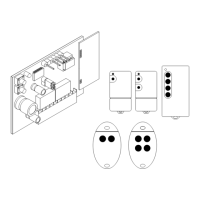
Press the hidden key P1 (Fig.2/Fig.5) on the
transmitter until the Led remains on, then press the key
T (1-2-3 or 4) on the transmitter until flashing is
resumed, wait for the Led to switch off (15secs.) or
disconnect the power supply. Now the key T of the
transmitter is stored.
TABLE A
LEGEND
Constant blinking.
Automatic memory
storage only
TRC2/MITTO2 with
impulse output
The key T1 of the transmitter is automatically stored on the output
CH1 while the key T2 on CH2. Do not store the TRC1 with this
function (key T2 is not available).
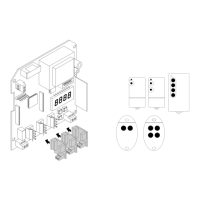
Press the hidden key P1 (Fig.2) on the transmitter until
the Led remains on, then press the key T1 on the
transmitter (pressing of the other keys is ignored), until
flashing is resumed, wait for the Led to switch off
(15secs.) or disconnect the power supply. Now the keys
T1 and T2 are automatically stored on CH1 and CH2.
Standard Programming
Step-by-step
output
The combined output relay changes its status each time the
transmitter key is pressed.
Press the hidden key P1 (Fig.2/Fig.5) on the
transmitter until the Led remains on, then press the key
T (1-2-3 or 4) on the transmitter until flashing is
resumed, wait for the Led to switch off (15secs.) or
disconnect the power supply. Now the key T of the
transmitter is stored with step-by-step mode.
Timer output
Each time the transmitter key is pressed, the output relay remains
picked up for 90 seconds. If the key is pressed during the counting
cycle, counting is restarted for further 90 seconds.
Press the hidden key P1 (Fig.2/Fig.5) on the
transmitter until the Led remains on, then press the key
T (1-2-3 or 4) on the transmitter until flashing is
resumed, wait for the Led to switch off (15secs.) or
disconnect the power supply. Now the key T of the
transmitter is stored with timer functioning mode.
Advanced Programming
Code elimination
Cancellation of
the entire
receiver memory
WARNING! This operation deletes all of the radiocontrols stored
on channel 1 and channel 2 from the memory of the receiver.
While the Led is flashing, simultaneously press the
keys SW1 and SW2 on the receiver for more than
10secs.
Now all of the transmitters have been cancelled and
the programming mode is abandoned.
FUNCTION
FUNCTION DESCRIPTION
PROGRAMMING PROCEDURE
N.D.
 Loading...