English | 21
Bosch Power Tools 1 619 929 J54 | (24.10.11)
Dust/Chip Extraction
Dusts from materials such as lead-containing coatings, some
wood types, minerals and metal can be harmful to one’s
health. Touching or breathing-in the dusts can cause allergic
reactions and/or lead to respiratory infections of the user or
bystanders.
Certain dusts, such as oak or beech dust, are considered as
carcinogenic, especially in connection with wood-treatment
additives (chromate, wood preservative). Materials contain-
ing asbestos may only be worked by specialists.
– As far as possible, use a dust extraction system suitable for
the material.
– Provide for good ventilation of the working place.
– It is recommended to wear a P2 filter-class respirator.
Observe the relevant regulations in your country for the mate-
rials to be worked.
f Prevent dust accumulation at the workplace. Dusts can
easily ignite.
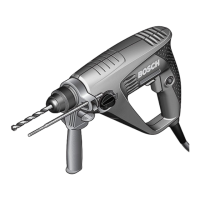
Changing the Tool (see figure C)
The motor unit 12 is provided ex works with a dual-sleeve key-
less chuck 16.
Inserting
– Turn the securing ring 27 toward “UNLOCK”.
– Turn the clamping sleeve 29 in anticlockwise direction un-
til the application tool 17 can be inserted.
– Completely insert the application tool 17, hold it in the tool
holder and firmly turn clamping sleeve 29 by hand in clock-
wise direction.
Firmly hold the holding ring 28 when doing this.
– Turn the securing ring 27 toward “LOCK”
Note: When inserting drill bits with small diameters, set the
tool holder beforehand approximately to the drill bit diame-
ter. Otherwise, it is possible that the drill bit is not inserted
centred.
Removing
– Turn the securing ring 27 toward “UNLOCK”.
– Turn clamping sleeve 29 in anticlockwise direction until
the application tool 17 can be removed.
Operation
f Before any work on the machine itself, pull the mains
plug.
f After each adjustment on the machine, retighten the
screws and clamping levers.
Preparing for Operation
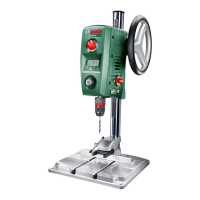
Illuminating the Work Area (see figure D)
Provide for sufficient lighting of the direct working area.
–To activate the display 14, turn the On/Off switch 13 to
position .
– Switch on the illumination unit 22 with button 30.
The indication “Light” is shown on display 14.
Correctly positioning the workpiece (see figure E)
A laser cross indicates the exact drilling location.
–To activate the display 14, turn the On/Off switch 13 to
position .
– Switch on the laser unit 22 with button 31.
The indication “Laser” is shown on display 14.
– Align your mark on the workpiece with the laser cross.
Clamping the Workpiece (see figures F1 – F2)
To ensure optimum working safety, the workpiece must al-
ways be firmly clamped.
Do not saw workpieces that are too small to clamp.
– Position the workpiece with help of the laser cross (see
“Correctly positioning the workpiece”, page 21).
– Loosen the quick-clamping lever 2 on the quick-clamping
device 3.
– Allow the quick-clamping device to face against the work-
piece. Turn the quick-clamping lever 2 in clockwise direc-
tion until the workpiece is firmly clamped.
– After drilling, loosen quick-clamping lever 2 in anticlockwi-
se direction.
– Turn the quick-clamping device 3 aside and remove the
workpiece.
The parallel guide 19 is used for securing larger workpieces
against turning.
– Loosen the wing bolts 20 of parallel guide 19 and insert the
parallel guide into the grooves of base plate 1.
– Retighten the wing bolts again.
– Clamp the workpiece with the quick-clamping device 3.
Note: Use a machine vice (e.g. Bosch MS 80) to clamp small-
er workpieces.
Adjusting the Height of the Motor Unit (see figure G)
f Do not adjust the height of the motor unit during opera-
tion. Actuate clamping lever 7 only when the hand-
wheel is in the starting position. This safety measure
prevents possible injury.
The height of the motor unit 12 can be adjusted dependent on
the length of the application tool and the size of the work-
piece.
Note: After adjusting the height of the motor unit, the posi-
tioning of the workpiece must be checked again with the laser
cross. Realign the workpiece, if required.
When clamping lever 7 is open, a brake prevents the motor
unit 12 from accidental lowering. Occasionally check the
clamping force of the brake and readjust it as required (see
“Adjusting the Brake of the Motor Unit”, page 23).
– Make sure that the handwheel 11 is in the starting posi-
tion.
– Grasp the handwheel 11 with one hand and with the other
hand, loosen clamping lever 7 in anticlockwise direction.
– Adjust the height of motor unit 12 with the handwheel ac-
cording to the inserted application tool and height of the
workpiece.
– Tighten clamping lever 7 again in clockwise direction.
OBJ_BUCH-1183-004.book Page 21 Monday, October 24, 2011 11:35 AM
 Loading...