138305557-R2
USING THE WEIGH SYSTEM
FK0646.ai
4
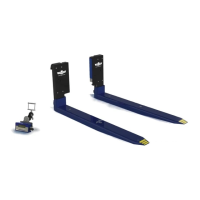
1 Turn on the forks by pressing the blue button on each
battery holder. The button is located at the base of the
battery holder, as shown.
2 On the indicator, press the "ON/PRINT" button. Wait five
seconds.
3 If necessary, zero the weigh system by pressing the
"ZERO/OFF" button, with forks off the ground.
4 Position the load on the forks and raise the forks.
5 The indicator will show the weight of the load. Allow
more time, as needed, to show a steady weight. Before
the next weighing, verify that the indicator is zeroed.
To Weigh A Load (Normal Weighing Mode)
IMPORTANT:
• At initial daily start up, allow 3-5 minutes for the forks to
warm up before weighing loads.
• The system will not weigh correctly if the front face or
bottom of the forks touches the load or pallet.
• Unstable weight readings indicate debris (ie. wood
chips) between fork and fork shoe.
• When weighing liquids, more time is needed for
indicator to show a steady weight.
• Do not exceed fork length by more than 6 in. (152 mm)
with load length.
2
3
1
If required, press the
"ZERO" button to manually
zero the indicator.
5
IMPORTANT: The indicator will show the weight in divisions
(increments) as follows:
Model
A Load Weight
Indicator Divisions
Non-Certified NTEP Certified
23C
Up to 2500 lb. (1000 kg) 2 lb. (1 kg) 5 lb.
Up to 5000 lb. (2500 kg) B
5 lb. (2 kg) 5 lb.
28C
Up to 2500 lb. (1000 kg) 2 lb. (1 kg) 5 lb.
Up to 6000 lb. (3000 kg) B
5 lb. (2 kg) 5 lb.
50C
Up to 4500 lb. (2000 kg) 5 lb. (2 kg) 5 lb.
Up to 10000 lb. (5000 kg) B
10 lb. (5 kg)
10 lb.
A Models with fork length of up to 48 in. (1200 mm)
B Fork capacity
 Loading...