24
English
9. INSTALLATION / WIRE
CONNECTION GUIDE
1) Before Starting
6JKUUGVKUGZENWUKXGN[HQTWUGKPECTUYKVJC
PGICVKXGITQWPF8RQYGTUWRRN[
2. Read these instructions carefully.
$GUWTGVQFKUEQPPGEVVJGDCVVGT[őVGTOKPCNŒ
DGHQTGUVCTVKPI6JKUKUVQRTGXGPVUJQTVEKTEWKVU
during installation. (Figure 1)
2) Package Contents
3) General Cautions
1. Do not open the case. There are no
WUGTUGTXKEGCDNGRCTVUKPUKFG+H[QW
drop anything into the unit during
installation, consult your dealer or an
CWVJQTK\GF%NCTKQPUGTXKEGEGPVGT
2. Use a soft, dry cloth to clean the case.
Never use a rough cloth, thinner,
DGP\KPGQTCNEQJQNGVE(QTVQWIJFKTV
CRRN[CNKVVNGEQNFQTYCTOYCVGTVQC
UQHVENQVJCPFYKRGQHHVJGFKTVIGPVN[
CONTENTS
1) Before Starting ...................................................................... 24
2) Package Contents................................................................. 24
3) General Cautions .................................................................. 24
4) Cautions on Installation......................................................... 25
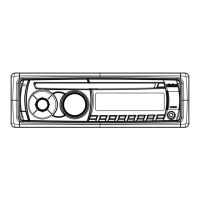
5) Installing the Source Unit ...................................................... 25
6) Removing the Source Unit .................................................... 27
7) Wiring and Connections ........................................................ 28
8) Connecting the Accessories.................................................. 29
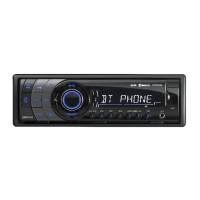
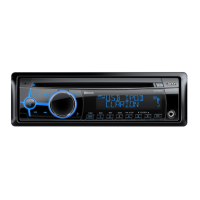
Source unit .......................................... 1
Front panel .......................................... 1
Trim ring .............................................. 1
/QWPVKPIDTCEMGV................................. 1
5ETGYU/ZOO................................ 4
.MG[.................................................... 2
Wire connector .................................... 1
4GOQVGEQPVTQNWPKVYKVJDCVVGT[........ 1
DCP case ............................................ 1
1YPGTŏUOCPWCN................................... 1
Warranty card
...................................... 1
5RGEKCNUETGY(TQPVRCPGNNQEM ......... 1
%CTDCVVGT[
 Loading...